Showing posts with label Nancy Nickel. Show all posts

20 December, 2020

Library Pocket Journal Insert in Burgundy with Cream

 This is my final project using the new Christmas Collection:

 Burgundy with Cream

...at least for now...

Recently I have been having lots of fun altering some books,
and making some fun new journals.
I'll be sharing that with you in upcoming posts.

Today I am sharing a fun journal insert idea.
I have decorated a library pocket using this pretty collection.

Here it is:


I have used a cut file from My Scrap Chick to make my library pocket and tag.
Both the pocket and tag were cut from kraft cardstock.
I've collaged the bottom of the pocket with elements from the collection:
a fussy cut Santa image,
a piece of the decorative red paper,
a decorative element strip,
and a piece of the music paper.
To finish off the pocket,
I wrapped the flap with some lovely red jute twine.

Here you can see them side by side.
I fussy cut another Santa, and added him to the side of the tag.
Then I fussy cut the sentiment, and adhered it in place.
The back is left blank for journaling.
Finally, I added more jute twine to the top of the tag. 

This fun library pocket will be inserted into my altered Christmas book project!

Meg's Garden Products Used:

Burgundy with Cream

* * * * *

 Thanks for stopping in today!

Don't forget to visit Meg's Shop
 and look at all the other beautiful items!
 
Also, don't forget to sign up for her newsletter HERE.
That way you won't miss any news!

* * * * *

18 December, 2020

Quick and Easy Christmas Cards in Burgundy with Cream

Hello, everyone!

It's Nancy back to share some more fun projects!
Again, I'm using the new Christmas Collection:

 Burgundy with Cream

This time I have made a selection of quick and easy Christmas Cards.
They look like so much more because of the beautiful papers.

We all need the option to make pretty cards that are easy to mail too.
So these digital products make them flat and fabulous!

Here are the first two cards:


For these two cards I simply resized two of the papers from the collection.
I distressed the edges with both a tool and ink,
and added them to burgundy cardstock card bases


I wanted you to see a closer look at these beautiful Digital Sentiments.
They are so elegant and the final touch to finish the cards.
You'll find them HERE.

Here are the next two cards:


For these two cards I used the card fronts from the collection. 
I was inspired by the frame around the card on the right to do some embossing.
I placed the piece on my scoreboard and simply followed the lines
with my embossing tool.
I repeated the process for the other card front.
If you look closely you can see it.
Then I adhered the card fronts onto burgundy cardstock bases.
To finish them off, I Stickles to each of them.
On the left, I added a frosty one to each of the snowflakes.
On the right, I added gold glitter to all printed old glitter bits. 


Meg's Garden Product Used:

 Burgundy with Cream

* * * * *

Thanks for stopping in today!
Don't forget to visit Meg's Shop and take a look at all the other beautiful items!
 
Also, don't forget to sign up for her newsletter HERE.
That way you won't miss any news!

* * * * *

02 December, 2020

Burgundy with Cream Christmas Tag

Hello, everyone!

It's Nancy here with a fun new project to share with you!

This is my first project using the newly released Christmas Collection:

 Burgundy with Cream

It's a beautiful Collection full of goodness!
The creative possibilities are endless!

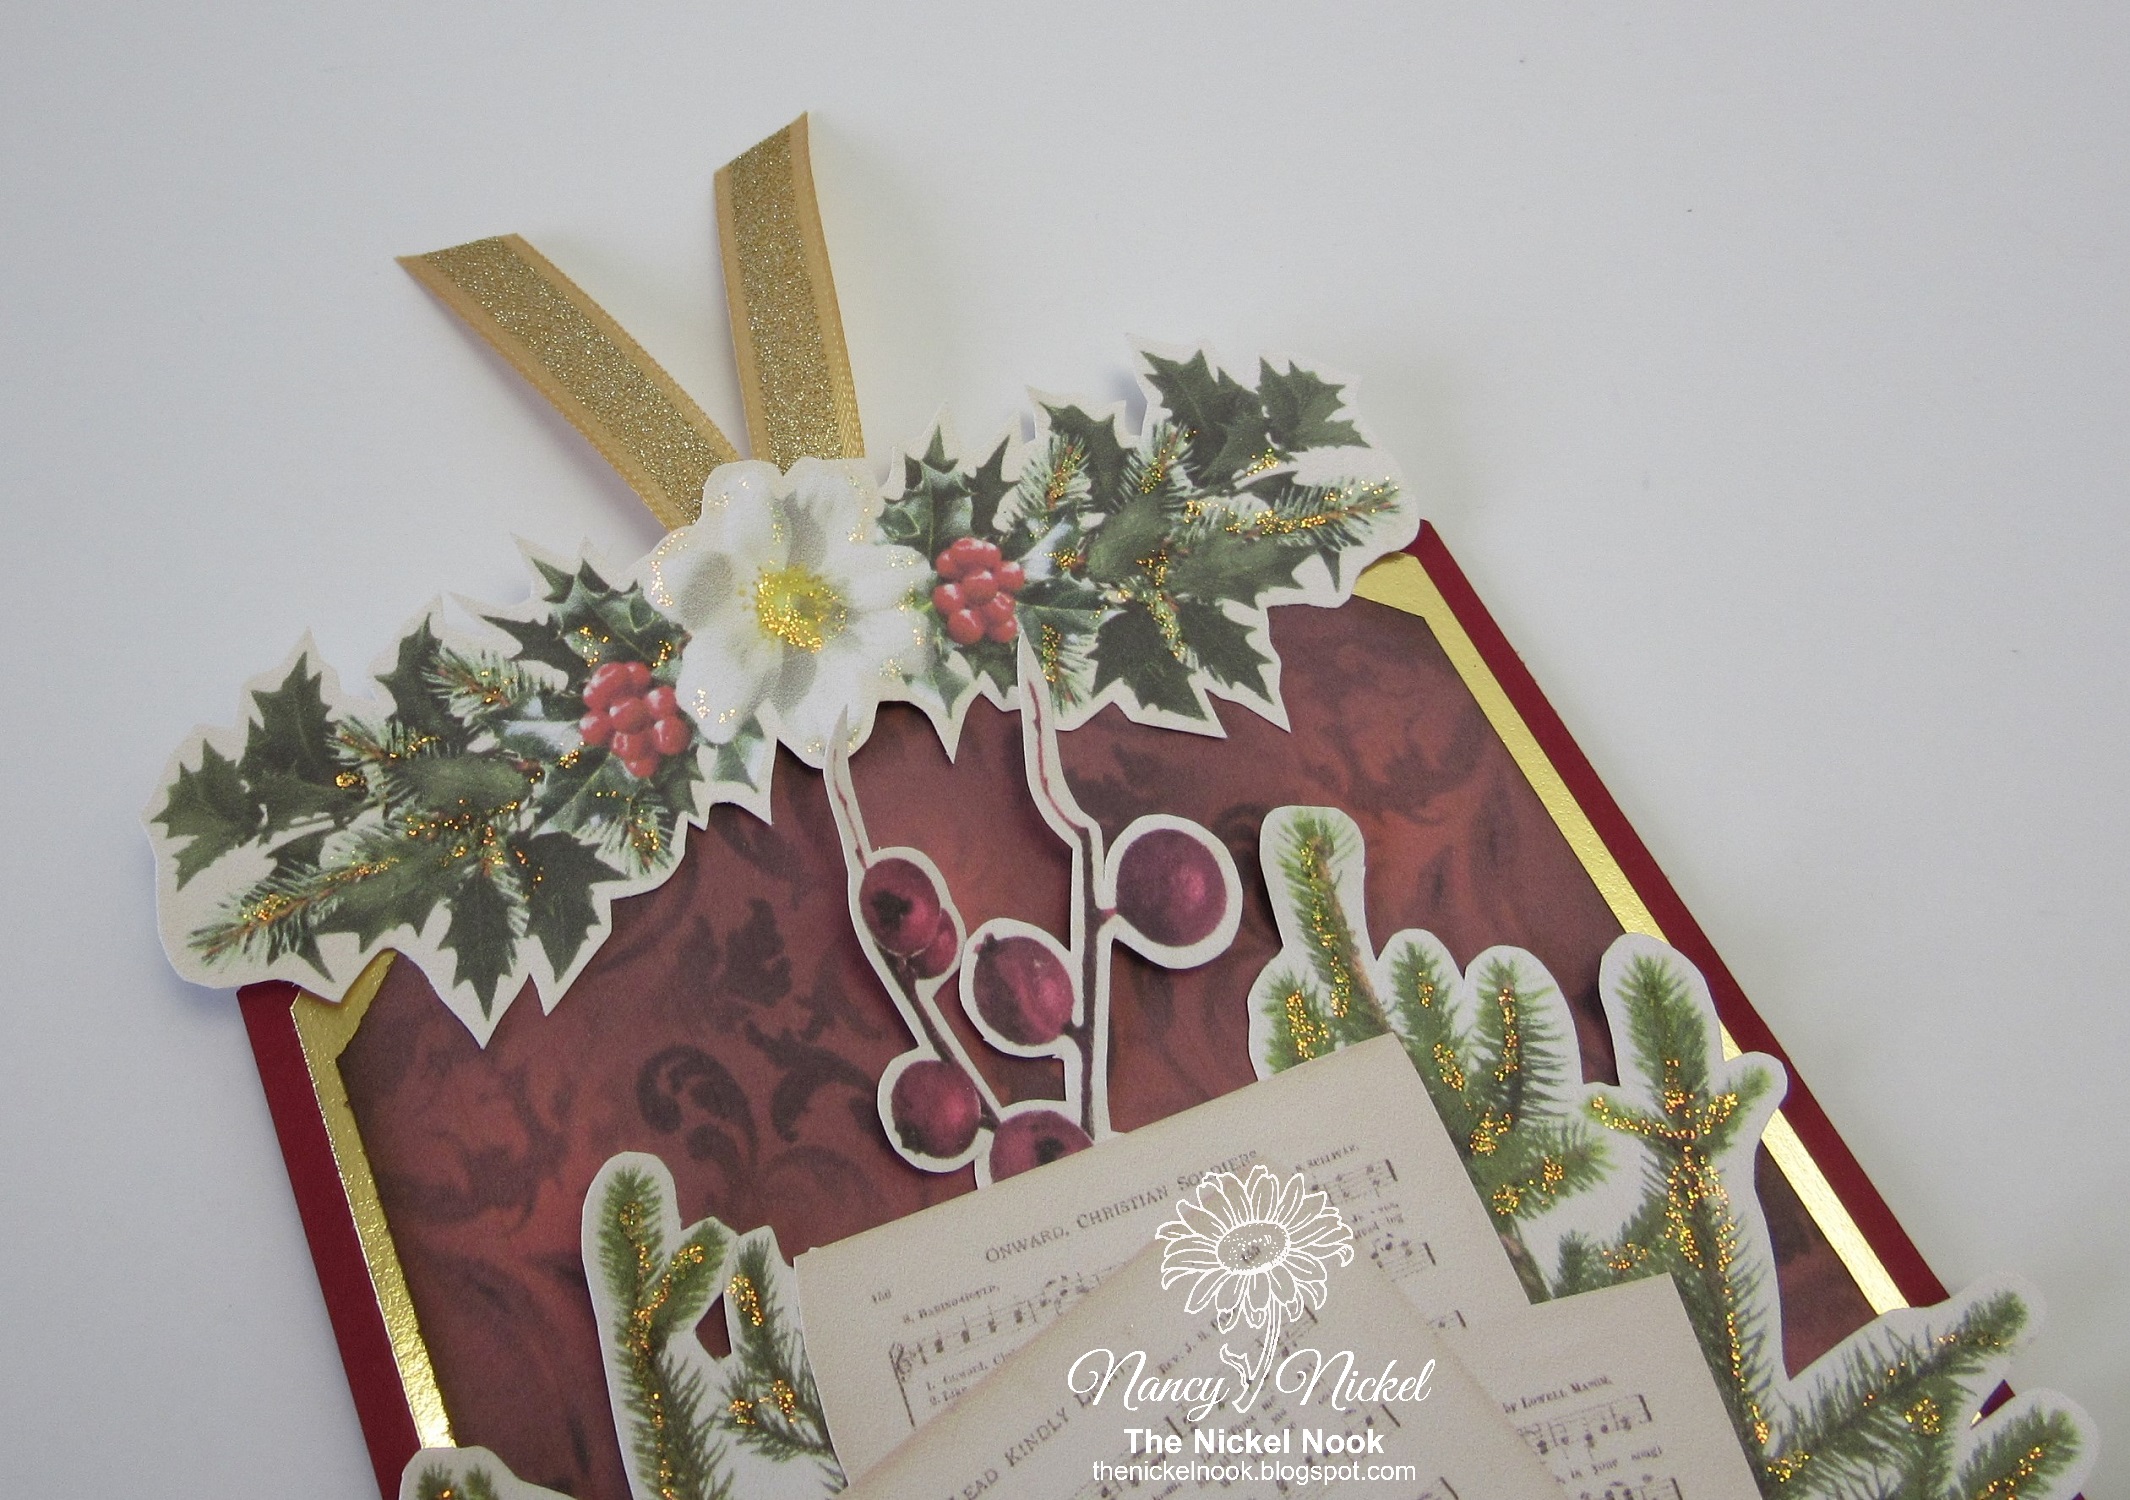
For my first project I have created a tag:


I began with a red cardstock tag base.
I punched along the bottom edge with a decorative border punch.
To pull out the bits of gold included in the collection,
I also punched along the bottom edge of the foiled paper.


I chose one of the beautiful Burgundy with Cream Papers,
and added that in place on top of the Foiled Paper layer.
Then I fussy cut several of the elements from
 the Burgundy with Cream Cut and Create Pages.
I had fun positioning them in place.
I added some pretty gold ribbon to the top of the tag.


I also added a small gold bow to the berry stem.
Finally, I added some extra sparkle with Stickles.

Find the full Collection here:

 Burgundy with Cream

* * * * *
Thanks so much for stopping by today!
Head over to Etsy to take a good look at this beautiful collection!
You can buy the complete collection, or just pick up what you want!
I'll be back soon with more fun!

 * * * * *

Don't forget to visit Meg's Shop and take a look at all the other beautiful items!
 
Also, don't forget to sign up for her newsletter HERE.
That way you won't miss any news!

* * * * *

26 November, 2020

Christmas Gift Tags in Burgundy with Cream

 Hello, everyone!
It's Nancy back with a new project share!

This is another fun idea for using the new Christmas Collection:

 Burgundy with Cream

This time I have made an assortment of Christmas gift tags:


Aren't they pretty?
This is such a beautiful collection of papers and elements!
The tag base in the top center of the photo, is one of the printable elements.
I simply cut it out, and layered a Santa image on top of it. 

This collection has lovely touches of gold throughout.
To bring out the gold, I have added a layer of Rinea Gold/Gold Glossy Foiled Paper.
To finish the tags off, I punched a hole and added a piece of gold cording.
They've all been left blank on the back,
offering a place to add names and messages.

Below is my favorite image! 
The finished tag measures 4"x 4".
That will give you a good idea of the size of all in the photo. 

Any of these tags would certainly dress up a Christmas gift!


Meg's Garden Products Used:

 Burgundy with Cream

* * * * *
Thanks so much for stopping in today!
I'll have another project to share very soon!

* * * * *

 Thanks for stopping in today!

Don't forget to visit Meg's Shop and take a look at all the other beautiful items!
 
Also, don't forget to sign up for her newsletter HERE.
That way you won't miss any news!

* * * * *

26 October, 2020

A Walk in Nature Ephemera Folder

   Hello, everyone!

It's Nancy back with a fun new project share!
I'm using one of Meg's newest kits, and it's loaded with beautiful pieces.

My project features:

A Walk in Nature Papers,

and A Walk in Nature Cut & Create.

 I love to work with printable files!
 I usually let the product inspire the project.
I like to print everything out, and then fussy cut all the ephemera.
These kits are so loaded that I end up with lots of pages and pieces.

This leads me to today's project.
I have created a fun Ephemera Folder using the A Walk in Nature Collection.

Here's the front of it:


I began by chosing two of the journal pages that displayed the theme of the collection.
This will help me remember which kit it is.
I made my folder base from kraft cardstock.
I distressed all the edges of the journal pages,
and adhered one to the front of the folder,
and one to the back of the folder.
I added a piece of seam binding for a tie closure.
Below is a photo of the back side.
Aren't the papers fabulous?


Here's the folder when it's opened.
Isn't that a lovely display of ephemera?
I added kraft cardstock pockets to my folder.
The pockets were decorated with more paper from the collection.
Then I filled them with journals cards, photos,
and all the fussy cut bits.


I had so much fun making this folder!
I think it will be a great way to keep everything together.
I think I might start making them for each printable kit I work with.
It would be fun to see them all lined up on my shelf!


Meg's Garden Product Used:

A Walk in Nature Papers,

and A Walk in Nature Cut & Create.

 Other Materials Used:
Recollections Kraft Cardstock;
Unknown Bias Tape;
Distressing Tool.

* * * * *

Thanks so much for stopping by today!
I'll be back soon with a new project!

 * * * * *

Don't forget to visit Meg's Shop and take a look at all the other beautiful items!
 
Also, don't forget to sign up for her newsletter HERE.
That way you won't miss any news!

* * * * *

22 October, 2020

A Lavender Card

Hello, everyone!

It's Nancy back with a new project share!

I have created a card using the beautiful new Lavender with Mint Collection.

One of my favorite colour combinations is purple with green,
and this collection is just that...and more!

For my first card, I have focused on the purple,
and made a tri-fold card.

Here it is folded flat:


This is what it looks like standing up:


I cut the base from purple cardstock,
then I printed two of the Lavender with Mint Papers, and cut the card panels out.


Each panel is decorated with fussy cut images from the Collection.
The "Les Fleurs" on the front cover is from the Summer Garden Cut and Create.


Although I've made mine as a card,
I think this would make a great journal insert.
With that in mind, I added a belly band to the back panel,
and tucked in the tag from the collection.


The cut file includes an envelope.
I cut it out of purple cardstock, and added this beautiful journal card to the front of it.
I added a fussy cut flower to the back for a flap tuck.


It makes such a pretty set!


Meg's Garden Products Used:

Lavender with Mint Collection

Summer Garden Cut and Create

* * * * *

Thanks so much for stopping by today!
I'll be back soon with another card using this beautiful collection!
For the next one, I'll be focusing on the green!

 * * * * *

Don't forget to visit Meg's Shop and take a look at all the other beautiful items!
 
Also, don't forget to sign up for her newsletter HERE.
That way you won't miss any news!

* * * * *

Mint Beautiful Thoughts Card

Hello, everyone!

It's Nancy back with you today.
I have created another card using the new Lavender with Mint Collection.

As I said last time, one of my favorite colour combinations is purple with green,
and this collection is just that...and more!

Last time I focused on the "Lavender" and this time I'm focusing on the "Mint"!

 Here's my card layed flat:


Here it is standing up:


The elements of this collection are ideal for an easel card.
The base is made from green cardstock,
and the layers were cut from one of the Lavender with Mint Papers.


I fussy cut the flowers, butterfly, and ticket sentiment,
from the collection.
I inked all the edges before assembling everything.


To finish it all off, I added a pretty double-looped bow and some pearls.
Although it doesn't show in the photos, 
I went over everything with my sparkle marker,
so it has a really lovely sparkle!

Meg's Garden Products Used:

Lavender with Mint Collection

* * * * *

Thanks so much for stopping by today!
I'll be back soon with another fun project!

* * * * *

 Don't forget to visit Meg's Shop and take a look at all the other beautiful items!

Also, don't forget to sign up for her newsletter HERE.
That way you won't miss any news!

* * * * *

27 September, 2020

Summer Garden Tag

    Hello, friends!

It's Nancy back with another fun project to share with you!

This time I've made a pretty tag, using items from the

  Summer Garden Cut and Create Ephemera Papers.

The Summer Garden Collection is so pretty!

Here's my tag:


I began with a piece of green cardstock that measures 4 1/4" x 8 1/2".
I distressed the edges with a distressing tool
Then I went through the ephemera pages,
and fussy cut all the rose and pink pieces.
Then it was just a matter of playing and positioning them all.


Some bits were distressed with ink, or the distress tool, or both.
Some were adhered flat, and others were adhered with foam tape.
A couple of the corners were curled up and inked.
It all adds such lovely dimension to my tag.


To finish it all off, I added a few pink flower sequins,
and a pretty double looped sheer ribbon bow.

The strip in the photo below, that says:
"A LOVELY ROSE. ROMANCE."
is what inspired my tag.
I think it's a lovely assortment of bits! 


Meg's Garden Products Used: 
* * * * *
Thanks so much for stopping in today!
I'll be back soon with another fun project!

* * * * *

Don't forget to visit Meg's Shop and take a look at all the other beautiful items!
 
Also, don't forget to sign up for her newsletter HERE.
That way you won't miss any news!

* * * * *

20 September, 2020

Summer Garden Cards

  Hello, everyone!

It's Nancy here today!
I'm very happy to be sharing my first DT projects with you.

I have created two cards with the gorgeous Summer Garden Collection.
This collection includes:

Summer Garden Papers,

and the Summer Garden Cut and Create Ephemera Papers.

Combined they include more than 16 pages of creative fun!
The possibilities are endless! 

Here's my first card:


Isn't that a pretty combination? 
I used Page 3 of the Summer Garden Papers,
It comes with the gorgeous gazebo on it.


Then I fussy cut that fabulous bench and added it to my scene.
We all need this bench in our collection! 
It's one that I'll be using often.
I also fussy cut the "Love My Garden" and added it.
Both the bench and the sentiment are part of the 


Of course I needed a sweet bird for my garden scene;
this one was fussy cut from one of the ephemera cards
I added him with a piece of foam tape.

Finally, I scattered just a few floral sequins on my card.
Isn't that gazebo fabulous? 


Okay, now onto my second card:


As soon as I saw this gorgeous gate,
I knew I had to make a gateo-fold card!
 This is a PNG file that is included in the Cut and Create Ephemera Papers.
I added it to Page 10 of the Summer Garden Papers before printing it out.
I made my gate-fold card base from brown cardstock,
and then cut the gate right down the center,
before adhering it to the card base.
Then I fussy cut the butterfly out, matted it,
and added it to the center of my gate.
One side of the butterfly is adhered in place,
while the other side has some repositionable adhesive.
It makes a wonderful closure!


I used more of the paper on the inside of the card.


I also added several of the Poppy images to the inside,
along with one of the pretty sentiments.
These are all found in the 


Our garden is always FULL of poppies - just like this card!
They're one of my favorites! :o)

Meg's Garden Products Used:

* * * * *
Thanks so much for stopping in today!
I'll be back soon with another fun project for Meg's Garden!

In the meantime,
head on over to Meg's Shop and take a look at all the gorgeous items!
She does beautiful work,
which makes it very easy for us all to make pretty things!

Also, don't forget to sign up for her newsletter HERE.
That way you won't miss any news!

* * * * *