Showing posts with label card. Show all posts

17 December, 2020

Happy Holidays on vellum Word Art

 Hello Paper Artists

A Holly card image is my choice for this quick & easy card.

It is mounted on cream cardstock & embellished with a burgundy organza ribbon tied in a bow with long tails. The tails are looped & glued to give depth to the ribbon.  Some holly berries & green leaves are the only other embellishment.

The word art is printed on vellum & foam mounted above the berries at an angle. (the foam dot should not be seen like this - should have been further to the corner under a berry)

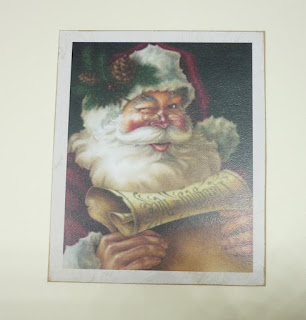
Inside the card is a smiling Santa cut & create


Inside card - spot to tuck sentiments or $$


Bye for now - more cards coming

Meg


14 November, 2020

Birthday, Engagement or Wedding Card

  Hello everyone & welcome!

Leanne, back with you today and I am sharing another card that I have created using the "Lavender & Mint collection". 

These gorgeous digital patterned papers are available from Meg's Garden Papercraft Etsy store. 

I have made a large card; it measures 11.5 x 21 cm when folded. This card would be wonderful as a Birthday, Engagement or as a Wedding card.

Simply make:

For the card base you will need a piece of white cardstock that measures 29.5 cm wide x 21 cm high. 
I have scored along the wide section at 9 cm, then at 20.5 cm, fold then burnish each score line.

Front panel:

Cut a piece of green cardstock to 8.5 x 20.5 cm, distress the edges of the paper with a distressing tool,
ink using distress ink: old paper, then adhere to front panel as shown.

Cut patterned paper to 7.5 x 19.5 cm, distress, ink using distress ink: milled lavender, then adhere to green cardstock.


Cut image from the cut & create sheet. Add a strip of gold & purple papers to the image as shown before adhering this whole piece to the centre of the front panel.

Inside panel:

Cut a strip of green cardstock 2.5 x 20.5 cm, distress, ink and adhere as shown. Add a length of lace to green cardstock.

Cut a strip from the patterned paper 6 x 20.5 cm, distress, ink and adhere to card. 


To embellish the front of my card I have fussy cut my butterflies from an ephemera piece, then fix each butterfly in place with glue. Next add some lace and string of pearls as shown.

I have punched out 6 small flowers from some patterned paper. The flowers were shaped, inked then fixed in place.

To finish my card I have added some stickles glitter glue to the rose image & small flowers.

Until next time.
Thank you so much for stopping by.
I hope you have a wonderful day & happy creating.  
Leanne

07 November, 2020

Happy Birthday to You

Hello everyone & welcome!

Today, I Leanne want to share with you this Special Occasions card.
It was made with the delightful digital paper set "Lavender & Mint #MG501."


I have created a Centre step card.  


My card base was created using plain Lavender coloured cardstock.
I then cut a piece from one of the digital patterned papers, this has adhered to the centre panel. I have inked my papers with Tim Holtz's distress ink called Milled Lavender. 
Next, I die cut a piece of green cardstock, raised this with some cardboard before adhering it in place. 
I then die cut a piece of patterned paper, cardboard was added, before fixing to the die-cut green piece.
I have fussy cut the image from one of the cut & create sheets, this was adhered using 3D foam tape.


My butterflies have been punched out of some offcut pieces from the patterned papers.  
I don't like to throw any paper away as the scrap pieces are ideal for die cut & punched out shapes.


My card has been embellished with die-cut & punched out shapes, jute twine, lace, decorative trim and self-adhesive pearls.

Stop by Meg's Garden Papercraft Etsy Store for these digital papers & to see all of the wonderful paper collections on offer.
Please keep stopping by to see all of the Design Teams creations & inspirational projects.
We would love to hear from you also.

So until next time,
Thank you so much for stopping by.
I hope you have a wonderful day & happy creating.

04 November, 2020

I Just Made This Especially For You

 Hello everyone & welcome!

Leanne here with you today & I have a card that I would like to share.

The papers I have used are from the digital paper collection called Lavender & Mint. They are available from Meg's Garden Papercraft Etsy Store.


I have created a shaker card.

Simply Make:

You will need a piece of white cardstock 28 x 14 cm, fold in half to create a 14cm square card base.
 

Cut a piece of green cardstock to 13.5 x 13.5cm, paper distress the edges then adhere to card base.
Trim digital patterned paper to 13 x 13cm, distress the edges then adhere to green cardstock.
Add lace trim to left hand side then fix in place as shown.
Trim patterned paper to 5 x 12.5cm,  distress the edges then adhere with 3D foam tape.


To create the shaker you will need:
An oval die cut frame in green cardstock
An oval die cut ephemera piece
An oval die cut piece of plastic or acetate
Seed beads & 3D foam tape


Create shaker piece then fix to card with 3D foam tape as shown. 

To finish card fix in place some paper roses, self - adhesive pearls and a fussy cut butterfly.

Until next time.
Thank you so much for stopping by.
I hope you have a wonderful day & happy creating
Leanne

22 October, 2020

A Lavender Card

Hello, everyone!

It's Nancy back with a new project share!

I have created a card using the beautiful new Lavender with Mint Collection.

One of my favorite colour combinations is purple with green,
and this collection is just that...and more!

For my first card, I have focused on the purple,
and made a tri-fold card.

Here it is folded flat:


This is what it looks like standing up:


I cut the base from purple cardstock,
then I printed two of the Lavender with Mint Papers, and cut the card panels out.


Each panel is decorated with fussy cut images from the Collection.
The "Les Fleurs" on the front cover is from the Summer Garden Cut and Create.


Although I've made mine as a card,
I think this would make a great journal insert.
With that in mind, I added a belly band to the back panel,
and tucked in the tag from the collection.


The cut file includes an envelope.
I cut it out of purple cardstock, and added this beautiful journal card to the front of it.
I added a fussy cut flower to the back for a flap tuck.


It makes such a pretty set!


Meg's Garden Products Used:

Lavender with Mint Collection

Summer Garden Cut and Create

* * * * *

Thanks so much for stopping by today!
I'll be back soon with another card using this beautiful collection!
For the next one, I'll be focusing on the green!

 * * * * *

Don't forget to visit Meg's Shop and take a look at all the other beautiful items!
 
Also, don't forget to sign up for her newsletter HERE.
That way you won't miss any news!

* * * * *

20 September, 2020

Summer Garden Cards

  Hello, everyone!

It's Nancy here today!
I'm very happy to be sharing my first DT projects with you.

I have created two cards with the gorgeous Summer Garden Collection.
This collection includes:

Summer Garden Papers,

and the Summer Garden Cut and Create Ephemera Papers.

Combined they include more than 16 pages of creative fun!
The possibilities are endless! 

Here's my first card:


Isn't that a pretty combination? 
I used Page 3 of the Summer Garden Papers,
It comes with the gorgeous gazebo on it.


Then I fussy cut that fabulous bench and added it to my scene.
We all need this bench in our collection! 
It's one that I'll be using often.
I also fussy cut the "Love My Garden" and added it.
Both the bench and the sentiment are part of the 


Of course I needed a sweet bird for my garden scene;
this one was fussy cut from one of the ephemera cards
I added him with a piece of foam tape.

Finally, I scattered just a few floral sequins on my card.
Isn't that gazebo fabulous? 


Okay, now onto my second card:


As soon as I saw this gorgeous gate,
I knew I had to make a gateo-fold card!
 This is a PNG file that is included in the Cut and Create Ephemera Papers.
I added it to Page 10 of the Summer Garden Papers before printing it out.
I made my gate-fold card base from brown cardstock,
and then cut the gate right down the center,
before adhering it to the card base.
Then I fussy cut the butterfly out, matted it,
and added it to the center of my gate.
One side of the butterfly is adhered in place,
while the other side has some repositionable adhesive.
It makes a wonderful closure!


I used more of the paper on the inside of the card.


I also added several of the Poppy images to the inside,
along with one of the pretty sentiments.
These are all found in the 


Our garden is always FULL of poppies - just like this card!
They're one of my favorites! :o)

Meg's Garden Products Used:

* * * * *
Thanks so much for stopping in today!
I'll be back soon with another fun project for Meg's Garden!

In the meantime,
head on over to Meg's Shop and take a look at all the gorgeous items!
She does beautiful work,
which makes it very easy for us all to make pretty things!

Also, don't forget to sign up for her newsletter HERE.
That way you won't miss any news!

* * * * *


08 September, 2020

A Special Occasion Card Just For You

Hello everyone & welcome.

Leanne here with you today, sharing a card that I have created for my Meg's Garden design team post.

I have created my card with ephemera images from the Summer Garden digital paper collection available to purchase from Meg's Garden etsy store.


I have created an easel card. My card has many paper layers, lace, die cut shapes and lots of punched out flowers.


Until next time.
Thank you so much for stopping by.
I hope you have a wonderful day & happy creating.

06 November, 2019

A Christmas card just for YOU

Hello everyone & welcome,

Today I would like to share with you a Christmas card that I have created using the latest paper collection from Meg's Garden called Elegant Damask Christmas.

A selection of items that I have used to create my card. Papers are from the Elegant Damask Christmas Vintage Journal cards & Elegant Damask Christmas A4 papers, plus bits & bobs from my crafty stash.

Here is my finished card. Lots of layers, a little touch of glitter, some hand dyed lace & cheesecloth and inked edges are added to create that vintage look.

I just love this beautiful image of Santa.

Until next time,
Thank you so much for stopping by.
Have a wonderful day & happy creating.
Leanne

11 April, 2019

Bonita Rosa Card

Hello everyone,

I would like to share with you a card I have created using an image from the Vintage Journal Cards.  This is a new collection of papers available from Meg's Garden Paper Inspiration online store.

This is an elegant but simple card to create using the colours from this pretty image of red, black and white. I also added a touch of gold for a hint of glamour. A die cut shape, lace, a large white flower, pearl trim and gold fern leaves adorn this card.
Until next time.
Thank you so much for stopping by.
I hope you have a wonderful day & happy creating.

28 March, 2019

Pretty in blue card

Hello everyone,

Today I would like to share with you a card that I have created with the latest release from Meg's Garden Paper Inspiration online store, Vintage Journals cards.

There is a wonderful range of vintage images in this collection, suitable for all styles of paper craft.


I chose this beautiful image to create my blue and white card.
This card has lots of layers using some background paper from Meg's Garden plus plain and coloured card stock. I have used a paper distressing tool, paper punches, an embossing folder and distress ink to add texture and interest to the paper pieces. I also added lace, pearl trim, ribbon, some glitter glue and a blue rose to embellish my card.
Until next time.
Thank you so much for stopping by.
Have a wonderful day & happy creating.

26 March, 2019

Happy Birthday


Hello everyone! I hope that you are well. Today I am sharing a shabby chic/vintage styled card which I created using the French Roses Collection from Meg's Garden. While planning my design for my card, I gave myself a challenge to use some products from my stash that I haven't used in a long while.


The results: border punches and paper clay frame (handmade). I went through a phase when I bought some moulds and made some frames. I haven't used any yet but I used one (yeah) on my card. I fussy cut an image from one of the cut and create papers from the collection and adhered it to the back of the frame. To age the frame, I dabbed my finger into some Prima white gold metallique wax and rubbed it over the edges of the frame.

 Lastly, I added lots of flowers and foliage to complete my card. I also added some drops of Nuvo crystal glaze on some of the petals of the flowers and in some random spots of the card to add some interest.


Supplies:

Papers: Meg's Garden French Roses 


Thanks so much for stopping by Meg's Garden today.

Hugs from Cathy


28 January, 2019

Loving the French Roses collection

Hello everyone,

I have created two pretty feminine cards to share with you today.
These stunning papers are from the French Roses collection which are now available from Meg's Garden online store.
For my first card I chose this background paper with its soft pastel tones of pinks & mauve. I then added a romantic image from a cut & create sheet. Keeping with soft pinks and a touch of cream I embellished my card with lace, ribbon and a pink flower.
Simple layering, some distressing & inking, embellishments and my card was created.

For my second card I have matted this lovely image onto layers of coloured card stock. These colours complement this image making it stand out. I then adhered this to the background paper. I distressed and inked all papers using Tea Dye distress ink giving that vintage look to my card creations.
Embellishments of lace, ribbon, a pink paper rose, a leaf, rhinestones and glitter glue were added to finish this card.
Two simple elegant cards that I know your family & friends would love to receive.

Until next time.
Thanks so much for stopping by.
Have a wonderful day & happy creating.
Leanne