Showing posts with label Postcards. Show all posts

30 August, 2013

Handbag with Vintage Postcards by Adriana Bolzon


Hello Bloggers, today Adriana will share her creation of a "Handbag with Vintage Postcards"

Adriana explains her project, "Hi everyone, 
today I have a project which I have created for my 
Meg's Garden Design Team work for this month, 
it is a Handbag
and inside are 
4 Vintage Ladies Postcards.

Using the new papers from Meg's Garden 
Designed by Denise -


The handbag.


I covered the outside of the bag with 
Adhered some German Scrap border
with glue around the bottom edges of the bag.

I attached a Brass Latch and hook - Scalloped 
for the closure of the bag
(there are so many to choose from
Meg's Garden website) also I
attached a Striped satin Ribbon - Brown and latte colour
 for a handle.


I also created 4 postcards, 
which fit quite nicely inside the bag.

The size of these postcards are 9cm x 11cm
Smaller than a normal sized card and a bit
larger than an Artist Trading card.
You could place these on top of card, if you like!  :)

"Put on the Bling" Postcard
Materials used from Meg's Garden are
German Scrap border
Elements - French Cinema

"Glamourous" Postcard
Materials used from Meg's Garden are


"Elegant" Postcard
Materials used from Meg's Garden are

"Unique" Postcard
Materials used from Meg's Garden are


On the back of every postcard
I stamped elements with the  


Other materials I have used in creating this project

Imaginarium Designs Chipboard
Clear pebble
Tim Holtz Label - Imagine
Glitter Glue
Silver rhinestones
Vintage Photo distress ink pad

Please check out all the wonderful products at
 Megs Garden Website
and see inspirational work from the other DT members
all on the

Thanks for looking , Cheers :)
Adriana XX "

What a fabulous project from one of the Queens of Vintage - well done Adriana.  This is a great project to remind everyone about the Vintage Challenge - some great ideas in this one project.

Bye for now
Meg
www.megsgarden.com


10 December, 2012

A Christmas Postcard Project by Elena

 
Hi
Elena has been very busy preparing this Christmas project for us & has taken pics of the steps &  explains her project in detail:
 
'When I was I child I strongly believed in Santa and when I went to school I realized that I could write him a letter asking to make me a gift. Now I have 2 kids and my daughter just started to go to school, but we have been writing a letter to Santa with her annually. This year she is going to make it herself. So I decided to make a Christmas Card for Santa and a beautiful envelope in case he would be pleased to receive it and hope he is going to make what she wants.

So I want to share with you some tips how to make simple envelope and a postcard for Santa. I suppose your children will love that idea, but the most funniest thing when they read about their wishes in 20 years. So let's keep them today.


Back of  card
 
 on the backside I used the paper from the Vintage Mini Christmas 1 collection, cut out some flower border and adhered it on the bottom to stretch the flower print. And stamped the post stamp.

Finished bag


close up of finished bag
 
 
Pic Envelope_tutorial_1


I took the wooden postcards by Kaisercraft but you can use just a cardstock.  Dabb the edges with the ink.


Cut the rectangle from the Patterned Paper, distress with the ink and adhere on your base.
I used Vintage Christmas 2 Mini Pack for this postcard.
 I adhere the background, then I took some leftovers from the previous projects and arranged them into a card.

Just a little tip I cut out the picture of Santa and a girl, but saved the leftovers and padded the picture on some other cut outs. I distressed all the leftovers with the chalk ink.
Then I added the silver thread, added some flowers and a lace which I turned over the post card.

Instructions for the bag:
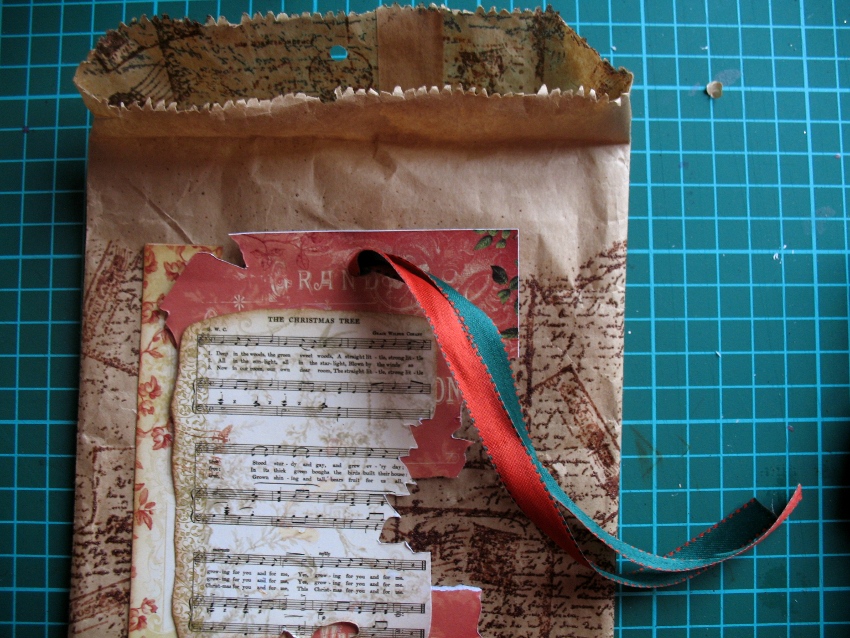
for the envelope I took the paper bag envelop and folded the top of it.
I stamped it with some postcard themed stamps over it.
then I stamped with clear ink using Small Script La Blanche Stamp and embossed with distress embossing powder.
 I used some leftovers again for making some padding for the picture.

 at this step you should make the holes for the ribbon.  So make the first hole under the fold.
make the second hole on the fold.

Then  pull the folded ribbon through the first hole and adhere the center of it with the tape on the inner part of your envelope.

Pull one part of the ribbon trough the second hole, add the twine or some fibers, and the bells . I used Bells hammered gold.

  I stamped the image of Santa using Singing Santa La Blanche Stamp. I combined 3 colors of ink and at the end just colored the image with the olive one.

Adhere it to the envelop and add  your embellishments.
 
I cut the Seasons Greeting from Vintage Christmas 1 mini pack and put it into the frame and added the pearls.
  I hope I have inspired you to make something with your kids or just a little surprise for them.'

Beautiful project Elena - well done & thank you so much for the details on how to make it

Bye for now
Meg
www.megsgarden.com


09 December, 2011

Summer in Paris

Hi

Gayle decided to spend the 'Summer in Paris' - at least with her projects. The bare bottomed lady is now fully dressed & ready for show. And she is so gorgeous & inspiring.

Here is Gayle's  little "speech" about her projects:

The beautiful papers I have chosen from Meg's Garden are so pretty and so detailed, they stand alone. I have deliberately tried to use minimum, if any, embellishment with these projects as I think the papers speak for themselves and need very little enhancement.
Meg asked us to choose a theme with the word "Summer" in it..........
my theme is "Summer In Paris"   


Firstly I have dressed a mannequin, very French and very fashionable at the moment, completely in paper from Meg's Garden and inspired by Marie Antoinette.


For my second project I made a bag, (of course you would need to go shopping while in Paris). It is however recycled from a brown paper shopping bag. I painted some cardboard in sage green and lined the bag to give it rigidity and then "voila!", transformed it with Meg's beautiful paper. I added some hand made flowers and velvet leaves and decorated the inside with beautiful lace.


For my third project I have made some vintage post-cards;  you would after all have to send all your friends a post-card to say, "wish you were here". I have used lots of distressing, stamps, and inks, along with the beautiful collage papers from Meg's Garden.


PRODUCTS USED
DRESS:
Meg's Garden background papers:
Cartouche 3402, A French Bouquet 3400, Pink Passion 3407
Paper lace – white strip, mini squares                                                                                      
BAG:
Meg's Garden background papers:
Green Satin & Flowers P6270, French Garden 3404
Lace - 6.3cm off white
Mini sq paper doily
Pale antique velvet leaves, sm pink & green leaves

POST CARDS:
Meg's Garden A4 Collage  papers:
Victorian Flower Oracle, Vintage Calling cards
Meg's Garden 12x12 Collage  papers:
Regency Romance 3366
Meg's Garden Background  papers
Chic Couture Flourish P6265,A French Collage label P6263:

Well done Gayle

Bye for now
Meg

What a fabulous Summer in Paris Collection of projects - love your little 'speech' describing the how & why of your projects.