Showing posts with label vintage Christmas. Show all posts

27 September, 2017

Twinkling Christmas cards i hope you enjoy these cards as much as i did making them.

Hello and welcome to Megs Garden

I hope you enjoy what I have created with the Twinkling Christmas range 


Thanks for stopping by 
Its never too early to start our Christmas cards.
Don't forget to stop and see what the another talented Design Team ladies have created.

15 December, 2013

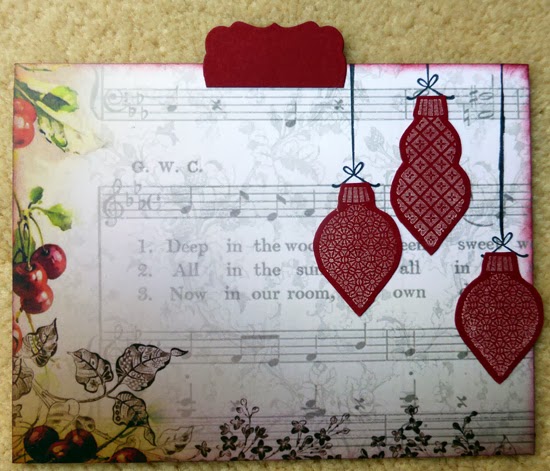
File Folder Album

Hello Bloggers

Sandra has created this great project - she has decorated with Christmas papers but it would be so easy to use for other occasions. 

Memory File Folder Album (my own version with measurements in inches)
You’ll need four (4) A4 Manilla Folders
Co-ordinating cardstock OR extra manilla folder

Cut each to folder to 8 ½ ” on open side and 6 ¼ ” on the fold side then score at 1” from fold side so it opens more easily and fits into the hinge.
For the hinge cut a piece of cardstock or manilla folder to 8” X 6 ¼ ”
Score at 1” all the way along the 8” length.
Fold in a concertina fashion.  Fit the first file folder into the first valley of the concertina fold.  Repeat with the other three folders.  See tape position in the photo.
Tape the bottom and sides of the folder that will glue to the second folder and the open top will form a pocket for tag or smaller page.
Cover each side with your choice of patterned paper before creating and affixing the spine. To make the spine cut a piece of co-ordinating cardstock to 6 ¼ ” X 3”.  Score on long side at 1” then flip and score opposite side at 1”, this will give you a  ¼ ”spine.
Decorate the memory file as desired.
For the tags or smaller pages that fit into the pockets cut cardstock to 6” X 4 ½” then cover both sides with patterned paper and decorate as desired.  I used a spellbinders die cut in half for the tabs and adhered them to the top of the smaller page but in hind sight I would have adhered before adding the patterned paper ie.  Adhere over the top of the tab.


Products Used:
Oh Christmas Tree - P6327
A Berry Merry Christmas - P6324
Christmas Decorations - P6360
Christmas Flowers - P6362
Christmas Cherries - P6363
Christmas Roses - P6364
Holly & Poinsettia - P1815
Vintage Christmas 6 – ATC04
Green Holly, Silver Leaf Flakes

Vintage Beauty Charm


Other:
ink, patterned paper and stamps
Spellbinders Nesting Frame, Sequins, Liquid Pearls

How fantastic  - well done Sandra.  Totally love the idea & would also love to use this ideas for a smaller version.

18 November, 2013

Tis the Joy of Christmas from Sandra

Hello Bloggers

Back to some Layout ideas using the Christmas papers: 


Tis the Joy of Christmas

'I loved the rich colour of the Christmas Greetings paper and wanted to use it as the background for my layout.  I embossed the little frames before applying two coats of paint and the distressed paper has been inked around the edges.  The lace has been sprayed with two types and colours of mist before being adhered over the top of the wider glitter ribbon.  I fussy cut the Father Christmas from the ATC paper and also the Intricate Glass Ornament Stamp before adhering behind the matting of cardstock and patterned paper.'


Meg’s Garden Products:

Lace - 3cm white –L2853


Other Products Used:
 Vintage Ink and Cardstock
Flowers, Chalk Ink and Mini Alphas, Glitter
Cuttlebug Embossing Folder, Glimmermist
Ranger Perfect Pearls Spray
Jo Sonja’s Paints

Glitter Ribbon and ‘Joy’ alpha from my stash

You have certainly used to rich colours of these papers to your advantage - well done Sandra. Love the embossing on the frames, the fussy cut Santa & the stamped ornament.  The frames & letterings in white really lift the LO & the vine up the side is perfect.  Also love the placing of the red lace mat & the 2 frames with pics - makes the LO very interesting & moves the eye around the entire LO.

Bye for now
Meg
www.megsgarden.com


11 November, 2013

Sandra creates Christmas boxes


Hello Bloggers

Sandra help us out with some awesome ideas for Christmas & shows us how to make these gorgeous boxes.


'4” X 4” Gift Box
I made the little 4 X 4 gift box using the Vintage Christmas mini, it’s great for a variety of pieces that can be cut to size.  I also used the holly strips from the Holly & Poinsettia 4X12 strip.  The background didn’t quite match the colour I wanted to achieve so I used my Faber Castell gelatos to colour the white areas.  I treated the green holly with some red glitter and then clustered it with the die cut doily, little flower and chiffon flower.  All the edges are inked to blend them into the background colour of the box.  I found a website that might be useful for making the box (not the one I used because I couldn’t find it but this one’s good). http://hubpages.com/hub/Gift-Box-Tutorial-How-to-Make-Your-Own-Gift-Boxes'


'Pillow Gift Box
These little pillows are great for those smaller gifts you need to give (I’ve used mine to give nail polish, chocolates or gift cards.
I fussy cut the stamp before adding some floral embellishment, sequins or threads and I’ve just tied one pillow with ribbon and the other has a band of border cut plain card and a band of patterned paper to encircle the pillow. 

There are so many options for decorating with the gorgeous things at Meg’s Garden so make sure you check out the goodies http://megsgarden.com/contents/en-us/d540.html.

I’ve included a website for the pattern and instructions for this gorgeous pillow box.  http://www.gomakeme.com/pillow-box-template.html%20'

Meg’s Garden Products:


Christmas Plaid– P6365

Holly &Poinsettia – P1815

VintageChristmas – mini –S110

Round GlassOrnament Stamp - LB1358


Other Products Used:
Faber Castell Gelatos
Stampin’ Chalk Ink, Doily Die, Glitter
Mini Roses, Leaves, Green Tara Lace Flower
Border Punch, Ribbon, Sequins and Micro Beads

Fabulous boxes - well done Sandra & thank you so much for the links to the templates. The boxes are a fabulous way to package a gift & are great ideas to also use after Christmas when a gift is ready for packaging.

Bye for now
Meg
www.megsgarden.com