Showing posts with label diamante trim. Show all posts

01 March, 2019

FRENCH ROSES COLLECTION - FAMILY LAYOUT & NOTEBOOK

Hello again Bloggers,

Well the months are certainly moving along and it is hard to keep up with all that is happening in the New Year.

For you today I have created a layout using Meg's Garden new Collection - French Roses.  Such beautiful soft colours in this range as you can see.


A small amount of fussy cutting with images of papers and cut and creates to add that special touch.


Finally I added more trim and beautiful flower  and metal bee.


Next for you, I have covered a little notebook that I have had for awhile and thought it would make a lovely gift for a friend to place in their handbag......what do you think???
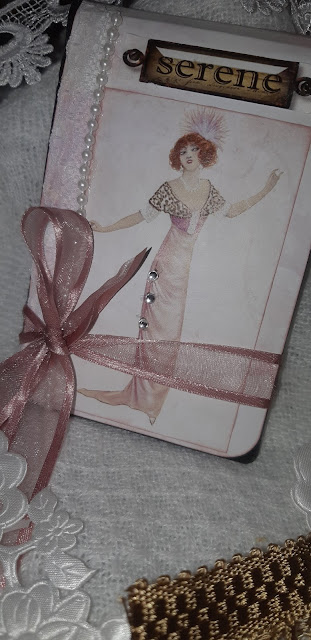
It was such fun to do and has a very elegant feel to the notebook.


I trust you have enjoyed the journey today and be sure to check more out on Meg's Garden  HERE.
Until next time....happy creating.....Love Liz

05 January, 2019

French Roses,collection DT post


Megs Garden French Roses papers collection and goodies are so pretty and feminine

 The bag of goodies are no exception, i especially love the roses
The flowers,dodo vine ,plus the crystals are also from Megs
Don't forget to drop in a see what the other ladies create also
Cheers Trish

25 October, 2017

A Twinkling Christmas it will be...with Tags and cards from me

Hello bloggers,it is almost upon us.....
Why not make it a Twinkling Christmas with Meg's Garden 
Twinkling Christmas range


I hope you stop by and see what everyone creates with this pretty range of papers
Cheers Trish

07 July, 2017

Amazing You ~ Lavande Range

Hello Mary here today sharing with you my third layout documenting my Granddaughters Graduation using the Beautiful Lavande Range.
Once again I have kept the layout clean lines and simple

Amazing You


a closer look


For this layout I used the 12" x 4" strip that comes with the 12 x 12 papers to add as a interest behind my photo. I cut the strip into smaller strips and then I used a paint brush to add gesso around the edges to give definition . Usually I swipe gesso over the whole area and wipe back, but because I did not want the pattern dulled, this time I used the paint brush.
I added a little stamp in two of the corners, the soft mauve ribbon to add flow and then draped the  pearl trim and anchored it with a flower gem. Above my title I added the diamante gem.

Thank you for calling by. I hope you take the time to visit Megs Store , you won't be disappointed with all the gorgeous products to tempt you and also you will get lots of inspiration here on the blog from the DT's amazing creations
Until next time
Mary x

24 June, 2017

Lavande Range

Hello Mary here today to share a layout created with the Lavande Range.
I have scrapped a photo of my Husbands Parents Wedding Day and I thought this range was a perfect fit.


I fussy cut the flower so the photo fits down behind the flower. The book is fussy cut from a cut and create sheet and I have added narrow cream ribbon and a bead as a book mark. Along the bottom of my photo I have added the gorgeous flower edged organza and anchored it with a diamante flower.


with the extra 4 x 12 strip that comes with the 12 x 12 papers I have once again fussy cut the flower from the strip and placed in the opposite top corner of the page to create balance, I raised it with foam squares.  Behind the flower I have used Mauve mesh ribbon and lace and then  placed the satin edged cream ribbon, draping across the top of the photo and again added the flower diamante . I punched some hearts from the strip also to place down the side of my photo as there was quite a lot of uninteresting space. I also punched a decrotive edge from the strip and placed at the side of the photo.


Thank you for calling by today , I encourage you to pop over to Megs Store , so much gorgeous products to inspire.
Happy Creating
Mary x


28 May, 2017

Heritage Journal ~ Sherlock Journal Vol 11

Hello Mary here today to share a project with you using the Sherlock Journal Vol. 11 Range.
When I received this range I knew exactly what I wanted to create with it. I take photo's of my family vintage photo's with props that belonged to my family, a friend said I should make a book of them for future generations, so some of those photos make an appearance in the book and some are the originals. Sherlock Journal Vol. 11 is perfect for such a project.
Because I did quite a few pages I thought I would show a few in pictures and also made a little film of the book completed. I will start with my front cover


I created a pocket with the postcard and have slipped family paper clippings etc inside as well as a tag documenting my Great Grandparents For the Pages I made from cardstock I have used a thick tissue paper that has fibres in it and I inked, misted and stamped it to give a old appearance and scrunched it as I glued it on , I have used this technique on most of the pages that I used cardstock as my base for the page. I also heavily inked the pages with Tim Holts Vintage paper Ink. The other half of the journal I adhered Sherlock Journal Vol 11 pages back to back.


The photo on the right opens back


To reveal some family photos tucked in the envelope from the cut and create sheet. I fussy cut the envelope to create the opening in the envelope. I then made a pocket from a image on the cut and create to slip the tag with journalling in opposite the photos.


I added the bead to the end of the string to act as a page book mark. A tag slides down behind the photo with journalling.


To read the journalling I just need to pull the tag from the side of the photo with the ribbon.


I will finish with this page of my Grandparents, as I don't think the video showed the whole page. Loved the filigrees for embellishing the page of my journalling.
You can find  the products ( only a small few are from my stash ) and the gorgeous Sherlock Journal Vol 11 at Megs Store .
I hope You enjoyed my project as much as I enjoyed creating it ,and my first attempt of a video.
Happy Creating
Mary x


21 October, 2016

Oh So Romantic ~ Vintage Journal Range

Hello Mary here to share a Romantic layout with you. I have to say when I sat down to create I had the intentions of doing some Masculine tags , but whilst shuffling among the papers I came to the beautiful, soft, romantic Vintage Journal 05 paper and I just adore it, so the tags went on hold for now.

How beautiful is this paper !
I kept my layout quite clean and simple, as the paper I feel is just perfect .

From this day forward 

I fussy cut the corner of the book image, so as to slot my photo behind it.


To mat my photo I have cut a corner from one of the large Doilies from Megs shop  and on the other side a lovely piece of lace from the shop
Top corner of my photo two organza flowers , a diamante   ,pearl trim and have added a narrow satin ribbon , that flows across my page and down to attach to the gorgeous vintage key and lock


With the 4 x12 strip of PP that comes with the 12 x12 , I punched out a couple of layered flowers and added to the layout.
Everything I have used on my layout besides some old rubons  and the silver hearts from my stash ,is from Megs Store


Thank you for calling by, I recommend you visit Megs Store for gorgeous papers and embellishments and to browse the blog for inspiration from the girls on the DT , you won't be disappointed .
Until next time
Happy Creating
Mary x

05 May, 2016

Megs Garden Chantilly cream cards

Hello lovers of Megs Garden goodies
I do hope I get this post up computer and blogger problems have plagued me for weeks.

I used Megs 6x6 card pack and ephemera cut and create the cherub was on some of the paper so I used a Tim Holtz Cameo to highlight it,Megs trim.


Same embossing folder with Chantilly cream 6x6 card papers
Cut and create flowers
Leaves,butterfly and trim from Megs


Chantilly cream paper along with Victorian lady,Velvet pansy
Die cut leaves from Mgs
I hope I have inspired you to try Megs Chantilly cream collection

23 January, 2016

Chantilly Cream Cards


Hello  everyone, Miriam here, and a Happy New Year. 

When I received my parcel from Meg, I couldn't wait to get started. I have made three cards using the Chantilly Cream paper craft pack and the Ephemera.Most of the products used came from Meg's Garden. I loved making these cards and was very pleased with the finished result.


For the flowers I used Heartfelt Creations Die "Arianna Blooms "and for the centre I used Memory Box Die "Cherry Blossom, and edged with Versa Magic.


Made this little envelope with the envelope maker, with a second one to line the inside. White lace from stash.


These tags are from the paper pack. The butterfly has been
 covered with Glossy Accents.


I used Lindy's Midnight Bronze embossing powder on the Eiffel Tower.