Showing posts with label Cream Lace. Show all posts
02 March, 2020
21 October, 2019
26 April, 2018
Shades of Green mixed media canvas
Hello everyone,
Leanne here to share with you a mixed media canvas that I have created using this beautiful sheet of patterned paper from the new collection called Shades of Green. I had a lot of fun creating this project. As soon as I saw this sheet of patterned paper I knew I wanted to make something special. I created this beautiful canvas as a gift for my daughter. I have used lots of elements available from Meg's Garden online store. Stop by the store and check out this delightful collection of patterned papers, flowers, metal charms, trims & so much more. Also keep coming back to the Blog & see the wonderful projects created by the design team using this new collection.
Leanne
Leanne here to share with you a mixed media canvas that I have created using this beautiful sheet of patterned paper from the new collection called Shades of Green. I had a lot of fun creating this project. As soon as I saw this sheet of patterned paper I knew I wanted to make something special. I created this beautiful canvas as a gift for my daughter. I have used lots of elements available from Meg's Garden online store. Stop by the store and check out this delightful collection of patterned papers, flowers, metal charms, trims & so much more. Also keep coming back to the Blog & see the wonderful projects created by the design team using this new collection.
Until next time.
Have a wonderful day & happy creating!Leanne
28 March, 2017
Memories for the book of Life
Hello Mary here to share a layout using the Vintage Journal 03 background Paper , along with images from the Parisian Gardens Cut and Create Sheet.
I have added texture paste through a stencil which I then sponged with pan pastels to add some colour. I also added stamping and washi tape to my layout. The Remember Sentiment is fussy cut from the cut and create sheet and I shaded it with Tim Holts vintage photo distress ink. I used mesh ribbon in both coffee and caramel at the bottom of the chipboard circle for texture and interest
I added the little butterfly filigree charm to the circle vine chipboard piece and sitting at the bottom of my chipboard circle I have the frog with the horn , attached to him I have some narrow ribbon twirling down to the key that I fussy cut from the Cut and Create page. These little charms just add that lovely little touch to a layout. The large butterfly sitting on the circle is also fussy cut from the cut and create page ( there are so many beautiful images to choose from ) . I have a piece of cream lace which I think adds to the old world feel of the layout.
The Photo was taken over 37 years ago, I am with some friends and holding my first born. I thought the papers suited this memory I wanted to document and keep .
Thank You for calling by , I hope you find some time to create this week and if you are looking for gorgeous products to do so with , then visit Megs Shop. Everything I have used besides the washi and stamps from my stash and the chipboard circle from A2Z Scraplets can be found at Megs Store.
Take your time scrolling through the DT girls inspiration and also some fabulous links to tutorials .
Until Next time
Happy Creating
Mary x
I have added texture paste through a stencil which I then sponged with pan pastels to add some colour. I also added stamping and washi tape to my layout. The Remember Sentiment is fussy cut from the cut and create sheet and I shaded it with Tim Holts vintage photo distress ink. I used mesh ribbon in both coffee and caramel at the bottom of the chipboard circle for texture and interest
I added the little butterfly filigree charm to the circle vine chipboard piece and sitting at the bottom of my chipboard circle I have the frog with the horn , attached to him I have some narrow ribbon twirling down to the key that I fussy cut from the Cut and Create page. These little charms just add that lovely little touch to a layout. The large butterfly sitting on the circle is also fussy cut from the cut and create page ( there are so many beautiful images to choose from ) . I have a piece of cream lace which I think adds to the old world feel of the layout.
The Photo was taken over 37 years ago, I am with some friends and holding my first born. I thought the papers suited this memory I wanted to document and keep .
Thank You for calling by , I hope you find some time to create this week and if you are looking for gorgeous products to do so with , then visit Megs Shop. Everything I have used besides the washi and stamps from my stash and the chipboard circle from A2Z Scraplets can be found at Megs Store.
Take your time scrolling through the DT girls inspiration and also some fabulous links to tutorials .
Until Next time
Happy Creating
Mary x
28 February, 2017
Iron Orchild Moulds and Parisian Gardens chocolate box
I had to have these Iron Orchid Moulds
I used the paper clay from Megs
I did read somewhere they are food safe so imagine pretty chocolates instead of clay.
Loved this Parisian range of papers so much I didn't want to cut into them so did a digi download as well.
The chocolates box didn't get to the intended recipient ,i think my cat ate them....
I coloured the moulds with Cosmic Shimmer gilding polish in green then a pearl lustre
over the top to tone the green
I changed the colour of the trinket with the gilding polish also
Lace and trinkets from Megs and some pearl gems
I hope you enjoyed my first attempt at making moulds and gilding.
They say practice makes perfect.
Don't forget to check out what the other ladies have created with Megs Garden paper range,
trinkets and lace
26 December, 2016
LOVE ~ SPRING PASTELS COLLECTION
Hello fellow scrappers, Mary here to share a layout using the beautiful new SPRING PASTELS COLLECTION
For this layout I also created a tag from the Cut and Create Sheet . I originally was going to place the tag next to the photo of my Aunt and Uncle on their wedding day, but I did not want to cover the gorgeous image of the lady on the PP, so moved the tag further down on my page. This Range is so pretty and soft.
I made my tag on a piece of cardboard just ripped from the pizza box that my kit came in. Painted it with black gesso and then sprayed with white mist and rose and gold mist , some perfect pearls , added lace and organza ribbon from Megs Shop and the image and Dream sentiment from the cut and create sheet.
I cut around the image of the butterfly with a craft knife enough that the frame could sit without covering the butterfly image. The Love title is again from the Cut and Create sheet , have I mentioned before how many beautiful images come on one sheet ! Ribbon , flowers and the bit of lace you can see peeping through the frame are all from Megs Garden Shop.
I really love this range. I kept this layout relatively simple and clean because the paper is so pretty.
I hope you pop over to the shop and check out this gorgeous range, so pretty !
Until next time
Happy Creating
Mary x
For this layout I also created a tag from the Cut and Create Sheet . I originally was going to place the tag next to the photo of my Aunt and Uncle on their wedding day, but I did not want to cover the gorgeous image of the lady on the PP, so moved the tag further down on my page. This Range is so pretty and soft.
I made my tag on a piece of cardboard just ripped from the pizza box that my kit came in. Painted it with black gesso and then sprayed with white mist and rose and gold mist , some perfect pearls , added lace and organza ribbon from Megs Shop and the image and Dream sentiment from the cut and create sheet.
I cut around the image of the butterfly with a craft knife enough that the frame could sit without covering the butterfly image. The Love title is again from the Cut and Create sheet , have I mentioned before how many beautiful images come on one sheet ! Ribbon , flowers and the bit of lace you can see peeping through the frame are all from Megs Garden Shop.
I really love this range. I kept this layout relatively simple and clean because the paper is so pretty.
I hope you pop over to the shop and check out this gorgeous range, so pretty !
Until next time
Happy Creating
Mary x
26 November, 2016
Hens Party Box by Meredith Hilly
Hello to all. Hope you are enjoying a bit of sunshine.
Recently my daughter had her hens night and I scrapped her a book of all the fun things we got up to.
Not wanting everyone to be able to see these activities a box was needed to be made for the book to be stashed in.
I used a red chocolate container and recycled it into the box I needed by sticking ribbon and paper onto it. This fitted the book and also the some of the party favours I made for our guests on the night.
The flowers where made using two or three of the paper flowers from Megs garden. By holding the centre of the first flower and pinching the petals up you then repeat the same process with the second flower. Fold as many as you want for a fuller flower effect. Then gather them together and glue them down. I added green glitter to the centre of them for a deeper effect. I think they look like dahlias.
Beings a hens night my lovely hens donated some feathers to the decorations on the lid.
I am sorry I am not able to show you the hens book inside but "What happens on a hens night stays on a hens night."
Megs Garden
My Stash
Feathers
Chocolate box
Red and cream ribbon
03 August, 2016
'Dream today' with Chantily Cream by Katrina Thompson
Hello everyone. Today I have created a layered card using the Chantilly Cream Papercrafter Pack. This collection of prints will give you all such an amazing assortment of images to create with. I love the neutrals and earthy tones as well as the pops of colour that you can work into your projects. A step by step guide follows. Please enjoy! Katrina x
Select an assortment of images, background papers and flowers that coordinate.
Start playing with your layering. When you've found a good combination, trim,
ink and attach your layers. I found the Antique linen and dried marigold inks
both worked well to blend & enhance the image and background.
The flower is a combination of the leaves and base of the organza lace with diamante flowers
together with a large petal from the Carabella Roses and a paper rose in the center.
The cardstock you choose will also change the look of your card. I have chosen to stay with
neutral colours and now select from an assortment of smaller flowers for the clusters.
I originally had lace on the top and bottom of the 'Dream' word but found when attaching it
that just having it on the base was enough and then it also didn't cover too much of the image.
I've taken the base petal from the cornsilk flowers to wrap around the paper flower and have used some of the stamens from the cornsilk flower to tuck off to the side.
The finished bottom cluster.
Thanks for looking, until next time, - 'Dream today' & Happy Creating!! K x
22 March, 2016
CREATING PRETTY MAIL WITH CHANTILLY CREAM
Hello Mary here with my second post for Megs Garden.
Pocket Letters and Snail Mail are very popular at the moment and I thought I would like to create my pen friend a fold out Mail letter using the gorgeous Chantilly Cream range that I had left over from my kit.
I will take you through step by step on the construction of my folder
Firstly I used my envelope maker to create a 6 x 4 and 1/2 envelope from the left over paper Chantilly Cream 2 in my 12 x 12 kit
and for the folder itself I have used Chantilly Cream 03 . If you do not have a envelope maker , do not worry , just use any envelope you have at home in a suitable size as a template
Next I placed my envelope in the centre of the Chantilly Cream 3 Patter Paper and
Marked 4 equal squares . Using my envelope as a starting guide to measure from . This will create the folds for your folder to encase your envelope.
Next cut away the four corners and ink all the edges
Now for the fun part , decorating the folder
Because the back of the folder is plain , I am using the 4 inch Chantilly Cream strips in my kit to decorate it with
The Chantilly Cream Cut and Create are perfect for these types of projects. Pocket letters, tags, cards, the possibilities are endless . I have made two little tags and tucked in the side of pockets The tags are made with the Cut and Create images as are the pockets for them to slide into. I have also made a larger tag that I fussy cut the butterfly from the Cut and Create sheet , this tag will go in the envelope with my letter.
This is the Chantilly Cream Cut and Create Sheet You can purchase at Megs Garden ~ so many gorgeous images
So now my folder is already to send once I have added my letter. I have used white satin seam binding on my tag and envelope flap , I sprayed the satin seam binding with Gold Glimmer mist to give it an aged look
So to fold it up and send it on its way ~ the inside
Side flaps folded in
It doesn't show up very well here, but I have used the wide cream ribbon to place the die cut hearts on at the top
The Back ~ I love the girl image and I have placed a vintage trinket in the centre of a little frame from the Cut and Create Chantilly Cream sheet
A little lace along the bottom and tied up with cream narrow ribbon, all available at Meg Garden Shop
and the front ~ I have used a image from the Cut and Create sheet , Pearl spray, narrow cream ribbon and cream Organza satin edged ribbon
I hope I have inspired you to create some pretty mail for someone special ,and you can get all you need to create that special mail over at Megs Garden
Until next time, happy creating.
Mary
Pocket Letters and Snail Mail are very popular at the moment and I thought I would like to create my pen friend a fold out Mail letter using the gorgeous Chantilly Cream range that I had left over from my kit.
I will take you through step by step on the construction of my folder
Firstly I used my envelope maker to create a 6 x 4 and 1/2 envelope from the left over paper Chantilly Cream 2 in my 12 x 12 kit
and for the folder itself I have used Chantilly Cream 03 . If you do not have a envelope maker , do not worry , just use any envelope you have at home in a suitable size as a template
Next I placed my envelope in the centre of the Chantilly Cream 3 Patter Paper and
Marked 4 equal squares . Using my envelope as a starting guide to measure from . This will create the folds for your folder to encase your envelope.
Next cut away the four corners and ink all the edges
Now for the fun part , decorating the folder
Because the back of the folder is plain , I am using the 4 inch Chantilly Cream strips in my kit to decorate it with
The Chantilly Cream Cut and Create are perfect for these types of projects. Pocket letters, tags, cards, the possibilities are endless . I have made two little tags and tucked in the side of pockets The tags are made with the Cut and Create images as are the pockets for them to slide into. I have also made a larger tag that I fussy cut the butterfly from the Cut and Create sheet , this tag will go in the envelope with my letter.
So now my folder is already to send once I have added my letter. I have used white satin seam binding on my tag and envelope flap , I sprayed the satin seam binding with Gold Glimmer mist to give it an aged look
So to fold it up and send it on its way ~ the inside
Side flaps folded in
It doesn't show up very well here, but I have used the wide cream ribbon to place the die cut hearts on at the top
The Back ~ I love the girl image and I have placed a vintage trinket in the centre of a little frame from the Cut and Create Chantilly Cream sheet
A little lace along the bottom and tied up with cream narrow ribbon, all available at Meg Garden Shop
and the front ~ I have used a image from the Cut and Create sheet , Pearl spray, narrow cream ribbon and cream Organza satin edged ribbon
I hope I have inspired you to create some pretty mail for someone special ,and you can get all you need to create that special mail over at Megs Garden
Until next time, happy creating.
Mary
09 February, 2016
Chantilly Cream layout and Cards
Hello ! Mary here with my very first post as part of the DT for Meg's Garden , I am really happy to be part of the team and to create with Meg's beautiful products.
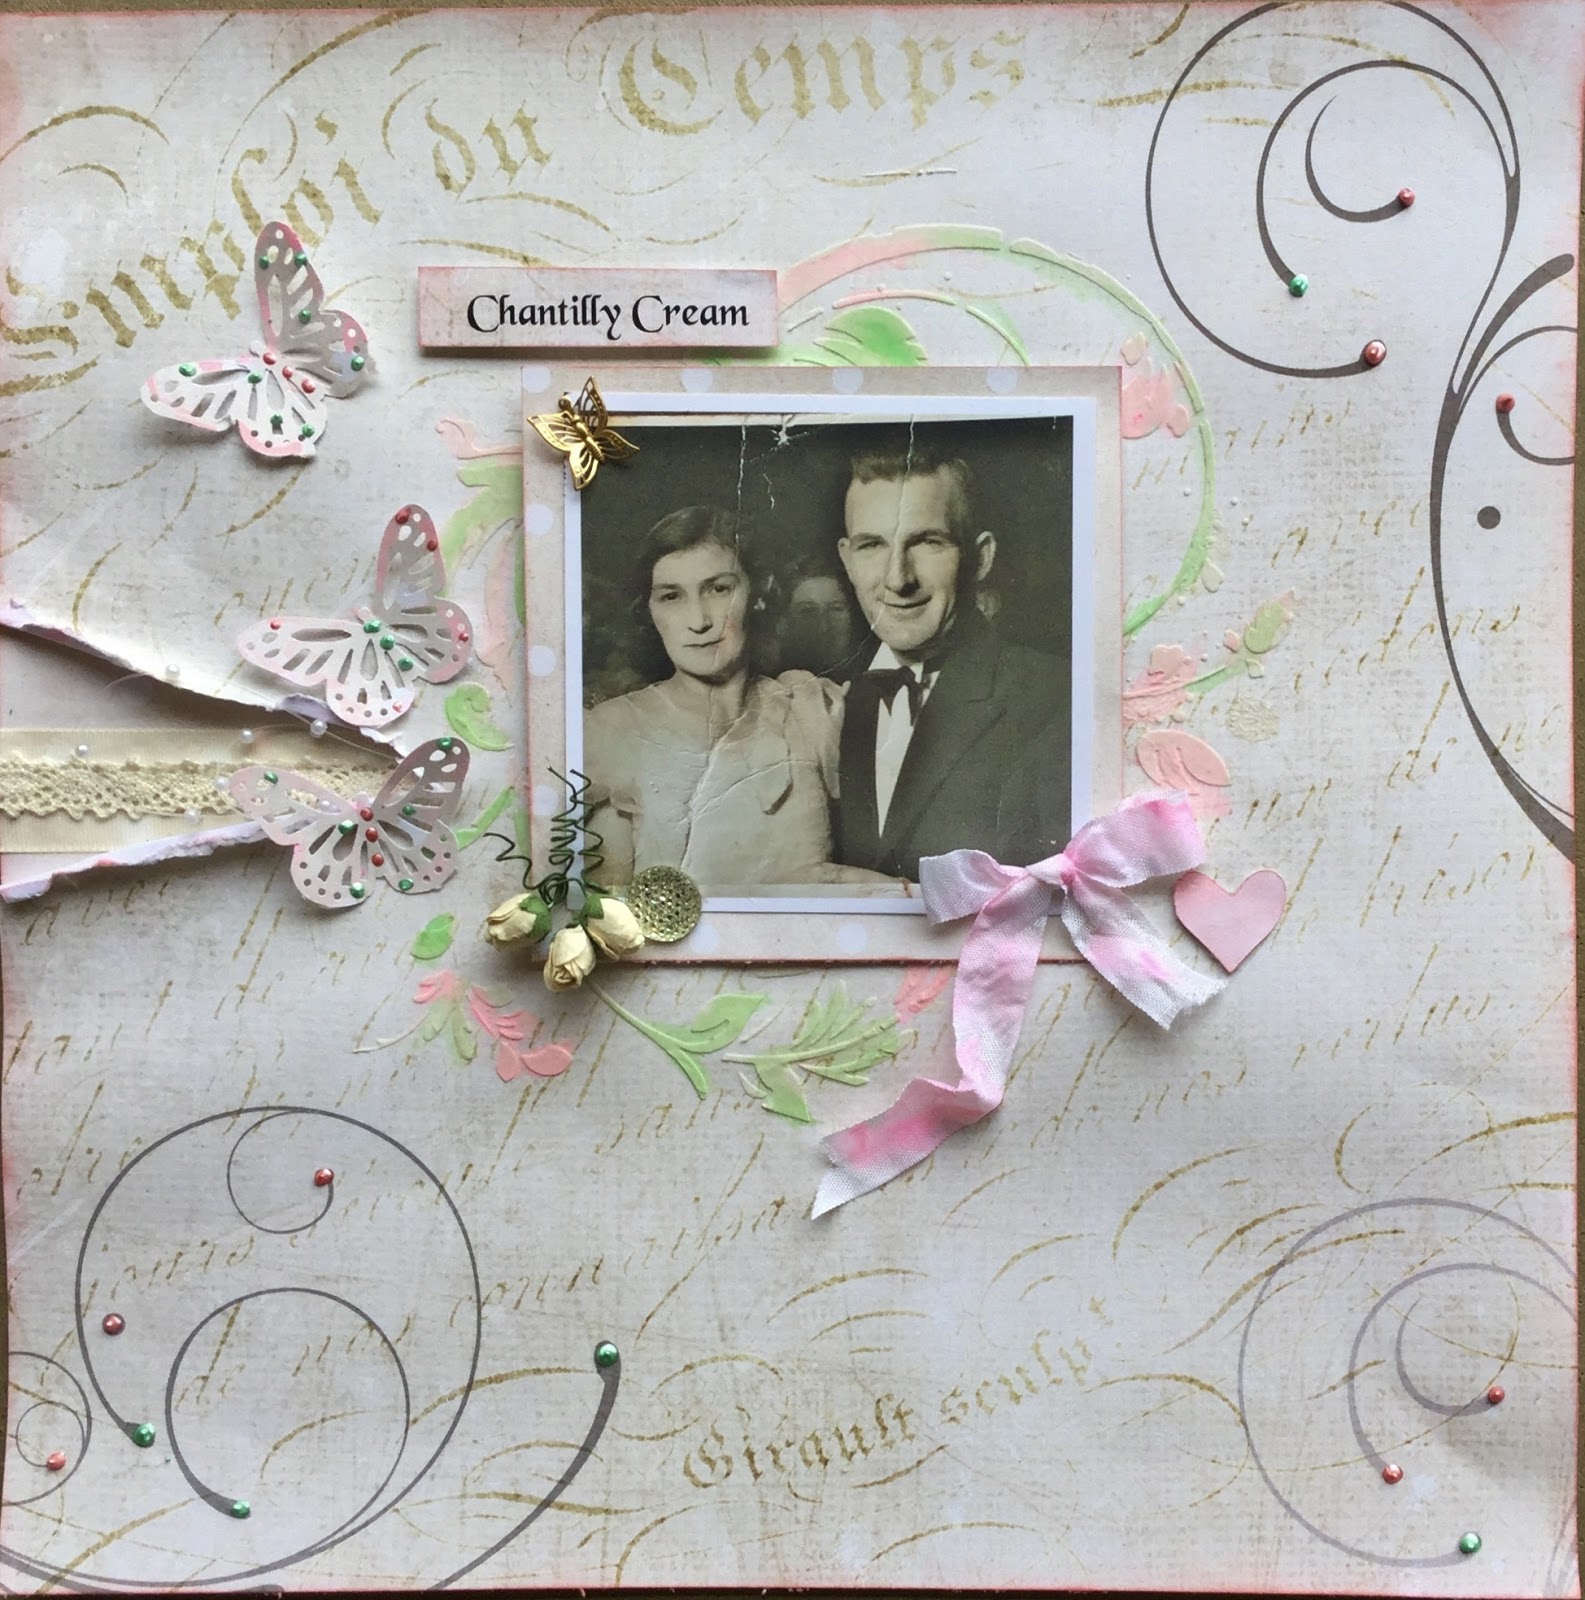
Today I would like to share a layout and two cards created with the gorgeous Chantilly Cream Range,
This range makes me think of Romance and softness, so with that in mind I chose a photo of my Aunt that I thought would be perfect.
I kept the layout quite simple
I tore the Chantilly Cream 05 PP at the side and added some Chantilly Cream 01 underneath. Then I placed some wide cream ribbon and on top of that some cream lace to this I added the pearl spray .I punched some butterflies from the Chantilly Lace 01 PP and added some perfect pearls and a touch of pink water paints for highlights. In the corner of the photo is the lovely little butterfly trinket. I also mounted my photo on the Chantilly Cream 05 PP
To add some romance I used a stencil and texture paste for the lovely vine pattern around my photo and then added the acrylic paints for a little colour. Satin Seam binding would be one of my favourite products, it is so soft and versatile and falls really nicely. The Satin seam binding was white, but I wet it, scrunched it and then just tipped my water brush into the paint and added some pink here and there for a little colour. I thought I would show you the page below before I decided to add the soft pink paint . I think it is subtle but makes a big difference. I have also added Perfect Pearls to the flourish Pattern on the paper.
Then I decided to make a couple of cards with the ephemera from the Cut and Create
Gorgeous vintage flower trinket , pearl spray, cream lace and cream cobwebbing , finished off with a big cream bow
Ephemera cuts make life so easy . I added a punched edge, a flower made form the Chantilly cream PP with a added cream , woven edge organza ribbon bow . I cut the butterfly from the ephemera cuts and used a Paris stamp
I hope I have given you some ideas to create with this lovely romantic range.
Until next time,
Mary
Today I would like to share a layout and two cards created with the gorgeous Chantilly Cream Range,
This range makes me think of Romance and softness, so with that in mind I chose a photo of my Aunt that I thought would be perfect.
I kept the layout quite simple
I tore the Chantilly Cream 05 PP at the side and added some Chantilly Cream 01 underneath. Then I placed some wide cream ribbon and on top of that some cream lace to this I added the pearl spray .I punched some butterflies from the Chantilly Lace 01 PP and added some perfect pearls and a touch of pink water paints for highlights. In the corner of the photo is the lovely little butterfly trinket. I also mounted my photo on the Chantilly Cream 05 PP
To add some romance I used a stencil and texture paste for the lovely vine pattern around my photo and then added the acrylic paints for a little colour. Satin Seam binding would be one of my favourite products, it is so soft and versatile and falls really nicely. The Satin seam binding was white, but I wet it, scrunched it and then just tipped my water brush into the paint and added some pink here and there for a little colour. I thought I would show you the page below before I decided to add the soft pink paint . I think it is subtle but makes a big difference. I have also added Perfect Pearls to the flourish Pattern on the paper.
Then I decided to make a couple of cards with the ephemera from the Cut and Create
Gorgeous vintage flower trinket , pearl spray, cream lace and cream cobwebbing , finished off with a big cream bow
I hope I have given you some ideas to create with this lovely romantic range.
Until next time,
Mary
Subscribe to:
Posts (Atom)