Showing posts with label Paper Lace Doily. Show all posts

14 August, 2018

VINTAGE JOURNAL CARDS

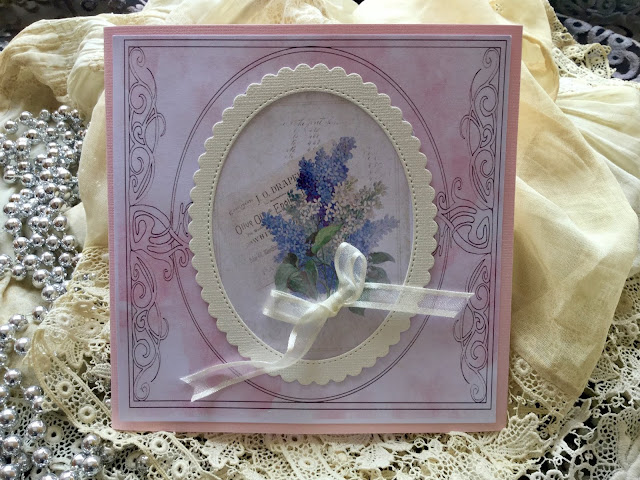
Hello Mary here today to share with you a card using the New Vintage Journal cards now available at Megs Store.


For this card I used the gorgeous bunch of Lilac Flowers Vintage Journal card and I have framed it with the Large Oval scalloped die from the set of two dies and finished with a satin edged ribbon bow.


For the inside of my card I added a small doily the Lilac die , mauve ribbon and a image from the cut and create sheet. 
 The range of Vintage Journal Cards to choose from are Flowers ( which I chose ) , Vintage Ladies, Male/Grundge.
They can be used for a multitude of projects ~ Cards, Project Life, Happy Mail projects, Layouts you are only limited by your imagination.


Thank You for calling by , we love to know what you think , so appreciate your comments.
Happy Creating 
Mary x


22 March, 2018

One Paper Torn in Half

Hello Bloggers

I took 1 piece of paper from the Shabby Chic Backgrounds Collection Card Artist Pack & tore it in half & decided to make 2 cards in totally different styles - 1 Shabby Chic & the other Slightly Grunge.  Did not think it would work BUT ...


This is the paper I chose - the Music paper

Here are the 2 cards:

1.  Shabby Chic Style


The cardstock chosen was a deep rose colour from my stash (sorry no source colour available)
I used a round doily background & layered the torn half of the music paper - this was distressed, inked & the edges curled. The pink edges were from my blusher brush

 The embellishments include a Pink Wild Rose, 2 White Paper Lilies, 1 Cherry Blossom with tinted pink edges & a Small White Paper Flower surrounded by a diecut flower with pinked edges (m356 open roses) as well as 3 paper leaves.  The pink die cut with a pearl highlight is from diecut Carousel m392.

There is no inside deco on this card since I had a slight woopsie with a bottle of glue which glued the card together.


2.  Grunge/Slightly Grunge/Masculine


The other half of the Music paper.   I was quite amazed by the results of my experiment using the 1 paper with 2 totally different styles.


The edges are distressed more than the first card, inked with frayed burlap & the corners curled. Cardstock was a light brown taupe & the layer was a scrap from old papers. The jute string was tied around the brown cardstock & the black diecut (Large Gears m277) was tucked behind before mounting on the card of ivory cardstock.  
 A Cut & Create Ephemera was foam mounted & a skeleton leaf tucked behind it. The other black diecut is from die Scribbles & Scrap m3130.


Inside the card are more scraps.  The brown/taupe cardstock creates a spot to slide a scrap of the patterned paper embellished with a vintage trinket. 


The other inside has more scraps of cardstock & cut & create pieces.
The black die cut is from the same die used on the front - Scribbles & Splat (I think this is the splat) m3130. This is a great & fun die. Some more jute string to carry the design through the card


It was fun doing this experiment which I did not think would work - I challenge you to try it.

Bye for now
Meg
www.megsgarden.com

13 March, 2018

Two Cards using Shabby Chic Backgrounds

Hi Bloggers

With new dies & new papers on my work table, what does a girl do?

She just has to try some of them out - just to make sure they are OK to sell of course! Not just for fun!


 The first card is in pastel dusty pinks:


  • Pale pink Spotted paper on ivory cardstock with pink matting
  • pink antique nylon ribbon is wrapped around the inside of the card & tied into a bow on the front - I use clear clue dots to keep the lace in place & to anchor the ties where I want them
  • white puffy rose is inserted through a rose die (m356) with its edges tinged with my blusher, pale pink rosebuds, rose leaves, cherry blossoms, pink tassel & pale pink satin ribbon
  • waterfall 1 die (m376) with blush pearl highlights


  • inside the card shows the ribbon wrap with tags for sentiments
  • pale pink rose, a clock from cut & create sheet of Shabby Chic Backgrounds foam mounted on pink cardstock & a white doily


 The second card uses green as a highlight color:

  • Silver grey damask on ivory cardstock
  • Champagne organza ribbon in a bow with a hatpin, pearl & green bead is pinned through the bow
  • green paper leaves, cherry blossoms & an apple blossom flower on the side of foam mounted oval frame die (p6745) with cut & create ephemera flower


  • the oval (from the same die on the front of the card) is foam mounted with a small embellishment
  • the green die cut is from die m242 - Elegant Lines
  • the other inside is a panel from the same patterned paper with a die cut flower from the same paper - this die is an old one from my stash


Hope the 2 cards give you some ideas for your 'card ideas file' as well as showing some of the die cuts in action

Bye for now
Meg

18 February, 2018

To have and to hold...

Hello again...
This time I have had the opportunity to use Meg's NEW range of Shabby Chic A4 papers
Today, I used the marl grey spotted pattern paper in a layout on a plain white 12x12 page.
I scrapped a black and white photo from my wedding day, on the 1st of February 2015, so we have recently had our 3rd Anniversary.
This is the pattern paper below that suited the black and white photo for this wedding day layout.
I have used a circle doily from Meg's store along with these little ivory rosebuds
I used a wedding title to finish the layout off.
Oh my goodness, Look at that beautiful die, from Meg's Garden. 
It's called Elegant Lines - Small, click here to see all the amazing new cutting dies over at Meg's Garden.  I want to purchase them all!!! I have limited myself to 3 so far so to see more of my work with these new dies, stay tuned.
I hope to back again soon with more delights from Meg's Garden.
Take care
xxx

16 November, 2017

WATERCOLOUR CARD TRIO ..

Hello friends 
Thank you for stopping by, 
Annette here 
Today I'm sharing three cards I created with the very pretty range 
titled 

'In the Watercolour Garden'


these cards are based on a similar design using square doilies as a lacy feature.
I deliberately left off a greeting as they could be used for any occasion,
birthday, thank you, get well or thinking of you ..
I hope I have inspired you to make some cards from these very pretty papers.
Products used:
In the Watercolour Garden ....papers & ephemera 
Whilst your here why not spend a little time scrolling through the garden blog 
to oooh & aaah over the beautiful work from the garden girls 
sure to set your creative juices working

Happy Scrapping
Hugz Annette x

08 August, 2017

IN THE WATERCOLOUR GARDEN - SIGNATURE ALBUM

Hello Bloggers,

Welcome again and thanks for joining us on Meg's Garden new collection 'In the watercolour Garden'.

Meg has outdone herself once again with this beautiful collection, which you can view in full HERE.

Today I have made a 70th Album for a dear friend, who has this special birthday coming up in a couple of months time.

 These papers are so soft and team well with all of Meg's ribbons, pearls and embellishments. Following you can see more pages of this Signature Album.


I then used some of the Spring Pastels Collection to make up some Signature Cards.


 I hope you will visit Meg's Garden to see all the goodies with this lovely collection 'In the Watercolour Garden.

Thanks for taking the time to look and see you next time......Happy Creating......Liz

25 February, 2017

Spring by Meredith Hilly

Hello everyone.
When creating your latest scrap project there will always be left over pieces of pages when its time to clean up. I find it very hard to throw these in the bin so I put them all in a tray knowing they will be handy for a future pages.
Well with such a wet winter the spring here was amazing for my flowers in the garden.
I knew I had paper from Megs garden that would complement pages with them.
So here is a mix up of a few of Megs papers.


The amount of bling I put on this page made it very difficult to get a nice photo. I used Kindy Glitz and Liquid Pearls to high light this lovely lady.


Tearing the edges of the matting around the photos gives another depth to the page.


When using left over paper to make a book it doesn't have to be the same size as the page before.


Adding fold out pages gets the best out of double sided pictures.


Cutting out and gluing part of a see through image , for example the butterfly , makes the image seen on following pages.


I am lucky enough to have a magnificent wisteria like the beautiful papers at Megs garden. They look great together.


On the back page I used a Slide Mailer from Megs Garden. This made a lovely ending for the book.


Thanks for having a look at my book.

Megs Garden


My Stash
Bling
Paint
Washi Tape