Hi friends! Dana Tatar here today sharing a pair of shaker tags that I created with some festive Meg's Garden products. My inspiration for this project came from Andrea Ockey Parr.
I printed and cut several tags from the Vintage Christmas Papercrafter Pack ephemera page and layered them with paper tags that I cut from a piece of English Rose Garden Leaves and Foliage patterned paper. I sprinkled glitter onto a chipboard transparency embellishment and glued a piece of clear packaging over the top to seal the glitter inside. I then punched a hole in the shaker embellishment and the tags and tied them together with a piece of white twine.
I'm thinking of wrapping all my gifts this year in brown paper and string. These handmade tags will make beautiful gift toppers and will add a fantastic pop of color to my packages.
Thanks so much for stopping by today! I wish you and yours all the best this holiday season!
Hi friends! Dana Tatar here today sharing a Christmas layout that I created using a photo of my daughters from last December and some fantastic Meg's Garden products. The A Flower Garden For Butterflies patterned paper was a fantastic neutral base for my page and the Vintage Christmas Papercrafter Pack was full of festive papers that helped bring the joy of the season to my design.
I selected a holly wreath patterned paper from the Vintage Christmas Pack to dress up the center of a Square Paper Lace Doily for the focal point of my page. I created a festive embellishment cluster with flowers, leaves and lace from the Temptations in Cream and Sage Bundle.
The lower left-hand corner of A Flower Garden For Butterflies patterned paper has a wonderful cluster of leaves. I used this corner as the base for my holiday embellishment cluster. The White Meringue Viola Posies were perfect for this holiday page with their velvet petals their colorful red and green flower centers.
I finished the page with a bow made from white seam binding and another White Meringue Viola Posy.
I hope you'll check out Meg's Papercrafter Packs. They have been designed for the papercrafter who loves the cardmaker packs but wants something extra and for the mini papercrafter who loves scrapbooking, cardmaking, and the inbetween. Meg has taken the concept of the mini paper pack into a new direction and converted it to a new printable version that is ready to download. Each printable product includes 6 8.5x11 inch papers. Three of the sheets have 2 designs with mini ephemera and strips down the side. The other 3 pages are full of ephemera. This is a fantastic option for international designers like myself who want to design with papers on their own schedule. I love that I can avoid a shipping charge and I don't have to wait for the mail!
Hi friends! Dana Tatar here today sharing a layout that I created with the beautiful English Rose Garden collection. It is Fall in the United States so the deep greens and oranges present on several of the patterned papers in this line caught my eye.
I framed my photo with chipboard and flowers from my personal supplies and lots of fussy cut flowers and leaves from the Roses and Lace, Paisley and Roses, and A Bouquet of Roses patterned papers.
I embellished a strip of cardstock with leaves and flowers cut from the same patterned papers as listed above, plus pieces of Lace, Copper Trim and portions of a Square Paper Lace Doily. I topped this cluster with a chipboard bird from the Temptations in Blue Embellishment Bundle.
I finished the page with a metal butterfly charm and a clear title sticker.
Hi Meg's Garden fans! Dana Tatar here today sharing a layout that I created with The Forgotten Meadows Collection and some Bundles of Goodies. There are many neutral patterned papers in The Forgotten Meadows Collection, which are perfect to use as a base pattern. I brought in colors to match my photo using embellishments and flowers and birds that I cut from The Garden of Blue Flowers patterned paper.
Hello everyone this is Patti here and today I'm sharing my latest mini using The Butterfly Garden Book Kit from Meg's Garden. This is such a gorgeous collection of papers and butterflies that just screams spring. I used black 6" x 6" chipboard for my pages, something I rarely do. On one side I used Tim Holtz On the Edge die, Plaque, to create a decorate edge, poked a couple of holes and wove a combination of Meg's ribbon and some black eyelash trim and ribbon from my stash for the spine. The closure is a Tim Holtz doorknob latched with this gorgeous lavender ribbon from Meg's store.
On the front cover I went back and forth trying to decide if I wanted to add flowers and bling but in the end opted to leave the fairy take center stage by herself. I fussy cut her out and then carefully added a thin black line around all the cut edges. She's applied to the book with a Semi-Gloss Podge (I also have several layers of podge under her on the matted cover). The metal elements, under the doorknob and the tied ribbons, have been changed up a bit from their natural metal state to black by the addition of some Stampendous black embossing powder and Versamark. I love the look.
This book consists of 10 chipboard pages. I used a combination of techniques to create pockets and slip ins for photos.
Each pair of pages consists of either flip outs, like the page on the right above. It has a magnet hidden under the tassel, and the tassel by the way, is also from Meg's store. I snipped all the other tassels off this beige trim and left one remaining to act as the pull to open the page.
I had so much fun making these collage pockets. You simply start stacking bits and pieces from the collection to form an area large enough to become a pocket. To help the edges pop I used Tim Holtz Distress ink in Vintage Photo and Black Soot.
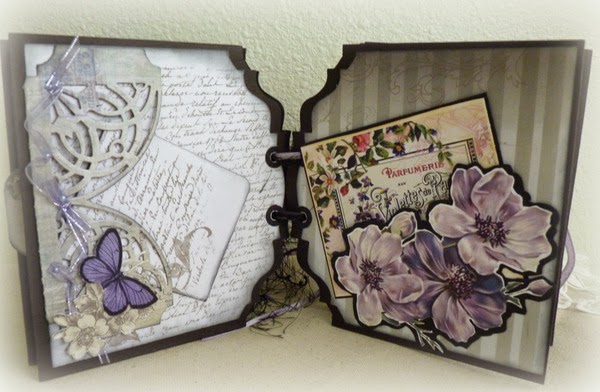
I also pulled out my dies to help make pockets or slip ins like the one on the left above. This die is from Marianne Designs called Vintage Decoration. This die cuts on all but the straight edge so I made sure I left up to an inch on this side to score, fold and tuck under the mat which in turns creates the black lacy top and bottom. The flowers are fussy cut on the right, that creates the stopper for the tags that can be slipped into the pocket from the left hand edge.
Here's another pocket (on the left above) using dies. This time I used Spellbinders Arched Elegance Pocket. I laced some of Meg's fine ribbon through it, added the purple butterfly and some fussy cut flowers across the bottom. On the right the pocket is also fussy cut flowers backed with black cardstock and fussy cut again (all black cardstock in this book is Core'dinations Black Cat 8.5" x 11").
Several times in this mini I cut the matted page to form a pocket, like you see on the right above. It's often times hard to cover up something as gorgeous as the butterfly here. That's easily fixed by slitting the paper with your X-acto knife (I like to add an additional piece of cardstock behind for support) and gluing. Make sure to leave the portion you want to act as a pocket free, with no glue. Another example of this is two photos up, you'll see the bird flying atop the curved edge. Beneath him has been cut and glued the same way to form the pocket for my little booklet.
Belly bands work wonderfully for holding mini books and tags as shown on the left above. Another magnetized page is on the right. The metal piece has been altered with Tim Holtz alcohol inks to change the silver to a golden blend. When lifted underneath reveals another page just ready for photos.
Isn't this paper just lovely? Here again, as on the front cover, I took the gold dragonfly and added black embossing so he'd match the rest of the book. Tucked inside is a tiny little book of six pages. These were just end scraps left over from matting the pages. To give them interest I corner rounded the outer edges. Inside I used Kaisercraft's Windsor stamp very lightly on the pages. I've used this same stamp in other spots throughout the mini where a blank page needed just a little pop here and there.
I have to tell you this pair of pages are my favorite. Again I collaged elements together to create pockets. It's amazing how the smallest bits can just give pockets like this the pop they need. The little tuck ins are a fold-over to make a two page book on the left and an accordion pull out that have four sections on the right.
Come join me on the video, we'll do a walk through of each page and I'll share any techniques I may have missed here. Also there will be many more photos of all the pages, the mini booklets, and the flip outs. You'll find the supply list below for supplies I used from Meg's Garden store.
Hello everyone Patti here sharing how I planned out my mini and covered my waterfall pages with beautiful papers fromThe French Garden Collectionand Book Kit available exclusively at Meg's Garden. My problem was I planned the opposite side of the mini in a series of flip ups and downs and failed to check how much paper I had left. Needless to say there wasn't enough left to cover my flips, sigh, that's where planning ahead is such a good thing :-)
I had to do some creative blending of scraps to cover the rest of my whiteness. It all turns out in the end and makes you think real hard in the process. This mini is two pieces of black medium weight chipboard for the front and back (6"x8") and one for the spine (2 1/4"). I used my Cinch to punch seven holes front and back and a row on each side of the spine. Using a velvet ribbon I laced the spine to the book, corset fashion and tied it in a bow, inside and out.
Here's a peek at the inside you can see how I tied off the ribbon on the inside. The right side is a horizontal waterfall with seven waterfall pages measuring 5"x7", perfect for 4"x6" photos. The left side houses a day planner tucked in the outer pocket. Once removed the pocket will serve as a nice tuck in spot for additional loose photos, ticket stubs or other memorabilia. I used one of Tim Holtz Bands to close the planner. I also roughed up the page edges themselves and inked them with Victorian Velvet Distress Ink from Tim Holtz to follow the theme of the paper line. By just gluing a few of the planner pages to the front and back cover it ties everything together very nicely.
Here's a look at the pocket minus the planner
The flips out on the left side house multiple pages to hold photos,
To s-t-r-e-t-c-h my paper I did a lot of paper splitting,
adding additional headers or toppers of complimentary paper.
I also created tuck in pockets on most pages so besides adhering a photo
directly to the matted page you can also tuck another photo into the pockets.
Magnets help keep the flip out book closed when not being looked at.
I also wanted to share the front cover which utilizes many of the goodies found in the Meg's Garden store. Don't be afraid to cut your metal pieces to allow them to be tucked in here and there. I did that with both these pieces so they would flow from side to side on the front cover.
Thanks so much for letting me share my book with you. You'll find links to the store items following. I hope you'll come join me on my video as I walk you through the mini and share many more still photos.