Showing posts with label Shabby Chic Backgrounds. Show all posts

29 April, 2018

Do What You Love


Hello everyone! I hope that you are well. Today's post is a little bit different. These projects were completed toward the end of my school term. I was feeling stressed and needed to relax so I was colouring a little bit each night for some relaxation. I was also using this as an opportunity to practise my copic colouring as I haven't done any for ages. I had some practice images and I decided that one was good enough to use on a project. I played around with my distress oxides and before I knew it...a card had been created!


I used some of the Shabby Chic Background papers in my card and the sentiment of a Christmas stamp!

My second card is an elegant card which again uses the Shabby Chic papers. I have wanted to make one these card wrap cards for a while and decided that I would see if I had a suitable die in my stash and have a go and make one.

I had a Heartfelt Creations layered posy die which was originally designed to create a gatefold styled card and it was perfect for this card. I then die cut Memory Box Kensington Branch die along with the sentiment which is part of set from Tim Holtz Celebrate die collection. I needed to have elements that complimented the elegant swirls from the wrap portion of the die.
This middle section of the card lifts up as a top folding card so that you can write your sentiments inside.

Two very different projects completed using the same paper collection but created just for the purpose of enjoyment!

Supplies:
Ribbon

Thanks so much for stopping by!
Hugs from Cathy


17 March, 2018

Beautiful Day Cards


Hello everyone! I hope that all is well. Today I am sharing two cards that have made using the same stamp set. I have used the Altenew Beautiful Day stamps and coordinating dies to create my cards. I am a huge fan of the Altenew stamps. They have such beautiful stamp layering sets that are elegant and versatile to create cards with. These sets along with the inks are available from Meg's Garden.

For my first card, I stamped my card onto watercolour paper and heat set it with gold embossing powder. I used a combination of distress markers and Tombow markers to colour the stamps in.

For my second card, I used the Altenew ink to stamp the images, and the coordinating dies to cut them out. I used the following inks for the flower: pink diamond, pinkalicious, rubellite and razzleberry. For the leaves I used frayed leaf, forest glades and evergreen.

I used foam tape between my layers to add dimension.

Meg's Garden Supplies:


Thanks so much for stopping by!

Hugs from Cathy


15 March, 2018

More Cards with Dies & Shabby Chic Backgrounds

Hi Bloggers
Three more cards:

First card is simpler than most:


  • ivory cardstock with a grey mat under the Shabby Chic cream & white patterned paper
  • champagne organza ribbon is tied under the gray mat to the front of the card
  • the cut & create flower is from the sheets with this collection; the edges are distress to cover the white core of the paper (also a great way to hide errors in fussy cutting)


  • only 1 side of the inside of the card is used.
  • grey mat has a pocket with tags & decorated on the edge with die m3129  Edge with curls.
  • the pockets hold tags tied with cream satin ribbon for sentiments, journaling of any other insert


Second card:


  • uses the same patterned Shabby Chic Background as the first
  • I decided to experiment with colours on this one - the card is made with grey cardstock with an ivory mat.
  • the edge of the cream & white patterned paper is torn & distressed - Frayed Burlap
  • a chocolate organza ribbon is tied around the top of the card which opens up - anchored with clear glue dots
  • a brass corner charm is glued to the bottom corner
  • a white paper flower with black stamens, 3 chocolate small roses & taupe satin ribbon added just below the half mark of the card.  A green stem is used as a small colour element


  • only the bottom half of the inside of  the card is decorated
  • an ivory mat is added, a brass corner charm for the corner, the small oval frame (the smaller frame from Scalloped Oval Frame die p6745 holds one of the vintage ladies from the Cut & Create Vintage Ladies pack 28139 (digi & printed)
  • the vintage beauty is finished with some pearls & a taupe ribbon


Card number three:

After 2 simpler cards I let my head go to get very busy with some embellishing & inside card decorating
Especially when the papers are in blues.


  • blue cardstock is the base for the blue & white multi media patterned paper
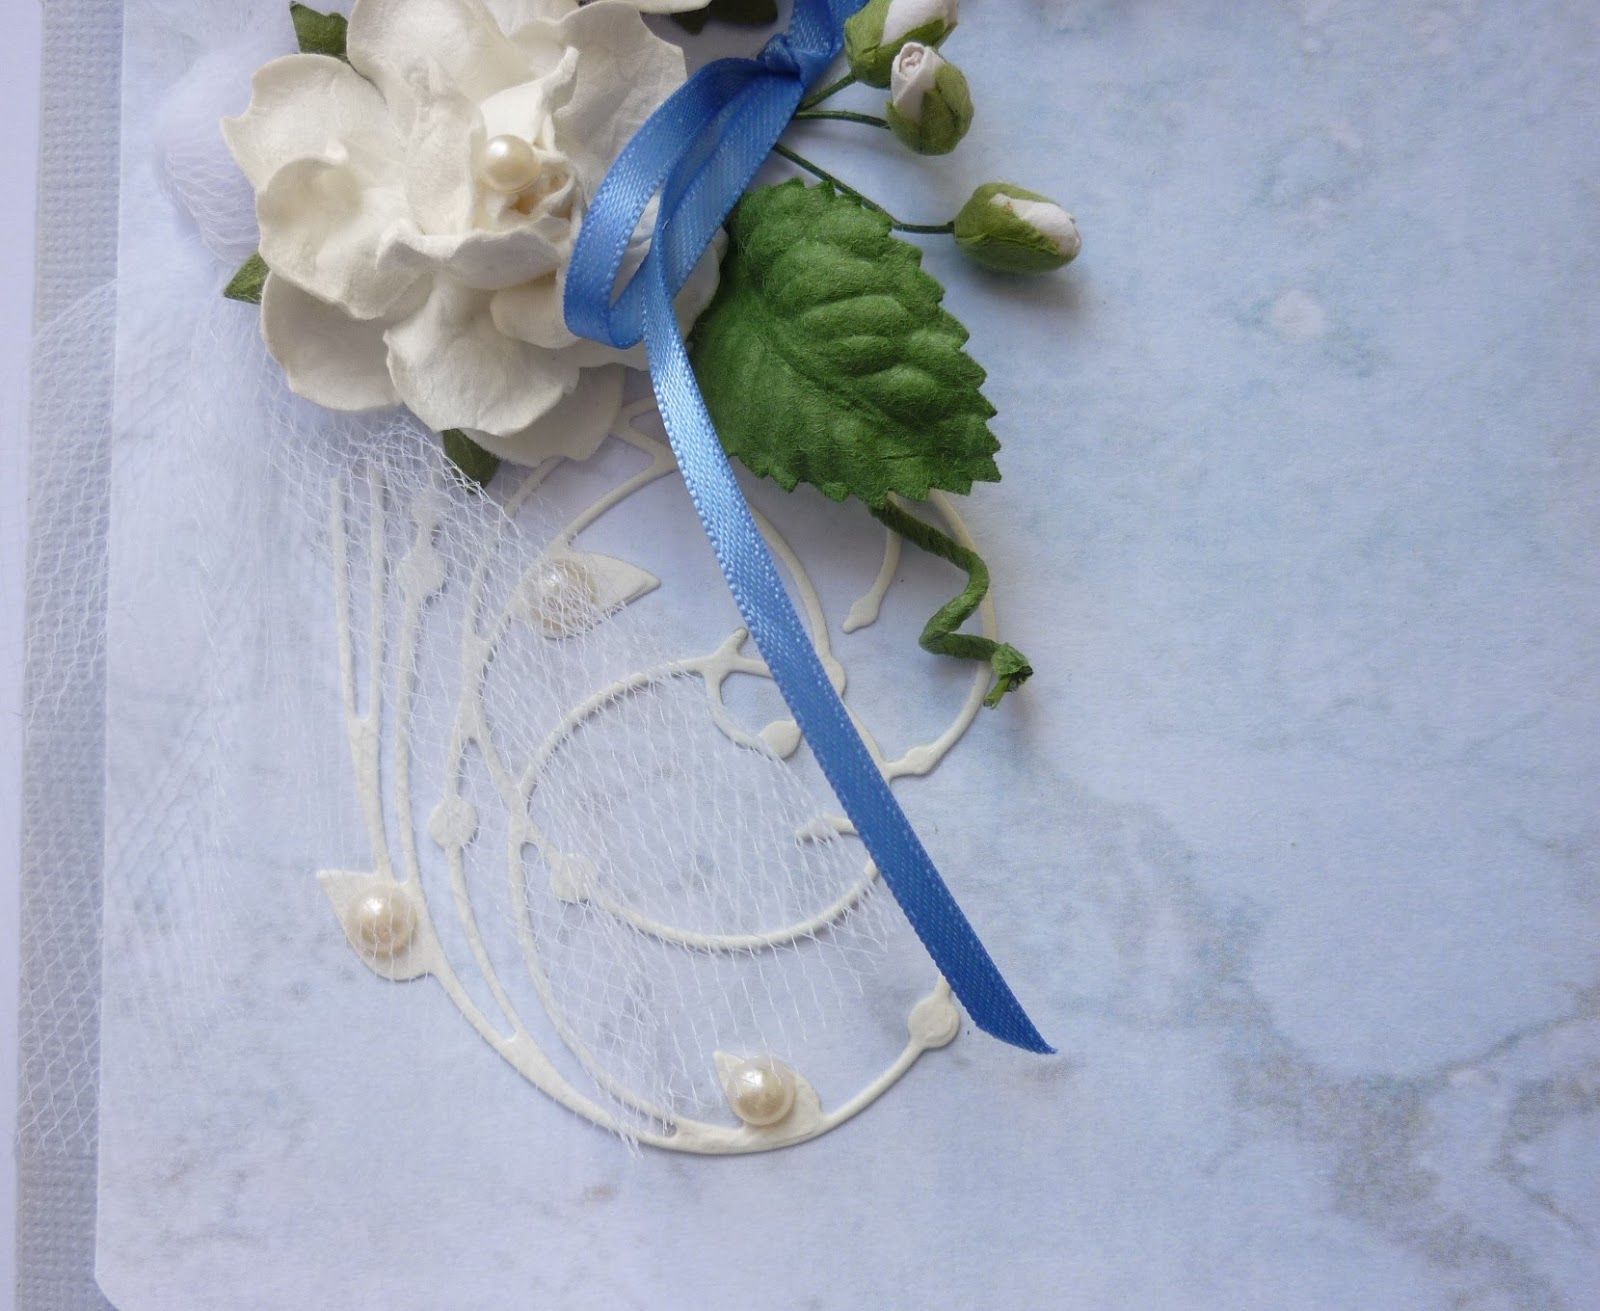
  • the netting is tied in a knot; 2 puffy white roses, 3 white mini rosebuds & a blue iris satin ribbon added.  The stems of the puffy roses are curled & added.
  • the die used is Elegant Lines m242 but it is actually cut in half horizontally, blush pearls added & the 2 pieces added above & below the floral embellishment
  • pearls were also added to the 2 large roses - probably not necessary


  • inside the card I was very busy
  • on the left side I created a pocket on top of the panel of patterned paper. A vintage beauty & some tags were inserted. Lace along the edge & some velvet flowers & rose paper leaves decorate the front of the pocket


  • the right side of the inside of the card has a vintage beauty anchored on 1 side only for tags & inserts.
  • the die cut is done in a dark lavender & is the same one as the front - Elegant Lines


  • a close up of the front of the card
I think these 2 posts cover the details of the 5 cards made using Shabby Chic Backgrounds with Dies.

Have fun creating your cards. Step outside your comfort zone with colours, textures & embellishments.  There is nothing better than when giving someone a card, that they say how 'gorgeous, beautiful, elegant etc' for the front & when it is opened they say even more!! Oh Wow!!  The card is a finished art piece.

Experiment when using your dies - because the die is pictured vertically does not mean you have to use it that way - try it tucked under a floral embellishment & coming out at an angle;  use just pieces of it; cut off flowers from a frame; cut it in half.  Keep you cardstock scraps to experiment with.

I would love to hear from you on your ideas using dies.

Bye for now
Meg
megsgarden@outlook.com
www.megsgarden.com

13 March, 2018

Two Cards using Shabby Chic Backgrounds

Hi Bloggers

With new dies & new papers on my work table, what does a girl do?

She just has to try some of them out - just to make sure they are OK to sell of course! Not just for fun!


 The first card is in pastel dusty pinks:


  • Pale pink Spotted paper on ivory cardstock with pink matting
  • pink antique nylon ribbon is wrapped around the inside of the card & tied into a bow on the front - I use clear clue dots to keep the lace in place & to anchor the ties where I want them
  • white puffy rose is inserted through a rose die (m356) with its edges tinged with my blusher, pale pink rosebuds, rose leaves, cherry blossoms, pink tassel & pale pink satin ribbon
  • waterfall 1 die (m376) with blush pearl highlights


  • inside the card shows the ribbon wrap with tags for sentiments
  • pale pink rose, a clock from cut & create sheet of Shabby Chic Backgrounds foam mounted on pink cardstock & a white doily


 The second card uses green as a highlight color:

  • Silver grey damask on ivory cardstock
  • Champagne organza ribbon in a bow with a hatpin, pearl & green bead is pinned through the bow
  • green paper leaves, cherry blossoms & an apple blossom flower on the side of foam mounted oval frame die (p6745) with cut & create ephemera flower


  • the oval (from the same die on the front of the card) is foam mounted with a small embellishment
  • the green die cut is from die m242 - Elegant Lines
  • the other inside is a panel from the same patterned paper with a die cut flower from the same paper - this die is an old one from my stash


Hope the 2 cards give you some ideas for your 'card ideas file' as well as showing some of the die cuts in action

Bye for now
Meg

12 March, 2018

Shabby Chic Card set No.3 by Leanne

Hello everyone,
I would like to share my 3rd set of cards made from the Shabby Chic Background collection of patterned papers. As with the previous sets of cards I have once again embellished with lace, ribbon, fussy cut images & metal charms. I have also created a circle step card & a Z fold card just for something a little bit different. Both are easy to create.


Until next time,
Keep creating beautiful things to inspire & share.
Leanne

11 March, 2018

Happy Mail

Hello everyone
Bec here, with some happy mail for a friend.
I used Meg's Garden Shabby Chic Background Papers range with the candy stripe pink paper and the pastel pink polka dot paper.
I made a flip book with little envelopes and because I filled the envelopes too much, could only close it in half not completely.
So I used a Hello sticker on front and Dear Jo on what would have been the back page.
I used the cut and create ephemera above Dear Jo and it was perfect to fill the blank page.
I used a Velcro dot to seal the envelope 
Inside...
(left to right)
I have used Meg's heart doily and some leftover from the A4 paper to create this little brad flower.  In this pocket envelope I put the little note.
On the second pocket envelope I have made a little selection of collectables from my stash.  I have put Life is better with Friends sticker on this pocket because we don't often get together as the group of friends but when we do, Life certainly feels better.
I have used a tiny satin ribbon from Meg's goodies.
The third envelope pocket is full of chippies,(and probably the reason I couldn't completely fold this flipbook up to it's smallest size). The lace on the pocket is the Lace Flowers 18mm from Meg's Garden lace range.
In the last envelope pocket I have made a washi sampler for my friend, hopefully she likes to bright colours.
I have created a tiny video to show you the end result in person follow the link to my instagram to see the video.
I hope you have enjoyed stopping by today, I look forward to showing you more of my creations with Meg's Garden products. 
You really must pop to her website to see all the gorgeous new items she has, there is literally something for everyone!
Take Care
All the Best
from Bec
xxx

09 March, 2018

SHABBY CHIC COLLECTION LAYOUT

Hello Crafters,

Liz here today with some more of Meg's Shabby Chic Collection.

I have created a layout for you using the Pinks in this collection.  As you will see, they are so soft and pretty.


A bit hard to see in this photo (I am sorry) I have cut the edges of Meg's doily and placed on the edge of the cardstock and then laid the paper on top.   I have then used the centre of the doily under the photo matts.

Here a couple of close ups of the fussy cutting from the Shabby Chic Background.


The pinks are well suited to Meg's Garden Doily, ribbon, lace and large brass corner.

 The flourishes are made from clay and inked.

Thanks for taking the time to look and if you would like to see more from this collection check it out HERE.

Until next time.....happy creating....Liz.

07 March, 2018

Love Always plus a tutorial


Hello everyone! It's Cathy here today on the blog and I'm very happy to share my latest project with you. I was inspired to do do some stamping and created this card using Altenew's Vintage Roses Stamp set. I have a few of these layering stamp sets as I love the depth and the beautiful images you can create with them.

I decided to have a heart shaped wreath as the focal of my card and to stamp my flowers around this.
I selected the lace background paper from the Shabby Chic backgrounds as I thought that the stamps would compliment it the best. I fussy cut the butterfly from the ephemera to add another soft romantic touch to the card. I stamped my sentiment onto some vellum so that my stamping would still remain visible.

Below is a tutorial demonstrating how to create the stamped heart floral wreath.


Supplies:


Other
Altenew Inks Frosty Pink, Cotton Candy, Coral Berry, Frayed Leaf and Forest Glades
Hero Arts Black
Waltzingmouse Stamps Say It Loud
Spellbinders Classic Hearts
Simon Says Stamp Masking paper
Pretty Pink Posh Sparkling Confetti Clear Mix
Vellum

Thanks so much for stopping byMeg's Garden today.
Hugs from Cathy