27 September, 2013

Vintage Layout from Heather

Hello Bloggers

Heather is with us today with one of her fab projects & she explains:

'Hi everyone ,

Today I decided to go Vintage , creating a layout with the ‘Top hat & Automobile Collection. These magnificent new papers are perfect for Vintage / distressed/and grunge art.

I discovered this old postcard, which I felt was just perfect for this layout. I wanted to create an impression of an envelope, with oodles of stamping and an old grungy /messy background suggesting age and days gone by.
Women would gather together for afternoon tea and support each other.
The fashions back then have always fascinated me with such amazing detail. Although quite impractical, still very beautiful with delicate hand crafted lace and the hairstyles of the day were beautifully exquisite.

A little bit of trivia about me :

As part of our hairdressing registration exams we were required to reproduce a Vintage hairstyle, and I truly adored creating from this era . I have always loved detail, and I guess I intuitively transferred my love of detail from my hairdressing days into my scrapbooking !!   he he he !!


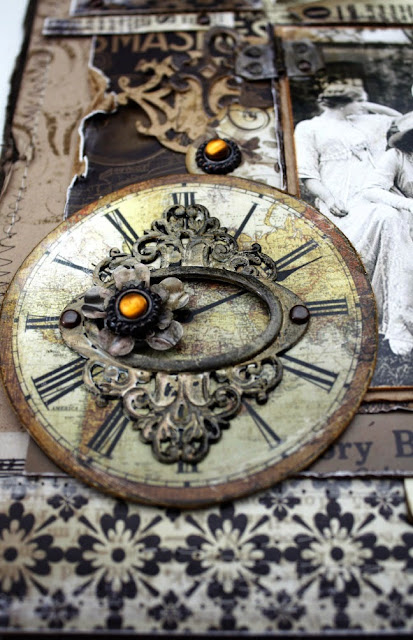
This vintage distressed clock fitted in perfectly with my theme, mimicking the time and the layers of that era.  I altered the Tim Holtz metal frame with gesso and paint, and stacked it over the clock element.


Again I distressed the papers and layered the diecuts to create dimension and interest . 


 Another layered cluster with papers, diecuts, chipboard, finished off with a metal brad .


Papers and items used  

Tim Holtz metal Ornate Plate


Other items.
Tim Holtz die cut/ metal brads, Sizzix die cuts, Brads
2Crafty chipboard, Kraft paper .

Thanks for popping by and I truly hope you are inspired to buy some of these papers and have a play.
Hugz from Heather x'

What a fabulous LO - well done Heather. The flap at the top with a die cut makes me want to open up the LO & get more!!  The multiple layers are awesome with their tears & the die cuts terrific.  Totally fabulous but what else did I expect.  I think my favourite element is the Ornate plate on top of the Old World clock.  The music washi tape adds just a hint of frivolity.

Bye for now
Meg
www.megsgarden.com

25 September, 2013

Guest Designer Layout called 'Love'

Hello Bloggers

Sandie Louise is guest designing for us with this beautiful LO.


Materials:
Meg’s Garden -
Dreaming in the Meadows Paper Collection
P6346A Dreaming in Duck Eggs Blue
P6349 Dreaming in Willows
Paper Lace Doily

Other: Cardstock, Stencil, Texture Paste, Flowers, Chipboard Title, Punch, Adhesive

Sandie well done as always & thanks for being a Guest Designer this month.
Love the background doily & its lacy effect, the die cut leaves look fab & the flowers are the perfect embellishment with their little scroll.

Bye for now
Meg
www.megsgarden.com

23 September, 2013

'Cherish' Card from Helen

Hello Bloggers

Helen goes from a masculine/heritage LO to a very pretty card.


Meg's Garden Products
      Dreaming in Duck Eggs Blue
      Music ATC - 010

Other Products
      Spellbinders - dies
      Scrapmatts - Chipboard title
    flowers, pearls, glimmer mist
Card stock

A very pretty card Helen - well done

Bye for now
Meg
www.megsgarden.com

22 September, 2013

'Heritage' LO from Helen

Hello Bloggers

Helen shows us her 1st project as a member of the fabulous Meg's Garden Design Team:

'Thanks for the opportunity to create with you wonderful products…I have really enjoyed the process. 

The layout is called "Heritage" and I've listed the products used from Meg's Garden'


      The Roadster's front seat blanket
      Take a Roadster for a Spin
      Cottage cutzdie

Other products
   cardstock - Whitewash, Black and brown,
    flowers, pearls & alphas
           Punches & die


A great LO - well done Helen. The colours in the embellishments really show up the detail in the papers. The fussy cutting is fabulous.

Bye for now
Meg
www.megsgarden.com

20 September, 2013

Love Layout from Stephanie

Hello Bloggers

Stephanie explains her LO:

It's Stephanie here today to share a quick layout I did using the “Ode to a Summer's Day Collection” designed by Denise Ann for Meg’s Garden. I used the “Buds of May” paper for my background which I distressed using my distress tool and distress ink in Vintage Photo. I also tore the top of the paper down a bit and added a small piece of light green cardstock behind the tear and placed one of my small handmade rosebuds between the tear. To start my layers off I caught off one of the lace corners of the Bond 25 square white doilies. I then cut a strip 8¾” x 1½” from the “Summers Day” paper. The other long strip is actually two small strips of paper cut from the “Summer Bouquet” paper and placed behind the 6¾” x 3” piece of the bottom left corner of the “Summer Beauty” paper to give the illusion of being one long strip. I distressed all of the layers (except the doily) using my distress tool and distress ink.


I love fussy cutting the flowers from the “Summer Bouquet” papers which I did for this layout and popped them up with pop dots. I then added the white Azalea flower and the two pink roses between the fussy cut flowers. I used one of the butterflies from the “Elements” butterfly sheet and glued it to the layout only down the middle so I could bend the wings up. I cut the “Love” title using my Cricut machine and I was all done!

Materials Used from Meg’s Garden
 P6333 A Summer’s Day
            P6336 A Summer Bouquet
            P6334 Summer Beauty
            P6335 Buds of May

Other Items Used
Light & dark green cardstock    
Small handmade green rosebud
Vintage Photo distress ink, Distress tool

A beautiful Layout Stephanie - well done.  Love the layers, fussy cutting & embellishments.

Bye for now
Meg
www.megsgarden.com

16 September, 2013

Altered Shabby Chic Shoe


Hi everyone, 
Today we have 
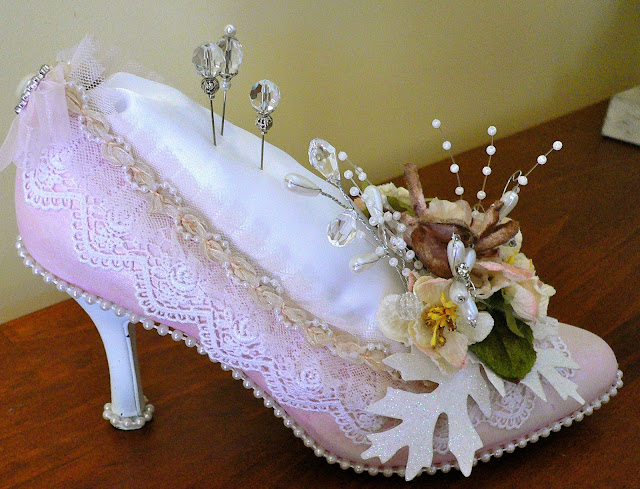
Adriana's Shabby Chic altered shoe 
to show you all.

Adriana explains her project, 
"My assignment for
the Australian Scrapbooking Ideas" 
magazine Issue 21
was to alter 3 different types of shoes.
One of them was a Shabby Chic Shoe. 

You can view the details, step by step and material
list in the magazine. So today I can only show
you all some photographs of the shoe.

Shabby Chic shoe


Most of the materials were supplied by 

They are the


&


Thanks to Meg from Meg's Garden for giving me product to create this shoe. 
Cheers Adriana XX 

Any time you need supplies for a project like this, just whistle - I will hear you up the hill.
Well done Adriana - just beautiful.

If you fancy doing some shoes for a card or project

3366 Put on Your Dancing Shoes
this is a perfect paper.


Bye for now
Meg
www.megsgarden.com


14 September, 2013

'Tis Christmas Time

Hello Bloggers

The Christmas Season is right around the corner & 'tis time to start planning your projects - mini books to record the pics of the season or for gifts, tags for packages, baubles for the tree, cards to mail or layouts of family & friends ....

Denise Ann Boddey, our fab designer, has created these beautiful papers that will help kick start your creativity.

The papers are called 'Tis Christmas Time Collection:

There are 6 beautiful 12x12" with 4x12" strip papers,
reduced to 145mm square for our famous mini pack,
an elegant Christmas Angels paper
& a cartouche paper that is perfect for Project Life sleeves, an unique card, the cover of a mini book & more....

P6360 Christmas Decorations

P6361 Christmas Greetings

P6362  Christmas Flowers

P6363  Christmas Cherries

P6364  Christmas Roses

P6365  Christmas Plaid

S119 'Tis Christmas Time Mini Pack

P6366  Christmas Angels

P6367  Christmas Day
We also have  your old favourites & the Christmas Shop is now open!

ALSO NEW:  Skeleton Mesh 100mm wide, Christmas Vines & more coming

Bye for now
Meg
www.megsgarden.com

11 September, 2013

Tiny Tiny Books & Microscope Slide Art Papers


Hello Bloggers

New to the range of papers is a collection of  microscope slide art papers.
You can choose whatever style strikes your fancy

1060 Chinese Art

1082 Vintage

1083 Geishas

1084 Peonies

1085 Art Nouveau

1087 Santas - also available in transparency #1087

The papers do not have to be used with the slide mailers - make a fantastic hanging for a window, a Christmas ornament, an addition to the front of a card or an accessory to a LO - take your choice from these or more ....


The slide mailers are available in single, double or quad as well as a pack containing 2 of each.  Slide are also available. (the slide mailers are used to mail the slides for pathology or research)

Please have a look on this blog at a project done by Gayle - fabulous ideas & awesome creativity - do a search for 'Microscope Slide Mailer' 


Bye for now
Meg
www.megsgarden.com

08 September, 2013

Layout in Lavender by Linda - 'Beautiful Dreams'

Hello Bloggers

This is Linda's first project on the DT & she explains:

'As soon as I saw this purple paper I knew I had the perfect photo for it.


"Beautiful Dreams"


Megs Garden Products used

Dreaming in Lavenders - 12" used for background and smaller sheet was fussy cut using all the flowers and leaves


Small sheet was used to cut out the mushrooms


Extra products used


Paper butterfly, Green Tara flowers, K&Co sticker, mix'd media inx 

It certainly is the perfect paper for the photograph - well done Linda & a great start to your term as a DT member.  Love the collection of embellishments you have chosen & the collection of die cut leaves is perfect. Just gorgeous!

Bye for now 
Meg
www.megsgarden.com

06 September, 2013

Altered Letter Holder by Jen Waugh

Hello Bloggers

Here is another OTP project - this is Jen's first project on the DT & she explains:

'I used the beautiful A Day in The Meadows paper to create the panels for the letter holder. I edged them in lace and them used some of the pearl trim to accent the paper. 

I used the Oval Victorian Frame from my DT pack and gave it a layer of Tim Holtz crackle paint in Tattered Rose;  added a resin cameo which I made myself, a doily and a beautiful Jewelled Pin.

For the bottom I used your beautiful velvet flower vines on top of another doily for texture.
The sides were given a coat of Gesso, then I used a stencil with modelling paste to create the texture effect. I blended different inks to give a touch of colour.'


decorated bottom of hanger

side of one of the pieces

beautifully decorated top of hanger

What a work of art - well done Jen.  Love the colours you have used to highlight the paper & all the textures.  Almost too beautiful to use.

Bye for now 
Meg
www.megsgarden.com