29 September, 2015

'Gather Your Dreams' Mini Album - Margaret Mifsud

Hello sweet visitors and welcome to Megs Garden Blog.  So nice to have you here and hope your day is going well.

I'm here to share another Mini Album with you.  This one is made with the 'Gather Your Dreams' Book Kit.  This is a lovely kit with purples and pinks and greens and lots of gorgeous floral images.

This is just a small Album with a waterfall and an accordion booklet as well.  I  do have to warn you though, there are a lot of photos and I mean a LOT of photos.  So, maybe grab yourself a cuppa and a comfy chair and .. here we go.  Hope you like it.
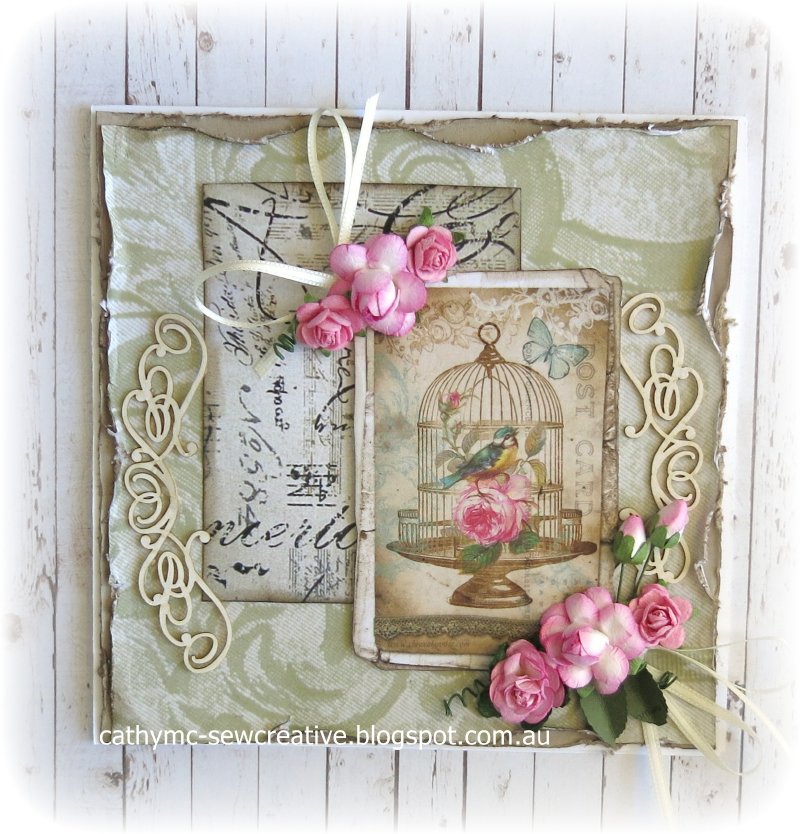
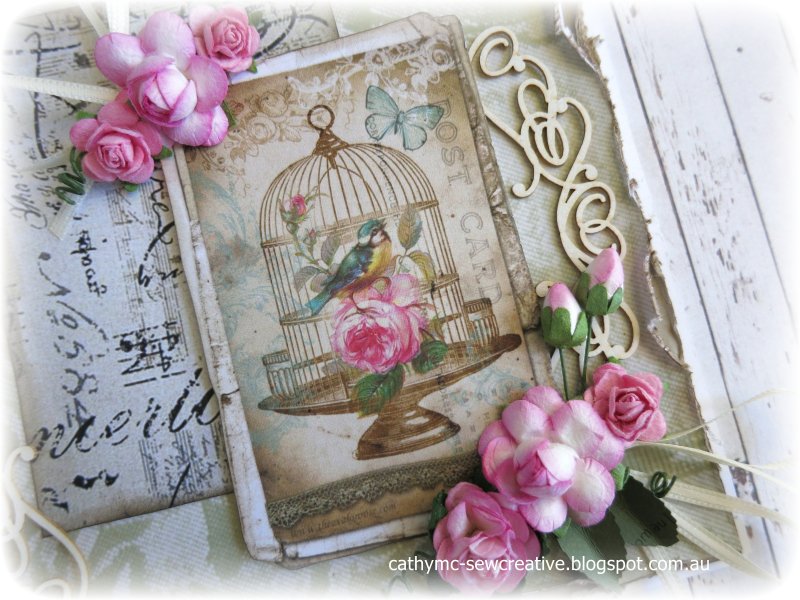
The Cover.


Added a strip of dry wall tape on the cover and then did some stenciling with Tim Holtz's Flourish stencil and texture paste.  Sprayed in the center with watered down acrylic paints and created some splatters around the edges.


I used some of the labels from the kit to add the layers.


The cameo and frame were made with air dry clay and some moulds.  They were both painted with acrylic paint and then glued together and sealed with matte medium.  The small roses were coloured with acrylic paint as well (watered down of course, so I could spray it) and I tucked some small pieces of lace into the cluster.


This lovely leaf chippie is the 'Mini Branches' from 2Crafty Chipboard.  It was coloured with Versa Color stamp pads in two shades of green and then covered in Clear Rock Candy crackle paint.  Once everything was assembled and glued down I dry-brushed the flowers with a bit of gesso and added a few stick-on pearls in and around the cluster.

Opening the book.


I tore the edges of the small labels in the kit, edged them with 'Gathered Twigs' Distress Ink and layered them on the inside front cover.  Added a Tim Holtz Chit Chat Sticker and one of the lovely butterflies from the Butterfly Transparency sheet.   

 
This is the right hand side of the cover .. the part that folds in underneath.  I'm not quite sure what to call it but it was stenciled the same as the main part of the cover and then it was sprayed with 'Afraid of the Dark' Glimmer Mist.  I used another of the labels from the kit  as the base for the Title which is also part of the Kit.


Open the right side (that pesky bit that I can't put a name to LOL!!) and you can see the waterfall section of the book.


I used one of the lined pages from the 'Sherlock Book' for this journal page and fussy cut some floral images from a scrap piece to decorate the edges.

The Waterfall Booklet.


I love the pretty floral images on these papers, don't you??  So gorgeous.


There is room for 7 wallet sized photos in this little booklet.  I have left this first page blank ..


.. and here I've added another vintage image from the Kit to give you some idea of how it looks with a photo.  Of course, you could add another photo on the bottom page, or you could use it for your journalling.


I have simply placed some washi tape in the small bit of space between the pages.


Open the right side again and you can see the Accordion Booklet and the inside back cover.


Here I have fussy cut some of the floral images to create a little pocket.


The tag is one of the images from the 'Cut & Create' pages of the Book Kit.  There are a number of these lovely vintage images and I have used some of them in this book.

The Accordion Booklet.


I don't embellish my mini albums a great deal because I don't like too much bulk in my books but I do like to use stencils to add a bit of interest to the pages.  Here I've used my fave stencil, Tim Holtz's Latticework with Gathered Twigs Distress Ink.


Before I show you the inside pages of the Accordion Book I thought I would show you this view so you could see how it all works.


Opening the booklet to the right you can see another lovely vintage image from the 'Cut & Create' pages.  I've simply framed the photo with some die-cuts and added some micro beads and a few seed beads as well as a Chit Chat Sticker. 


Similar embellishment here with a die-cut,  micro beads and a Chit Chat Sticker ..


.. and the same again here.  I haven't filled all the pages with images .. just enough to give you an idea of how it would look once photos are added.


 Opening the booklet to the left, I haven't added any pictures on these pages.  Just did a little stenciling and added some more die-cuts.


The back of the Album where I've just added a small metal trinket.  Done!!  I did warn you that there were a lot of photos didn't I??  I do hope you were able to stick it out to the end and, of course, I also hope that you enjoyed your visit.

Megs Garden Products used

Gather Your Dreams Book Kit
Mini Rose Buds
Small White Roses
Filigree Strip

If you would like to take a closer look at these products simply click on the name and it will take you straight to the relevant Megs Garden area.

Thank you so much for visiting the Garden.  Why not take a further stroll around and take a look at the wonderful creations by my Team Mates, you will love them.

I hope you enjoy the rest of your day.
Take care and God Bless.
oxox  Marg


27 September, 2015

Two Cards ~ English Garden Collection~


Hello friends of Meg's Garden! Today I am sharing two cards that I have made using papers from the English Rose Garden Collection from Meg's Garden. I was really drawn to the ephemera in this collection and used it in the card above.

I used some roses from stash that complimented the rose in the ephemera. I also used some chipboard from my stash as well, which I kept raw as it worked well with the papers.

To create the vintage look, I used my distressing tool and I also tore some of the papers gently in areas. I also applied Walnut Stain Distress ink to all of my edges as well.

My second card has quite a few die cuts. I used Spellbinders A2 devine eleoquence set and stamped my sentiment onto it. I also used some lace from my stash.

I really liked this sentiment and the elegance of the frame. I applied foam tape to them to add extra dimension.

Meg's Garden Supplies


Thanks so much for stopping by!

Cathy


25 September, 2015

A Lovely Rose by Dana Tatar - English Rose Garden Collection


Hi! Dana Tatar here today sharing a layout that I created with the beautiful English Rose Garden Collection. This sweet girl is my youngest niece. This photo of her paired perfectly with the Paisley and Roses Patterned Paper.


I matched some cardstock to the pink and orange hues on the patterned paper for my photo mats. I used a stencil and some chalk ink to add a rose pattern to the 6x6 piece of cardstock that I placed in the center of the Square Paper Lace Doily. I framed my photo with embellishments from the Temptations in Cream and Sage and some die-cuts from the Forgotten Meadows Cut and Create Patterned Paper.


I finished this page with a sweet brass butterfly charm and a Gold Metallic Ribbon bow.

Thanks for stopping by today!

Meg's Garden Supplies:
English Rose Garden - Paisley and Roses Patterned Paper
Forgotten Meadows - Cut and Create Patterned Paper
Temptations in Cream and Sage
Square Paper Lace Doily
Gold Metallic Ribbon
Antique Champagne Tassels

24 September, 2015

Denise shows us how she used the Slide Microscope Papers on her projects

Hello Bloggers

We continue into November Christmas project with one of my favourite things slides & slide mailers - they are so easy to decorate & create fabulous projects.
The single slide mailers make a perfect tree deco while the double & quad mailers are perfect little gifts.  You can use the Santa Microscope Papers as Denise has done or use some photos trimmed down.  So easy!!

Denise explains:

'I have always wanted to decorate slides and I have finally taken the time to give it a try.  I will admit I did have a couple of big ideas and just ended up taking the easy option'

Cover of quad mailer 
The front is covered using P6363 Christmas Cherries & decorated using die cuts mounted with foam & topped with a slide covering 'NOEL' from the strip that comes with Christmas Angels P6366

Inside the quad mailer 
The Cherries paper is used to cover the inside front cover & also behind the slide & an image from the Christmas Angels is on top. The edges of the mailer & inside the cavities for the slides is coloured gold. The slides cover images are from the Santa Microscope Art papers

close up of slides

close up of inside cover
A satin ribbon is used to keep the decorated slide mailer closed


This shows the back of the slides which were made as decorations designed to be hung on the Christmas tree.  This pic shows the back side of the slides -   there are images on both sides since I have joined two slides together

Another set of slides


With the left overs I decorated a two slot slide book.  The slides are adhered to the book with glossy accents


  Everything is available at Meg's Garden including the slides and slide mailers.'

Fabulous use of the slides, papers & mailers - well done Denise.  Love the gilding & use of papers.  The decorated slides for the tree are awesome.

The slide & slide mailer projects are not only fabulous for Christmas but can be used with photos (cut to fit the slides), scraps of paper, vintage looks with pearls & velvets as well as masculine projects.

The papers specifically designed for slide art projects are at Microscope Art Papers

The mailers are heavy cardboard so will take all your embellishments, paints & papers with ease.  They are available in single, duo & quad as well as a combination pack.  The slides are in 10's or 50's & are at Slides & Mailers

There are several projects on display at the Slides & Mailers page - have a look for different ideas.

Bye for now
Meg
www.megsgarden.com

19 September, 2015

"Nana" - An English Rose Garden Layout by Sarah

Hi Meg's Garden friends! Sarah back with a new layout using the Gorgeous English Rose Garden collection. As soon as I saw these papers, I new I wanted to do a heritage layout using a photo of my grandmother with my sister and me and our children - three generations! I wanted the layout to look almost like a visit to Nana's house - with her favourite colour (green) as well as floral and lace accents.
I've embellished the layout with doilies and lots of flowers, lace and metal accents from Meg's Garden store as well as a few pieces from my stash.  I also added some extra sparkle to the layout using a stencil with white texture paste sprinkled with bronze glitter! Here are some close-ups and different angles of the layout!


Thanks for stopping by the Meg's Garden blog today!
Happy Scrapping!

Meg's Garden Products Used:
Meg's Bundle of Goodies - Temptations in Cream, Camel, Copper and Brown
The English Rose Garden Collection - A Bouquet of Roses and Leaves & Foliage
Circle Lace Doilies (15 cm diameter)