Showing posts with label metal embellishments. Show all posts

10 January, 2020

Chapter Three: Loss


From Letters, to Love.. and now to Loss.
The storytelling that evolved through using Meg's Garden Cut & Create images while creating my journal, concludes in this final chapter.


The third and final section in my junk journal starts on a sombre tone. Dark colours feature heavily, and a Vintage Journal Card image that evokes sadness to the viewer.  

Meg's Garden Junk Journal papers again form the cover pages of the chapter, perfect for making your own journals or mini albums.  


The section opens with an interactive element to begin the story.

She is sad and downcast, and the single word "thinking" leaves you with a sense of what is to come.


Opening the right reveals wedding rings. 


The left, a message, if he shouldn't make it home.


Another pocket, embellished with a spilled envelope of postage stamps. She has tried to reach her soldier without success. Inside the pocket holds her card to him, dated so long ago.

The individual sections throughout are textured - crumpled vellum, ripped and torn paper, to convey anger and sadness, as well as time and being worn from handling. 


A rose patterned paper from a previous Meg's Garden collection was the perfect piece to use with the sentiment, which I made pop out as the card is opened. Both the envelope and card are embellished using Cut & Create imagery, die cuts and lace.


He kept her photo close, as well as a stamped message - wish you were here. 
Inside his jacket, a pocket with the rings - he was to propose when returning from the front.

Pockets feature heavily in this section, holding the personal effects of her soldier. 


Using more masculine Cut & Create images, I selected items he would have on him and his clothing, matches and a letter from her, all returned to his pen pal, the only address he had.


A torn envelope holds the official documents and paperwork sent to her. Removable from the envelope, however she keeps them tucked inside. 

Each piece, including the envelope, is heavily distressed and inked. Bundling together the imagery with twine for texture, also gives the suggestion of formality and finality.


The reverse of the envelope is a rose, this time from my garden, I pressed and framed for the journal. 
My rose is now her rose, given to her from him during their time in Paris. 
She now keeps it close.

Words are minimal in this section, letting the Cut & Create imagery speak. However, here I embellished with a simple word - love. An old charm.

The distressed vellum and doily add to the layers and to the sence of loss. 


The final pocket holds Cut & Create tags - his war tags, embellished and strung together on a chain with his key.

The metal embellishments complement the masculine Vintage Journal Card, which I have used as his service photo and documentation.     


The back cover is a simple sentiment, one that sums up the journal and the journey within, decorated with a beautiful bloom of colour and joy.

It is amazing the stories that can grow from a sheet of paper. 


Julia

04 January, 2020

Chapter One: Letters


I am sharing with you a project that completely overtook my imagination. 

Upon receiving Meg's new Junk Journal collections, I started with no clear plan or idea in mind, just to enjoy creating with these wonderful papers and embellishments.

It wasn't too long however, that the stunning imagery in the Cut & Create pages started telling me a story, thus taking me on an entirely different direction for this project.

And the end result is something I am incredibly proud of and will treasure.


The diary of a young lady. Decorated with metal trinkets, a wooden frame and ribbons. 
Beautifully vintage. 


She, an avid writer of letters and poetry. Sharing her musings from Australia with a pen friend who happens to be a Frenchman. 
He, a young man and equally talented with his penmanship. Enjoying his last days of freedom before rejoining the battle at the front.


I created three sections within, each hand-sewn onto the leather cover. 
The sections are a mixture of textures, colours and functionality - on almost every page is an interactive element, inked to add age and show it is lovingly worn - all adding to the story.


This is Chapter One: Letters


The beauty, and the detail of Meg's papers helped me piece together my story. Taking the one dimensional imagery of a stack of old papers and making it three dimensional - adding a real paper clamp with lined and written papers from Meg's previous collections. The beginnings of my young lady's writing compendium. 

She keeps everything, and notes everything. 
Her first letter, including a lock of her hair, and his reply.


The first section is in bright colours - a happy time, excitement and joy - just what possibilities could this pen-friendship bring? And who is this man, simply known as "R"?


I gave my young writer her magic wand by winding ribbon around an old pencil and embellishing with feathers. Using the ever versatile Art Tags, I created a lace loop to secure the pencil, so she is never without, and can easily be removed to write her next letter. 

Art Tags feature heavily throughout the chapters, decorated to pull out or sewn in to form one of the many layers in the sections.


Smitten, my young lady is keeping all of her correspondence and the little extras she is starting to receive from France. What does the white rose symbolise, she wonders.. And was that a mention of meeting in France written in this letter?

Using an envelope as one of my layers, I kept its true function by enclosing one of the handwritten letters from a Cut & Create sheet, which pulls out when opening the envelope flap. 


Over the months, she starts sending him more photos of herself, and encloses small pieces she has made for him.

I took inspiration from the many divine Vintage Journal Cards as my lady's photos throughout the chapters, and for this page I have made them into pockets. Tucked in behind I have used another Art Tag, embossed and embellished.


In this chapter, the sections include Meg's papers along with a variety of embellished mediums - doilies, vellum, Art Tags  - all complimenting and all available from Meg's Garden. One of my favourites is definitely the small vellum envelopes. Here I have enclosed more Cut & Create pieces into the envelope. Tokens and trinkets from France.


Another rose - sent with love! 
The rose slides in perfectly behind the Cut & Create piece, creating another interactive element. 
It looks like he sent her a bottle of beautiful French perfume along with the rose..


As I gave her a pencil, I couldn't resist giving her a notebook too. 
It is kept safe inside the pocket, ready to pull out for all her stories and poems, and letters of course..


Made from two Vintage Journal Cards folded in half, I hand sewed in the lined paper and also decorated the inside covers. 


The last page of the first section.. What is that tag hiding?


 I have clustered together many coordinating pieces, from Art Tags to Cut & Create images, embellishments and finished with hessian ribbon. 

The closing page of this chapter again was inspired from the Cut & Create imagery, with so many French pieces it can only mean one thing.. 

But first, let us swing the Bon Voyage tag aside.


And open the book to reveal, our girl is off to France! 
Complete with a Cut & Create passport and documents, swing tag and stamps. 

The pop out letter says it all. Bon Voyage, Mademoiselle!

Julia's Video:  


Until next chapter,
Julia

25 March, 2018

Easter eggs by Meredith Hilly


Hello everyone.
I would like to show you the Easter eggs I made using Megs Garden embellishments and papers.
I used duck eggs as they are larger but chook eggs can be used instead.
After blowing the egg yolk out I painted this egg with a moss green paint and then a coat of crinkle crackle paint. I used toilet rolls as frame work for all of my Easter eggs stands. Decorating the roll in different ways.


This velvet flower was the perfect colour for my egg.


This lovely egg I painted first. After drying I cut out pictures and scrunched them into balls. There are so many pictures you can choose from at Megs garden to cut out. Clocks , flowers , ladies. The possibilities are endless. The scrunching breaks down the paper fibre making it easier to glue onto a curve surface. Then using wood glue mixed with water I softened the paper. Gentle smoothing the paper onto the egg. Don't over work the paper as it will loose the picture and colour.


While the eggs has the wood glue mixture on it you can attach lace or ribbon to the egg.
When the egg is dry the hole used to blow the egg can be used as a anchor for flowers and leaves.


I did the same process with this egg. Glitter works great on the flower and pictures.


Adding pearls and small embellishments like dragon flies makes the egg more detailed.


The base of this egg stand was painted with pink paint and I added lace with pearls drops. I cut up the round silver trim ribbon to use  for smaller decorations. Don't ever be afraid to cut off small portions of lace and ribbon. They make wonderful embellishments.


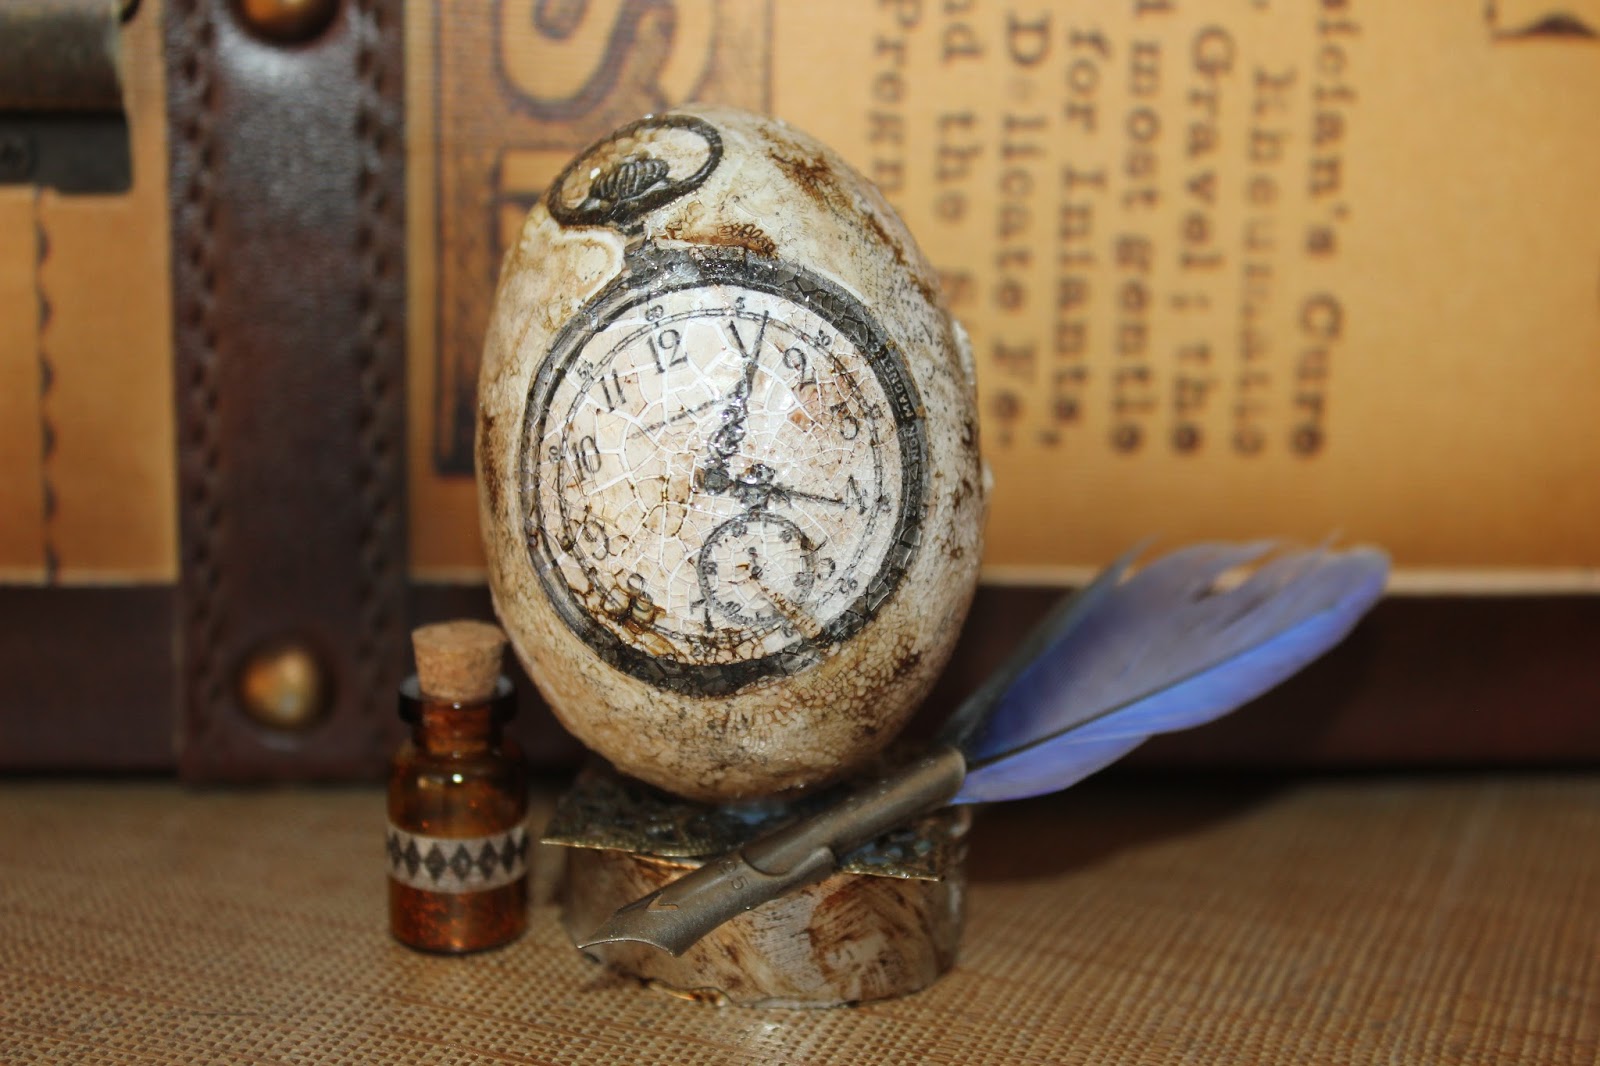
And now for the boys.  I  choose my photos to cut out from  Alchemy 101 papers. I followed the same process as above but when the egg was dried I coated it with crinkle crackle. When this layer dried I used a dark coloured ink pad to wipe over the egg. This will go into the cracks. Before the ink dries wipe of excess with a tissue.


This egg I did not paint. I stamped it with stamps. You will need to roll the egg along the stamps to get most of the image on the stamp.


Again I used a toilet roll and painted it. Attaching the ribbon with the very cute cog and frog.


I hope you enjoyed this post as much as I did making the eggs. There is so much to be created using megs garden supplies on your very own Easter egg. Give it a try. Makes a lovely gift at Easter time without the calories.


Megs Garden

My Stash
Paint
Ink