29 April, 2013

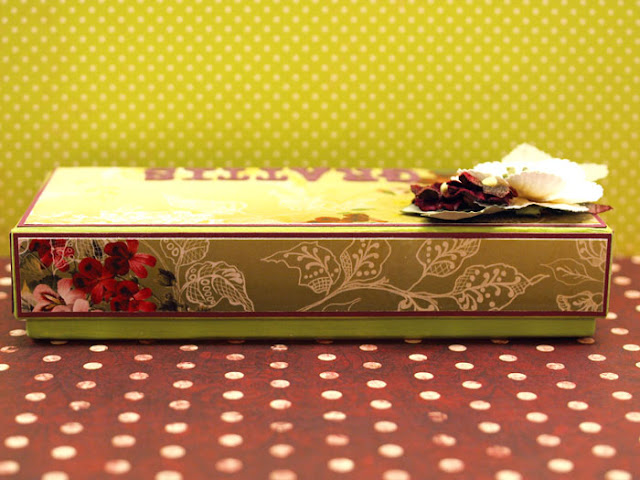
Tutorial from Ulrika on a box

Hello Bloggers

We always need some tutorials to give us new tricks & ideas so Ulrika is doing that for us today & explains her steps brilliantly:


First picture ( how I did it)

Start to paint your box on all edges. Cut pieces of cardstock and patterned
paper for all sides. I used double sided tape to attach the pieces to the box.
Then decorate the lid and the inside of the box.


I love to make plain boxes beautiful and then give them away as gifts. Inside you can put
Chocolate, soap, jewelry or a gift certificate for something nice. The best part is that
when the gift is gone the box can be used for something else!
I used “A Summers Day” from Ode to a Summers Day collection. For the lid I used the cute
red velvet flowers that you can find at Meg´s. And for the inside of the box I cut off the edges
of a paper lace doily called basket weave rectangle. Then I used it as a lace border. In the corners I
used the cute red flowers again  and green leaves from Dusty Attic. All from the shop!'


Fantastic tutorial on decorating a box - well done Ulrika. The pics & instructions are terrific & give our bloggers a lot of new ideas. I love the way you have layered the paper instead of covering the box which is always a messy choice & I know that my corners do not ever work - great alternative to solve a problem.

Ode to a Summer's Day papers
Paper lace doilies
Paper flowers

Bye for now
Meg
www.megsgarden.com

27 April, 2013

Inspire Card from Vicky

Hello Bloggers

Vicky shares this card with us & explains it:


'Inspire Card 

The extra strip of paper you receive with each of Meg's Garden papers are the perfect size to be folded in half to a perfect card size. I used the French Bird Cage sheet of paper from the Le Belle Jardin collection. This beautiful floral paper is so delightful and easy to work with. Meg also carries a beautiful selection of lace and flowers in the shop to embellish your projects. In addition, I have added some beautiful Dusty Attic chipboard pieces from my scrap stash and a handmade pink rose to compliment my card.


I used the mini word inspire, a left over piece from the French garden border casing and a chipboard butterfly. I primed the chipboard with gesso and used texture effects paste on the title and border and then glass bead gel and ink on the butterfly.


I also added a large handmade rose (tutorial to follow soon) and surrounded it with a few more flowers.'


This card is so gorgeous & shows how the strip can be used - well done Vicky. Love the hand made flower - scroll down for Vicky's tutorial.

TUTORIAL - SHABBY ROSE

My finished rose is 3 inches wide and 1 inch in height. I used punches that ranged from 1.5 inches to 3.5 inches to achieve this flower.


WHAT YOU WILL NEED:
*8 punched or die cut flower petals in 4 different sizes and shapes with rounded ends.
*2 gelatos (or watercolor paint)
*water mister
*paintbrush
*thick rounded tip object (I use a sharpie marker)
*white glue - like Helmar Acid-Free
*white gesso or ink of choice

STEP 1: Smear or shave/scrape little chunks of the gelatos into a plate (I shaved the light pink and smeared the dark one) and lay your 8 flowers on a plastic or glass surface. Gelatos wash up easily and do not stain.

STEP 2: Mist the light color with water and apply to all 8 flowers. Here is a picture of my first 4 done.

STEP 3:  Mist the darker color with water and apply to petal tips. Note that colors will blend and get lighter as they dry.

STEP 4: Scrunch up each flower around a rounded object (like a sharpie marker) and roll against it to create a cup shape.

STEP 5: On one of your two smallest flowers, pinch the end to create a bud. Let all 8 of the flowers rest in this shape for a few minutes to dry a little.

STEP 6: Slightly open up the 4 larger flowers and glue together, off setting the petals (largest flowers on the bottom). I put a little dab of glue up the sides too to hold it together and stiffen as it dries.

STEP 7: Once the 4 larger flowers are glued, roll again around the marker to bring back to a cup shape.

STEP 8: Do the same thing with 3 smaller flowers, leaving out the bud. Again, the larger flowers are on the bottom.

STEP 9: Glue everything together and let dry in this shape. Note that the colors will get lighter as they dry.

STEP 10: Once dry, shape a bit more by opening it up and folding back a few petals. Then, I dry brushed a bit of white gesso on the tips for a shabby look and to stiffen so the rose will not easily crush. You could ink the tips instead of gesso for a more traditional look. TIP: Smaller flowers can easily be made by only using 6 flower layers.

Thanks for sharing this tutorial with us Vicky - the rose is so gorgeous & elegant

Bye for now
Meg
www.megsgarden.com

25 April, 2013

Elena's published layout

Hello Bloggers

Elena shares this layout with us - she has actually used one of the Christmas papers for her background. She calls it 'Magic Winter'


Another multi layered LO from Elena - well done - really gorgeous.  The beads are fabulous & I love the embellishing of the paper flower.

Bye for now
Meg
www.megsgarden.com

Design team retirees

Hello Bloggers

This month we have several of our Design Team retiring:

Elena
Evgenia
Jenny
Ulrika
Vicky

We wish them all the best with their papercrafting projects & thank them so much for their fabulous projects designed specifically for Meg's Garden

Bye for now
Meg
www.megsgarden.com

22 April, 2013

Elena does a multi layered Layout

Hello Bloggers

The Ode to a Summer's Day Collection is the focus of this project by Elena & she explains:


'To create this LO I used Ode to a Summer Day Collection. It is so amazingly beautiful.
I applied gesso on the background sheet - Summers's Dance , then misted through Lace Doily Circle 25 with colorant and let it dry.
Then I made some fussy cutting from Summer Bouquet and Summer Beauty.
Added some stamping using La Blanche Script Stamp.


Fibres: Springtime Flurry, Cream Medley
Flowers: Mini Rosebuds - lavender 1cm'


Beautiful Elena - well done.  How gorgeous are the flourishes picking up the other touches of blue?  The layering is totally awesome with the main paper, then the round doily, then the fussy cutting & finally the photo with its papers frame & then a chipboard frame.  Did I miss any layers?  The fibres add so much texture & softness with the final touch of tiny rosebuds & butterfly.

Bye for now
Meg
www.megsgarden.com
20 April, 2013

Fussy Cut Flowers

Hello Bloggers

Denise Ann, our Designer, shows us how she fussy cuts & uses the Ode to Summer Collection.


German scrap adds a touch of gold

Fussy cut flowers
Beautifully done Denise - well done.  You have shown us how all of the papers work well together. Love how you have added pieces from other Collections & the flowers are fantastic - the highlighting on the edges makes them stand out. I totally love Tim's ornate plates


Bye for now
Meg
www.megsgarden.com

18 April, 2013

Gayle also uses the new papers in Mixed Media

Hello Bloggers

Gayle also has some fabulous ideas for you on how to use the new papers.

She calls her layout 'Little Joys'


Products used:        
THE ROSE GARDEN COLLECTION - PALE BLUE ROSES
ODE TO A SUMMERS DAY COLLECTION - SUMMER BEAUTY
THE ELEMENTS COLLECTION
                  VINTAGE TAGS
                  VINTAGE ORNATE TAGS
                  OLD WRITING
                  OLD WORLD TIME
                  TRANSPARENCY - BUTTERFLIES

Ode to a Summer's Day Collection
Rose Garden Papers
Elements Collection

Fabulous LO Gayle - well done.  You have taken some papers & created a mixed media effect on them & then added some pieces from the Elements Collection to add interest & excitement. Beautiful & exciting.

Well bloggers - you have now seen 2 different approaches using the new papers - Vintage Elegance & Exciting Mixed Media.  Now you have to try your own approaches & have fun - that is the name of the game.

Bye for now
Meg
www.megsgarden.com
 

16 April, 2013

Adriana plays Vintage with the new Elements

Hello Bloggers

Adriana has taken the new Elements papers & created these awesome tags & a Card.

'Hi there everyone,
Today I have created for you all a card and framed tag project.
Using the some of the new Vintage Elements papers from Meg's Garden.
I just love vintage images and could not wait to play
with these elements.
First, are 2 vintage tags which I framed inside
inside a Kaisercraft  beyond the page photo frame.

I applied gesso around the edges of frame and while still
wet I gathered pieces of muslin, using the gesso to adhere the muslin
to the frame, this gives a very shabby effect to it.
The background paper inside each pocket is the
 Dusty Pink Roses P6341 - The Rose Garden collection available
from Meg's Garden

Vintage Frame

The tags are covered with the Music sheets and Old Writing 1 - P2061 papers
which are NEW available from Meg's Garden website

Close up of Vintage Lady Tag

I covered the tag with the Old writing paper
stamped the La Blanche fence and lightly coloured
with distress markers
Cut image and ornate tag then
place the image inside the tag
I then adhered photo corners around
the Ornate tag.

Materials all from Meg's Garden website for the Vintage Beauty tag
Vintage tags elements 1031 (NEW)
Vintage Beauty images
La Blanche Stamp
German border scrap
Cream Lace
Paper Flowers - Asssorted Flowers
Silver Diamonte Trim
Pearl drop Jewels

Close up of Vintage Child Tag


I covered the tag with the Music sheet , inked around the whole tag
I fuzzy cut the ornate tag and place the photo
image of the French child inside
cut out the flowers and bird from collage sheets
The leaves were stamped with Black ink
then I coloured each one with Distress Inks.


Materials for the Vintage Child tag
Vintage French Girl 2 ATC034
Vintage Ornate Tags 1036 (NEW)
Vintage French Floral postcards ATC036
La Blanche Stamp
Paper flowers Asssorted Flowers
Pearl drop Jewels


White lace, German border scrap & La Blanche leaf stamp
Silver Diamante Trim and paper flowers
all available from Meg's Garden website

Next I have created a Vintage Lady Step up Card with 
one of the Vintage Beauty Images and the papers
from The Elements Collection - Old Writing 1 (NEW)


using the Vintage Ornate Tags
The Elements Collection - Old Writing 1 P2061 (NEW)

Meg's Garden website - Asssorted Flowers and green leaves

Check out all materials available from Meg's Garden website
or here below are quick links to all the products 
available from Meg's Garden website

Thanks for looking, 
Have a great Day,   Cheers Adriana :)'
 
 
Thanks Adriana - aka 'The Vintage Card & Tag Queen' - well done. I think you have used almost all of the embellishments in the shop. Fabulous effort.
 
You have really showcased the new Elements papers & given the bloggers lots of ideas on how to use them.
 
Bye for now
Meg


15 April, 2013

What are Elements??

Hello Bloggers

By definition Elements are:

  • One of the simplest parts of which anything consists
  • the simplest or essential part of anything
  • something small

We applied this concept to the 'anything' of papercrafting & came up with this collection of papers & transparencies.

The papers have been designed to cut, tear, distress edges, add colour with any of your colouring tools & more. The music papers have been done on a white background so that you can distress them to suit your project - blue, brown etc.

The papers are available in the pack or individually & there will be more to come.

The top 8 papers are A4 size, the next 2 are A4 transparency - a pack is available along with 12 assorted old book papers.

The last 2 papers are 12x12" with a 4x12" strip.

The Nightingale Song page 1  1032

Vintage Tags  1031

The Nightingale Song page 2 1033 

Vintage French Writing 1034

Vintage Map 1035

Ornate Tags 1036

Old World Time 1037 (also in transparency)

The French Cinema 1038

Old World Time transparency Tr1037

Butterflies Transparency ATC015

Old World Time P2063


 Old Writing P2061


The Elements are available at  Elements
 
Bye for now
Meg