Showing posts with label Envelope. Show all posts

19 March, 2018

Gift envelopes with alchemy 101 | Marina Gridasova

Hello Meg's Garden fans!
Marina is here today and I want to share with you my new projets with  Alchemy 101 collection. You know this is vintage collection with mixed-media look but also it's perfect for men works. Want to see the proofs? Here they are!  :-) Three different gift envelopes with one Alchemy 101 collection :-)
the first one
 some close-ups:


 I wanted to create different works, so decided to use contrast papers and here background is in cold grey tones and central cluster is in warm brown tones. For all envelopes as first step I fussy-cutted all the details from Ephemera sheets and after just layered all of them before got the perfect result.

the second one:
 details:


 here I used warm colors for the background and added dark elements for the contrast. the big clock is perfect for the main accent :-)

and the last one for today
 a few details:


this envelope is my fav :-)  because it is in light colors, despite the vintage appearance of the collection and the abundance of brown. and the best part of it this little pretty tag :-)

Hope you were enjoyed and inspired by my works and this collection and will create your oun Alchemy 101 projects!
Have a great day,
Marina.

06 July, 2016

Two envelopes

Hello, everyone!
Veronika here to share with you my two envelopes with  papers from Watercolour in Blues collection from Meg's Garden.
This time the main colour of collection is blue, but I love how it looks with violet and pink too.


 List of materials available from Meg's Garden
Watercolour in Blues collection
Vintage Trinkets Lace Flowers & Leaves 
Please check out all the wonderful products on
Thanks for looking, Veronika


28 April, 2016

Mothers Day Inspired Gift Set


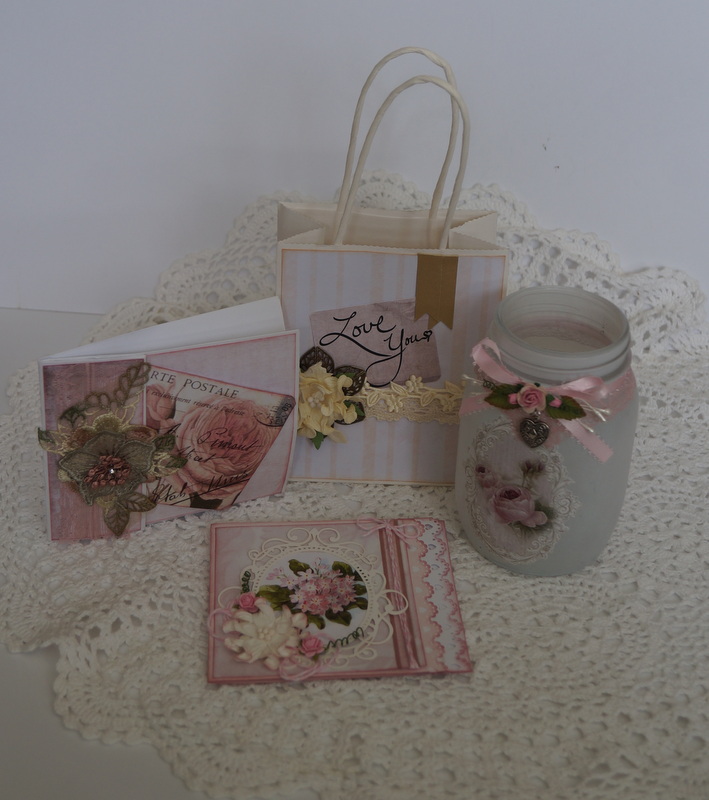
Hello all and welcome to my post for Meg's Garden.  Today's project has been inspired by Mother's Day, which is just around the corner.  I have created a unique and softly feminine gift giving collection.  The beautiful colours and soft tones in the Rose Quartz Papers lends itself perfectly for that special gift for Mum.

 My first two creations are a card and matching paperbag envelope that I have altered to

 To create the paperbag envelope, I have folded the base of the paper bag up and glued down both sides to create a pocket for one of the Cut and Create  tags


and I have slipped my card into the bag opening.


 My card is quite simple, just a piece of folded baby pink cardstock.  I have used a border punch down one side and also accented with a white cardstock border.  I have used more of the Cut and Create sheet, large Gardenia, dusty pink ribbon, twine, baby paper roses and a fancy frame. I have inked all my edges with Tim Holtz Victorian Velvet Distress ink.


 I have also added the punch borders to the inside of the card.


My next creation from this gift set is an altered white glass jar.  I am sorry readers, but I have no before pics, but I do have a bit of a tutorial on how I added the Cut and Create label.

I fussy cut one of the labels from the Cut and create sheet.  However I found that the paper was a little thick and wanted to crinkle around the edges.  So I decided to gently rub back some of the layers.  I gently spritzed the back of the label


 and then ever so lightly, I rubbed the back of the label till it started to "ball up".

 I repeated this a couple of times, being very careful not to rip or remove too much.
 Once I had removed enough layers  that the label now sat flush, with hardly any wrinkling or crinkling, I glued it into place with some mod podge.


and then sealed it with some Jo Sonja's decoupage varnish.


 And last, but not least is my gift bag.  I have a few of these little craft paper bags in my stash and this was the perfect size for my altered jar.

I have used ....... Rose Quartz to decorate the front and the back. To embellish I have used the large metal filligree rose and layered a cream gardenia to it.  I have also used the cream trim and lace from our kit.  I fussy cut   the "Love You" tag from the Cut and Create to tuck in behind the flower as an added sentiment.


Items I have used to create my projects are:-


Thank you for joining me today.  
....till next time
remember to live your bliss......
✿ღ.~♥  Much Love ♥~ღ.✿

10 October, 2013

When Meg's Garden becomes Versaille's Garden

Hello Bloggers

This is what Sylvie calls this small shabby chic card and its matching box envelope & she explains this beautiful project: 
 
I cut in differents papers: Birds in Forget me Nots P6303A, Old Writing from the Element Collection, Old World Time 1037; Summer Beauty from the Ode to a Summer's Day Collection, Antoinette 3373A.

This is what I like about Meg's Garden papers; there are so many small patterns that can be kept & all the paper falls to create  an entire  project... I love above all flowers and foliage..Just take a look at the card frame or the Eiffel Tower embellishment at the  back of the card to see how these small patterns work together to adorn themselves as a part of the project.
 I used  paper lace doily square to create an envelope. I just  folded the doily paper and I stiffened it with cardboard. I then cut another lace doily paper and this time I kept the pattern inside the square. I colorized it with pastel Brown chalk. To finish I used gesso on the flowers, round silver diamante trim and  iridescent gold paint on the frames to remind me of the gilding of the castle of Versailles and its gardens...


What a beautiful card & box envelope - well done Sylvie.  The way you have put so many different papers together is fabulous & each of the embellishments & elements is terrific.

Papers used:

Bye for now
Meg
www.megsgarden.com