Showing posts with label Tag. Show all posts

19 October, 2020

Tag Your It...

  Hello everyone & welcome!

Leanne here with you today & I have a Large Tag I would love to share.

I have created my tag with these stunning digital patterned papers called Lavender & Mint. They are available to purchase from Meg's Garden Papercraft Etsy Store. 


 I love to create tags in different sizes. They are wonderful to add to gifts, as home décor, to use as a decoration and to hang on a door knob. 

 
Simply make:

My large chipboard tag measures,14 x 21cm. 
Trim digital patterned paper to 14 x 21cm, trim to fit tag shape, paper distress the edges, then ink edges with distress ink milled lavender before adhering to chipboard.
Add lace trims along bottom edge of tag as shown.


Fussy cut & die cut ephemera pieces from the cut & create sheets, ink the edges then arrange pieces before fixing in place.
The wording has been adhered with 3D foam tape.


To finish add cheese cloth, paper roses, self-adhesive pearls, and some lace to hang your tag.


Until next time.
Thank you so much for stopping by,
I hope you have a wonderful day & happy creating.

18 April, 2019

TAG BOOK

Hi everyone,

I’ve been having a play around with the new “ART TAG” download. As a junk journaler, I love tags. They are so versatile, they can be decorated just be pretty or they can be very practical and be used for journaling. For this blogger post, I've done a bit of both...a TAG BOOK...


I’ve used two of the tags to make the tag book

I’ve attached the two tags to a piece of cardstock leaving a gap in between the tags so I could fold the cardstock along the gap, this the made the cover of tag book. I was then able to sew in some pages into the fold. Then I added an eyelet, a string closure and decorated. The tag book could easily slip into a pocket for extra journaling space or be a stand-alone mini book for journaling and photos.


Till next time HAPPY CRAFTING

Jacky


27 February, 2019

HOW DOES YOUR GARDENS GROW

Hi Everyone

I’m Jacky and I’m one of the new design team members and I’m really excited to be here. I’ve been a customer of Meg’s Garden for a very long time. Her store was always one of my first visits at the Stitches and Craft shows.

Anyway on to my first Blog post... I’ve made a BIG tag (8x4) from some blue Cardstock and have done some ink blending on white cardstock at the bottom of the tag to resemble a grassy field.... I’ve then used Megs PAPER FLOWERS on wire and attached  them to the tag so they look like they are growing. I’ve then used one of the titles from the SPRING FLOWER CLICK and CREATE, the words are beautiful and I just love the font! These titles print on white but you can easily use your inks or chalks to customise them or even print on coloured paper.

Till next time, happy making stuff

Jacky

16 October, 2018

Tag it with flowers

Hello everyone & welcome!

I would like to share with you today a tag I have made using the gorgeous Vintage Journal cards series called Vintage flowers. As well as some of the pretty A4 watercolour paper plus lots of goodies from Meg's garden online store. 
I love to create tags as they are a wonderful decoration to add to any gift.

The base of this tag is made from heavy cardboard.
A black die cut scalloped boarder was added to the right hand edge as shown. I like how this adds a touch of dramatic elegance and also picks up the colour from the butterfly and berries.
Next I traced the tag shape onto a sheet of A4 watercolour paper. I then cut out the tag shape. I have paper distressed and inked to the edges before adding this to the cardboard tag base.


A layer of patterned paper and lace was added next. The flower card was matted onto some coloured cardstock before this whole piece was mounted onto 3D foam tape and fixed in place.
Paper flowers and silver beads decorate the tag. I have finished with a black organza bow and a touch of glitter. 
Until next time.
I hope you all have a wonderful day and happy creating.
LEANNE

14 September, 2017

Audrey Doll Tag


Hello everyone! Today I have a tag to share with you. I bought a few of the Julie Nutting doll stamps a while ago, and I haven't used them for ages. As I had some left over papers from some projects, I thought it would be a great way to use both!

Firstly, I stamped the image twice and die cut them out using the coordinating dies. I stamped the dress onto left over Lavande paper and the face and legs section onto text paper. To colour the face and arms I used copic markers E000, E000, E11 and R20. To colour her hair I used E50, E55, E57 and E59.

To accent areas of her dress, I used copic markers BV000, BV11 and V17. I did some random stamping of butterflies and script over her dress to add some texture. I coloured her waist band in using some clear wink of stella. These flowers are from my stash, and they complement the doll and the papers.

I used the same skin tones to colour her legs. I used a black copic marker and the clear wink of stella to colour her shoes.

Some ribbon, seam binding and butterflies complete the tag.

Supplies:

Meg's Garden : Lavande Collection and White Flowers on Green


Thanks so much for stopping by Meg's Garden today.

Hugs from Cathy


24 July, 2016

Like from Attic..Part 1

Hi my lovely artistic friends,

  I've got small poem ;-)...

    Blue is the color of blueberry pie,
   A blue jay's feather and the bright moon sky.
   Blue is the color of ocean scenes,
   Picasso's art and my favorite jeans.

...yes "blue" is the major point of new,breathtaking collection "Watercolour in Blues" from Meg's Garden shop. I adore blue color and together with brown is most amazing and eye catching mix I thing. Therefore I couldn't resist start make my new project in this way.I can say that is something I never made before and I really hope you will like it as I do ;-) ...


...as this is "part 1" I will show you just a part of final project,but I have small photo tutorial for you, so hopefully you will enjoy create from this beautiful collection as I did.
  Here is my small tutorial for very easy and beautiful tag...


...when your embellishment will be ready glue it on a tag and start decorate with flowers & leaves..


..on the left underside of flowers stick small bow with rose in a middle...


...don't forget decorate left top corner with small pearls..


One more project belong to this "part 1".I don't have a tutorial for this but I will explain more in video which will be post in "part 2" of my project ;-)


 I hope you found some inspiration to create with Watercolour in Blues collection ;-)
If I can give you small tip, go pop up to Meg's Garden Blog check out amazing creations from Meg's girls.So many inspirations waiting there for you.
  It's all from me for today.Thank you so much for stopping by.
Have a wonderful time.
Hugs Eva xx

20 February, 2016

Creating with the Chantilly Cream Papercraft Pack - Margaret Mifsud

Hello crafty visitors and welcome to Megs Garden Blog.  Hope you are all having a wonderful day.

I have been having a fabulous time working with the new Chantilly Cream Paper Collection.  This paper collection is exclusive to Megs Garden and I must say I am totally in love with these papers.  They are gorgeous.  Beautiful creamy colours and suitable for so many styles of projects from Vintage to Shabby Chic and anything in between.

I would like to share two cards and a tag that I have created with the Papercraft Mini Pack.  This pack is like a mini kit and is ideal for all of your smaller projects such as cards, tags, ATC's and even mini books.   You get 6 sheets of papers measuring 8.5" x 11".  Three of these sheets have 2 designs at 5.4" square with two matching mini strips on the side.  The other three sheets are full of ephemera and you can order it in either the printed version or the download version.  The download version is fabulous because there is no waiting for delivery.  You pay for your purchase and download straight away which means you can buy your papers and start creating on the same day ..  how awesome is that??  To take a closer look at this Papercraft Pack HERE is the link.

So, on to my creations.  First up is the tag.


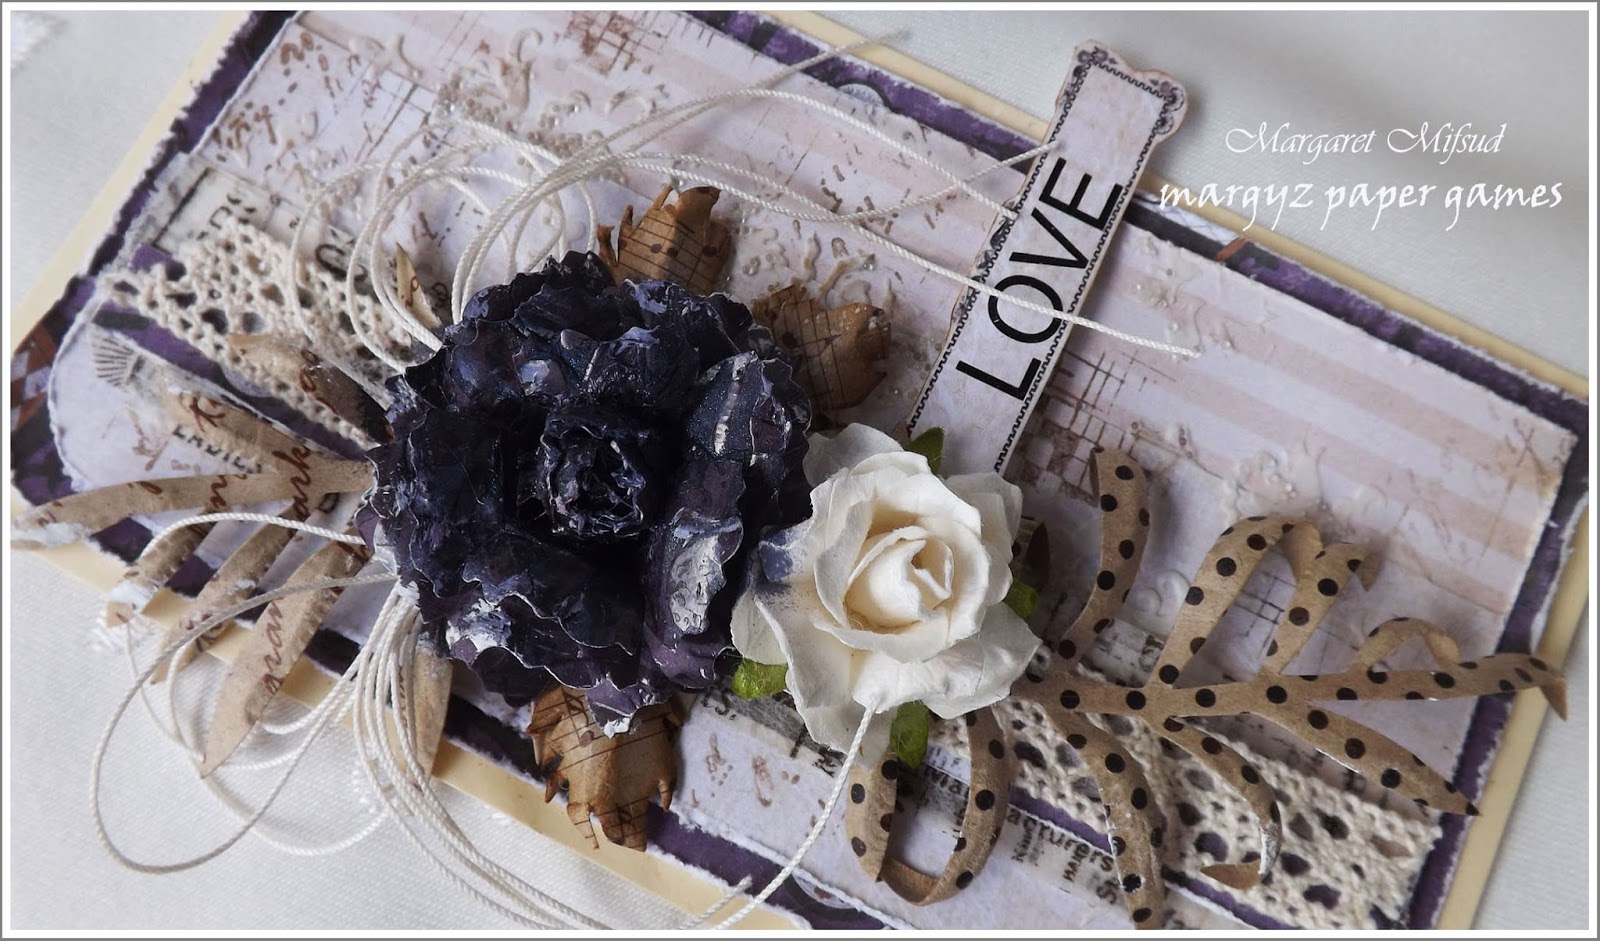
I used two of the mini strips for this tag.  To complement the neutral tones of the paper, I decided to use purple and tan .. I think these colours look really great together. I also did a little stamping with my fave stamps and added some texture paste through a stencil.


While the texture paste was still wet, I added some clear micro beads for some added texture.
The large bloom was one I actually handmade a long time ago.  I found it in a forgotten corner of my stash and felt it suited the tag beautifully.   The bow was made with some knitting cotton which is not quite as stiff as twine so it has a softer look to it.


The white rose is the 'puffy paper flower' available from Megs Garden and one of my fave 'go to' flowers.   The cotton lace is also available from the Garden but the fern is from my stash.  I will leave a list of Megs Garden products at the end of this post.


The 'Love' label is from the ephemera which comes in the kit.  It was simply fussy cut and then mounted on some card stock.


I love creating tags but don't always have a use for them so what I usually do is mount them onto some cardstock and turn them into cards and that is what I'll do with this tag.

So, onto my cards.  Here is No. 1.


 I used one of the 5.4" squares for this card.  My go to size for square cards is 5.5" x 5.5" so, as this is double matted, I did need to trim the paper to fit.  Used 'Gathered Twigs' Distress Ink through a Tim Holtz stencil for some added interest and distressed all the edges.


This flower is another treasure found  in my stash.  Have no idea where I got it from.  Originally it was brown so, to match in with my colour scheme, I sprayed it with Afraid of the Dark Glimmermist.  It has a lovely shimmer to it although that doesn't show up very well in the photo.  Swiped it with a little gesso to add some highlights.


I used some of the ephemera from the pack for my layers.


Border punched some Kaisercraft papers (the only purple paper I could find in my stash) and then pleated it and tucked it under the layers.  This was an idea I lifted from Nancy Border Dynes.  I love that bit of colour peeking out from underneath.


For this next card I also used the ephemera from the pack.


There are several different floral images in this pack and I felt this particular one went well with the other elements on the card.  The pretty lace attached at the side is, of course, available at the Garden.


All of these flowers are available at Megs Garden.  I used 'Sugar Plum Fairy' Glimmermist to alter the colour to match in with the image. 


A little bit of mesh and some cotton thread was added for extra interest and texture.

Megs Garden products used

Chantilly Cream Papercraft Mini Pack
New Cream Lace 12mm
Lace 1.6cm wide
Puffy Paper Flowers
Cherry Blossoms
Gold Pearl Stamens

I hope I have given a little inspiration for you to try Megs Garden papers and embellishments for yourself.  While you are here, why not scroll down and take a stroll through the Garden and take a look at all the wonderful projects created by my Teamies.

Thank you so much for visiting and do enjoy the rest of your day.
Take care and God Bless.

oxox Marg


30 July, 2014

The Sky's the Limit by Angela Johnson

Hello all my crafty friends.
Today I am bringing you my very first Design Team Project for Meg's Garden.
When I first received my papers from Meg's Garden I was so excited, the papers were gorgeous.
The only problem was, because I liked them, I didn't want to cut into any of them.
Well, that wasn't going to get me far was it.
So I took a pair of scissors, took a long deep breath, and cut into a sheet.
For this month's project I choose to work with The Gentleman's Collection
designed by Kerry-Jean Watson.
The papers are beautifully distressed and aged, and are perfect for masculine projects.
I thought this canvas would look great hanging in a gent's office for some inspiration when needed.


 This paper collection just called to me.
I love hot air balloons; I think they are majestic and awe inspiring.
I still remember around 17 years ago travelling to work at 5am and seeing their outlines
in a misty sky. Simply Beautiful.

For this project I wanted the look of a sunrise, so I cut 2 strips the size of my canvas.
I then cut both sheets at one time so the rays would line up.
I distressed and inked all my edges with Vintage Photo.
I also moulded each balloon and banner gently to give them a 3D look.
For the quote, I took the commonly used 'The sky's the limit' and added to it.
I really like how it turned out.

Meg's Garden Products Used
Other Products Used
Vintage Photo Distress Ink
4" x 12" Canvas
Matisse Turquoise Background Paint
Black Sharpie

But wait, there's more.
What did I do with all the leftover pieces of paper?
I made a card and a tag of course.

The first is quite a masculine tag.
I just loved playing with that starburst/sun ray pattern.


Meg's Garden Products Used
Other Products Used
Vintage Photo Distress Ink
Kraft Cardstock
Turquoise Brad
Yellow Leaf and Blue Flag
Recycled Packaging
For my tag however, I wanted to take the papers in a different direction.
I wanted to show the versatility of The Gentleman's Collection.
I created a feminine tag with lots of Meg's Garden embellishments.
  Meg's Garden Products Used
Other Products Used
Victorian Velvet Distress Ink
 Sheer Ribbon, Gold Bottle Cap
Chocolate  Pearls
Recycled Packaging (used as Tag base).

Thank you all for stopping by and happy crafting to all.