Showing posts with label Chantilly Cream Papercraft pack. Show all posts

23 February, 2016

Chantilly Cream Folio Mini

Hello everyone it's Patti here today sharing a new folio mini I've made.  I'm wondering if you're like me.  Do you have things in your crafty cupboard that you've pulled out often only to put them back again because you just could visualize what to do with them?  That's been my case with the Tim Holtz small folio.  I couldn't wait to get it and then didn't know what to do with it once I had it.  Well that all changed with I received my last Design Team package from Meg's Garden.  I knew immediately that I had been saving that folio for the Chantilly Cream Collection.


I added the beautiful Organza Lace Flower over the top of the Jute and Mesh Ribbons and topped it off with a dragonfly charm.  On the right flap I added an oval trinket and glued a brad I had in my stash (prongs cut off) to match the one I'd added to the Wish at the bottom. I added some Faber-Castell Whipped Spackle which I had mixed with a Bronze Pearl X powder and applied it with the help of a 13 Arts stencil called Cozy Evening. To complete my front I misted the front cover of my Chantilly Cream dot paper with Tattered Angels Dazzling Diamonds and Candlelight Glimmer Mist. 


Because the folio expands out and up when opened it was a little trickier to get photos for you today that did it justice. When you watch the video walk through it will show you in much more depth how these pages interact.  


I simply adore the images in the Chantilly Cream Cut and Create ephemera papers including this little girl, in fact I used her image in a couple of spots in my folio including here on the front inside cover. After fussy cutting her out I backed her with Kraft cardstock and inked her heavily with Tim Holtz Distress ink in Ground Espresso.  I tucked flowers from the Fantasy Blooms Ochre pack into her hair and bodice.  Leaving her open on two sides allows my to tuck in my folded photo folder behind.


This shows the first flap of my folio and I've included this small photo of the folio before I started altering it.  The little flaps in the front are the ones in the photo above only turned vertically.  I added graduated pages to the strips which include my decorative pockets, embellishments and areas for tuck ins.  Above you can see I added a diagonal belly band across the bottom to act a stopper for the inserted mats.  Using the Mesh Ribbon over the Kraft Cardstock is a winning pair and then adorning it with the fussy cut butterfly completed my first flap.  I did leave an opening on the side for a tuck in mat.  The solid mats are all cut from the Kraft cardstock, inked with the Tim Holtz Distress ink in Ground Espresso and Corner Chomped with a combination of one or more of the Scallop and Cloud edges.  Notice at the top  you see how you can take just a small snippet from the paper (the stamp and botanical) and when fussy cut makes the perfect tuck under for your mat.  Using just one tassel cut from the strip was enough to finish it off the end of my band.


Here is the next flap in my folio. I created a clustered pocket with the little scraps I had left over. This is a fantastic way to use up little bits and bobs you have left.  Start with a solid base behind and then glue your bits on top until you get the look you like.  I do several practice runs just placing my little scraps here and there until I get a look that is pleasing to my eye and then begin gluing them down.  I trim away the excess to create the straight side and bottom and then ink the edges.   


Here is the front of the next flap, I cut the pre-made strip that came with the folio into two sections and removed the extra pieces so I could have the two swinging pockets. 


Here's the back side of those same pockets.  You can see where I've reused my cute little girl and fussy cut a panel from the paper to create the belly bands.


The next flap is placed toward the middle of the pre-made folio flap and then the excess top and bottom is cut away so you have a 5 1/2" square pocket (this is from the Cardmaker pack).  I again took a few of the cut and create pieces to make my stopper across the bottom. Shown on the small photo to the right is the back of this swinging pocket.  Using an element from the collection I created a wide belly band to tuck my photo booklet into (this is an 8" x 4" piece of inked Kraft, scored in the middle and then folded to house 4 photos.

As each of the folio strips advance I increased the width of my pockets so that you get larger and larger photo mats either tucked on the front as shown here or in the side pocket these areas are large enough to hold 5" x 7" photos.


I used the frames from the collection and extended them across the two pages to create bottom pockets.  The inserted mats are adorned with fussy cut butterflies.  I glued the back of the butterfly completely down on the back of the mat but left the bottom front of the butterfly loose to tuck the photo underneath.


Now that I'm almost to the end of the folio the page is really large allowing for a good sized mat in the pocket and under the belly band.  Again I've used snippets from the paper for embellishing the jute and lace band and adorned the side with one of the Fantasy Blooms.


You know that old saying, I saved the best for last?  That's how I feel about this page, I often say a project takes on a life of it's own and that's the feeling I had here.  I loved how the page flowed together with the lace, mesh ribbons, butterfly and pockets.

Please join me on the video where you'll see a much more in depth look at the page and pockets.  All supplies to Meg's Garden will be linked directly below the video.  I'd be most extremely if you visited me at A Soul's Heartbeat either on Blogger or Facebook.


Supplies from Meg's Garden of Papercraft Delight


20 February, 2016

Creating with the Chantilly Cream Papercraft Pack - Margaret Mifsud

Hello crafty visitors and welcome to Megs Garden Blog.  Hope you are all having a wonderful day.

I have been having a fabulous time working with the new Chantilly Cream Paper Collection.  This paper collection is exclusive to Megs Garden and I must say I am totally in love with these papers.  They are gorgeous.  Beautiful creamy colours and suitable for so many styles of projects from Vintage to Shabby Chic and anything in between.

I would like to share two cards and a tag that I have created with the Papercraft Mini Pack.  This pack is like a mini kit and is ideal for all of your smaller projects such as cards, tags, ATC's and even mini books.   You get 6 sheets of papers measuring 8.5" x 11".  Three of these sheets have 2 designs at 5.4" square with two matching mini strips on the side.  The other three sheets are full of ephemera and you can order it in either the printed version or the download version.  The download version is fabulous because there is no waiting for delivery.  You pay for your purchase and download straight away which means you can buy your papers and start creating on the same day ..  how awesome is that??  To take a closer look at this Papercraft Pack HERE is the link.

So, on to my creations.  First up is the tag.


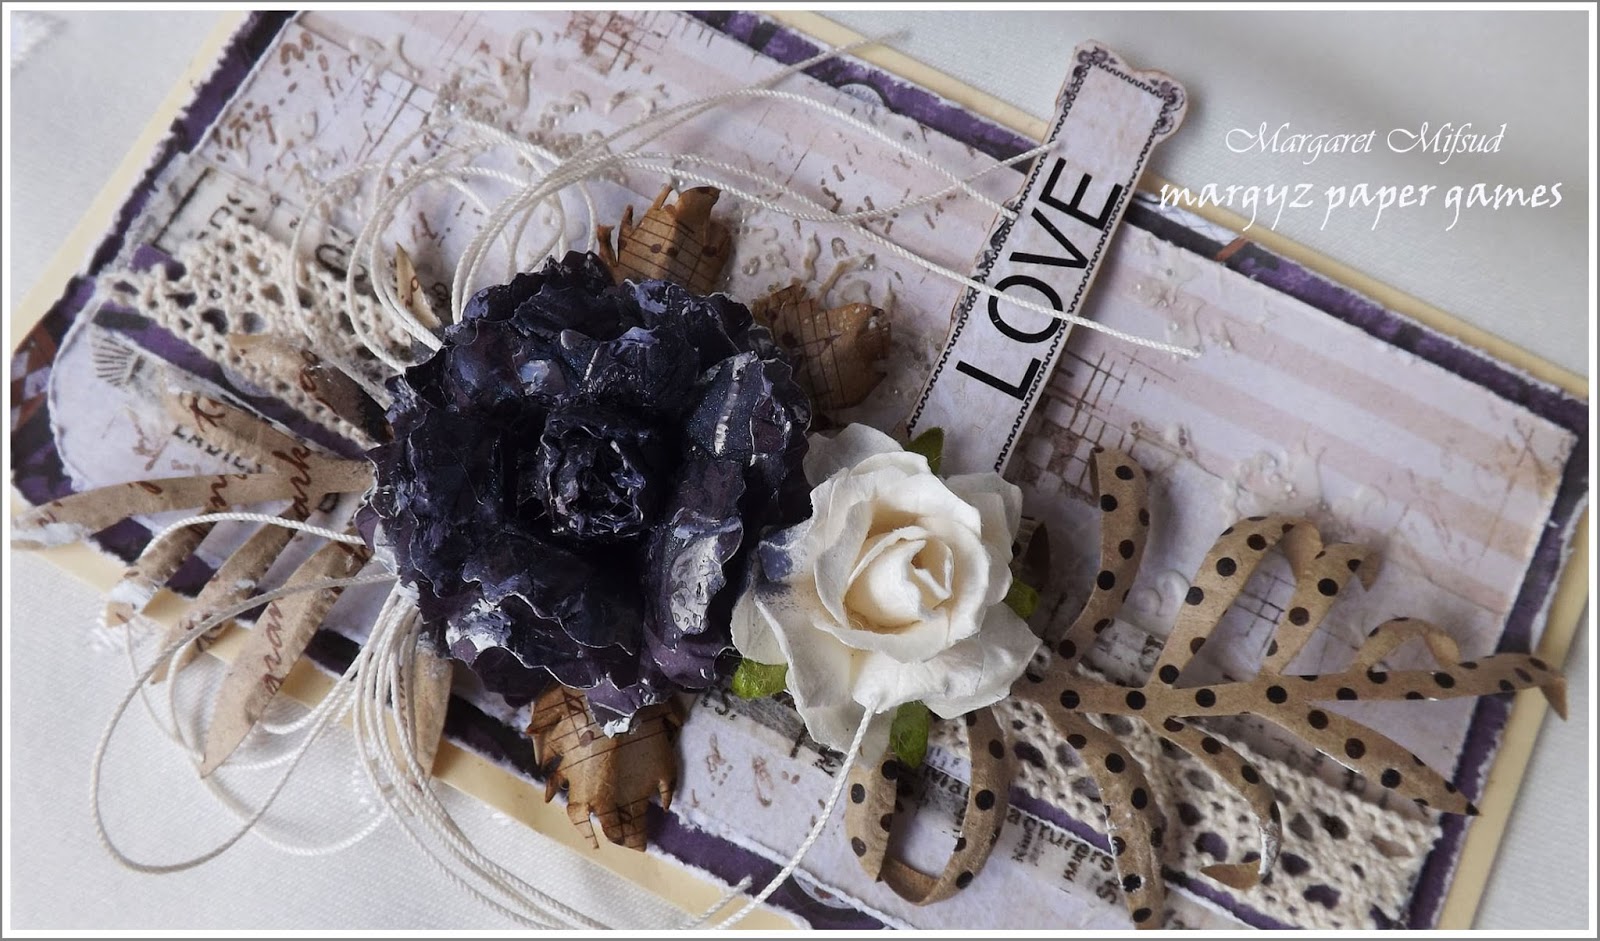
I used two of the mini strips for this tag.  To complement the neutral tones of the paper, I decided to use purple and tan .. I think these colours look really great together. I also did a little stamping with my fave stamps and added some texture paste through a stencil.


While the texture paste was still wet, I added some clear micro beads for some added texture.
The large bloom was one I actually handmade a long time ago.  I found it in a forgotten corner of my stash and felt it suited the tag beautifully.   The bow was made with some knitting cotton which is not quite as stiff as twine so it has a softer look to it.


The white rose is the 'puffy paper flower' available from Megs Garden and one of my fave 'go to' flowers.   The cotton lace is also available from the Garden but the fern is from my stash.  I will leave a list of Megs Garden products at the end of this post.


The 'Love' label is from the ephemera which comes in the kit.  It was simply fussy cut and then mounted on some card stock.


I love creating tags but don't always have a use for them so what I usually do is mount them onto some cardstock and turn them into cards and that is what I'll do with this tag.

So, onto my cards.  Here is No. 1.


 I used one of the 5.4" squares for this card.  My go to size for square cards is 5.5" x 5.5" so, as this is double matted, I did need to trim the paper to fit.  Used 'Gathered Twigs' Distress Ink through a Tim Holtz stencil for some added interest and distressed all the edges.


This flower is another treasure found  in my stash.  Have no idea where I got it from.  Originally it was brown so, to match in with my colour scheme, I sprayed it with Afraid of the Dark Glimmermist.  It has a lovely shimmer to it although that doesn't show up very well in the photo.  Swiped it with a little gesso to add some highlights.


I used some of the ephemera from the pack for my layers.


Border punched some Kaisercraft papers (the only purple paper I could find in my stash) and then pleated it and tucked it under the layers.  This was an idea I lifted from Nancy Border Dynes.  I love that bit of colour peeking out from underneath.


For this next card I also used the ephemera from the pack.


There are several different floral images in this pack and I felt this particular one went well with the other elements on the card.  The pretty lace attached at the side is, of course, available at the Garden.


All of these flowers are available at Megs Garden.  I used 'Sugar Plum Fairy' Glimmermist to alter the colour to match in with the image. 


A little bit of mesh and some cotton thread was added for extra interest and texture.

Megs Garden products used

Chantilly Cream Papercraft Mini Pack
New Cream Lace 12mm
Lace 1.6cm wide
Puffy Paper Flowers
Cherry Blossoms
Gold Pearl Stamens

I hope I have given a little inspiration for you to try Megs Garden papers and embellishments for yourself.  While you are here, why not scroll down and take a stroll through the Garden and take a look at all the wonderful projects created by my Teamies.

Thank you so much for visiting and do enjoy the rest of your day.
Take care and God Bless.

oxox Marg


07 February, 2016

Wish card with Chantilly Cream by Katrina Thompson

Hello everyone. It is very exciting to be sharing with you all, my first DT project here at Meg's Garden. All of the beautiful images I have used are from the Chantilly Cream Papercraft Pack and the background print is from the Chantilly Cream Book Kit. A step by step follows:


I have cut the images in the Papercraft pack to use as features on the card.

 Gesso the Small Rectangle Parisian Frame then dab with various coordinating inks until you get a desired colour. It will dry a lot lighter as the gesso acts like a resist.

Insert your image behind the frame then add the Antique champagne tassel and the Tattered net trim.

I have used an assortment of the Organza Lace flowers with diamante. Cut varied portions and reconstruct them to make your own unique flower set.

        Cut a section from the middle of the background paper so your design fits nicely into the arc.

Once you have all your elements prepared attach all your pieces. I have popped some muslin behind the image to soften and age and then some seam binding  to dangle from behind the feature flower.

                Dab around the edges of your coordinating cardstock to create an aged  look.

This flower has been inked and scrunched to coordinate. It is the Cornsilk flower pack in the fabric flowers section of the website.

                      To complete, I have added a few diamantes onto the flowers in the background.

Thankyou so much for looking. Until next time, Happy creating!! K

30 January, 2016

VINTAGE HANDBAG AND CARDS by Liz Hocking

Hello Bloggers and Happy New Year to you all.

I hope that now all the festivities are over that you will find some time to get your creative juices flowing.  And what better way to start with Meg's Garden brand new collection 'Chantilly Cream'.
For my project today, I have used  'The Chantilly Cream Papercraft Pack' along with the 'Cut & Create' Sheet.

Ribbons, lace, flowers and trinkets all my Meg's Garden and now here is the side and back view.


I then set about making some cards using this wonderful collection.  I am really happy with the end result and hope you are too.


Here are a couple of close ups for you to see how versatile this range is and how well it is suited for your cards.


Well thanks for taking the time to look and I hope that you have been inspired to restart your new projects with this fabulous range.....Until next time .....happy scrapping....Liz

27 January, 2016

Chantilly Cream Cards with Flowers

Hello Bloggers

This post really should be called leftovers & mats since I used some of the ephemera that were not used on the Chantilly Cream mini book & created some cards using the Flower ephemera & different mats.

Vanilla bazzill was used, antique linen distress ink & leftovers from Chantilly Cream Papercraft kit - 3 pieces of ephemera featuring cream flowers.

Card no. 1:
The Snowdrops ephemera was mounted on green cardstock & then onto a sage green fibre material.
A butterfly charm, green ribbon & a pearl spray were used to embellish.


Card no. 2:
Was matted on blue/grey cardstock & then onto vanilla bazzill. It was them embellished with a small piece of tattered net, paper rose leaves, 2 blue paper flowers & an antique blue velvet forget me not. A blue ribbon was tied around the front of the card, a piece of dodo wire tucked into the
 flower posy & a ladybird charm added for whimsy.

Card no. 3
Is a tall slim card using the cream roses ephemera matted on sage green cardstock & then onto the vanilla cardstock.  The embellishing is again kept very simple - a cream woven edge organza ribbon, a pearl spray & a heart charm


The 3 cards were made in very little time; they used leftover ephemera, scraps of cardstock in my stash for mats & were embellished very simply.

The ephemera were all printed on a cream patterned background so, when cutting them out, you can use part of the this background as an additional mat - this is what I did with cards 1 & 2; card 3 had none used.

Hope these give you some ideas on simple cards

Bye for now
Meg