14 February, 2015

Adore Layout By Sue Smyth


Adore Layout 
By Sue Smyth 

Hi Bloggers 


Today I am sharing a gentle little layout using Butterfly Garden papers 
The soft blues work perfectly with a red or orange as a contrast.
But first I wanted to alter the paper, not much but just 
to add icing to the cake!


After randomly punching the edges,
the first step is to dry brush gesso over a stencil around the paper
and create 3 tears in the sides of the paper.
When dry spray over a turquoise and Denim blue spray ink. and dry off 
with a heat gun.
Curl the tears with your fingers to give a good shape. 
Flick over white, turquoise and black spray inks
for a random splatted look.


Next whip out that gesso brush and add some more, add it to the trinkets and flowers.
Gesso gives a flat white substance for any water based spray to 
soak into and colour.


To do my butterflies, I always like to glue them to scrap
cardstock first. Then fussy cut them. This gives the
wings a bit of strength. 


I have then carefully outlined the wings of the butterflies
and dipped them in fine black glitter.


To glam up the silver trim, first coat with gesso to lessen 
the brassy shine. I have then placed a drop of good 
gel glue in each and popped in a turquoise glass bead. 
One way to use up those seed beads!


When dry it looks nicely antique and great!

The over all effect is cool, with a shabby chic look.
Add a cluster of flowers. I have layered up my flowers
with trinkets and smaller blooms.

You might also notice I have cut a trinket in half and placed it 
either side of the photo, this gives a cohesive look and is 
one way to make embellishments go further.


Tuck glass beads and a generous bow from seam binding.
Take ordinary white binding and spritz with water, when damp
spray over the colour ink you like to match the layout.


This metal trinket is vamped up by adding gesso to the wings, then 
spray with a soft pale blue ink. 
Then apply a line of Dimensional magic to the centre
and apply black pearl seed beads, for a textured 
rich look.


Add a small title, you don't have to have a large title 
to have impact. Because there are words already
on the paper, it  dosn't need many more
and  this small metallic blue title stands out
superbly.

11 February, 2015

Petite Parfum Potion Book By Sue Smyth


Petite Parfum Potion Book
 by Sue Smyth 


Hi Bloggers
Today I am sharing a special little project, that I just love.
It is a mini book featuring The Butterfly Garden Collection 

I took my cue from one of the labels in the set
Parfum Camia
which I gather means flower perfume, so I made this little 
book. I imagined another time when a well to do 
young lady would make notes in this book of her 
favourite flowers or perfumes.

I have cut 2 chipboard covers measuring 9 x 7cm and 
covered them with patterned paper and lace


For the book cut 8 panels measuring 14 x 9cm and score 
and fold at 7 cm.
Adhere all folded panels together back to back,
ink edges and adhere ribbon
over to top panel and bottom panel
before gluing the covers over
the top.


Fill a small glass vial with seed beads and swipe 
cork and glass with gesso for a shabby look.

Trim blue flowers from the ribbon they are
adhered to.
Use a heat gun to melt a little, this 
will straighten the petals and make them 
flatter and easier to work with.


Refer to my previous post to find out 
how to create a tinsy butterfly like mine.


Trim an element from lace and
adhere to bottom of oval frame.
Add a gemstone to the centre as 
pictured.
Dont forget to add the hardware handle,
which I have swiped with a little gesso.

Trim an element from the silver trim
dry brush with gesso and drop
a small amount of gel glue 
to the centre, add a clear or pearl glass bead.


Wrap fibres around frame and decorate with more flowers
and a trimmed Parfum Camia 
panel altered to form a scroll. Also 
fussy cut the perfume bottle and tuck
beside the vial.

I hope you have a go at making this, it was such fun 
and so small it will not take up lots of room 
in your craft space.
It also makes a beautiful gift

Megs Garden Materials 


Happy Crafting 

09 February, 2015

Layout - "Love" - With Brenda Caldow

Hello crafty friends and a very warm welcome to Meg's Garden Blog.
Today I would like to bring to you my first DT post for Meg and I'm very excited to be part of the wonderful team. Today I will be showcasing some wonderful products that are all available in the Meg's Garden Shop.
The layout I have created is of my beautiful mother and myself.


These stunning papers are from "The Butterfly Collection" and the minute I looked at them I knew I was going to enjoy working with them. I love to fussy cut and these 12x12 papers were going to be great with beautiful butterflies to cut out.
I chose to use the 12x12 A Delicate Garden For Butterflies as my background to create on. It has a very soft print on it which I thought was beautiful. 


I decided to use some spray on my background just to bring the colors out in the butterflies more and so it also brought out the colors in my mothers top. I tore two of the 12 x 12 papers - A Flower garden For Butterflies and The French Butterflies up into smaller pieces larger than the photo and inked the edges. The tags I fussy cut from the Collections Cut and create Emphemera 12x12 sheet.


As you can see this is one of the fussy cut butterflies and they are just beautiful. The beautiful fabric and paper flowers are cornsilk.and the larger blue flower is from the Temptations in Blue collection. This collection has so many things in which you can create your layout, card or any project with.

The leaves are great and come in pks of 10. I thought the gold filigree butterfly was too cute not to use on these papers. It fitted in so well with them. The filigree Vintage Trinket placed under the photo reminded me of many things I gave seen in my mothers house over the years including in her broaches.

 I just love lace and the cotton cream lace I have used is just beautiful and I placed it behind each of the flower clusters. The frame has also been fussy cut from the cut and create 12x12 sheet. I used a little ink on the edge to make it stand out and then fussy cut one of the butterflies and placed in it.


 I used a love heart punch (Small) and punched out some hearts and come down from them I did some stitching with my journal pen. Stitching doesn't just have to be from a machine, I use my pen more often than getting the machine out. Around the flowers I used some Blue Jazz. You can get this from Megs Shop in the Fibers where you can find it in different colors or there is some in the Temptations in Blue collection.


  We have now come to the end of my layout and first Meg's Garden Blog first post.  I hope you have enjoyed looking at what I created with the beautiful products that are available at Megs Garden Store. There are so many other beautiful products available too so please take a look as I know you will love them all very much. 

Like the rest of the DT I'm so happy you have called to the blog and looked at our work. I would love to have you leave a comment as they are important to all of us.
Happy crafting, Hugs Brenda xxx

MEGS GARDEN PRODUCTS USED


06 February, 2015

Winter Visitor by Dana Tatar


Hi! Dana Tatar here today and I'm thrilled to be sharing my first project as a Meg's Garden designer! It is the middle of Winter here in the USA and I'm trying to keep warm. The end of my backyard borders a small forest that is home to all types of wildlife and I frequently look out my windows to watch birds and a small group of foxes. This gorgeous fox has been my most frequent visitor. Seeing him is always a special treat!


The cream, blue and grey tones of the patterned papers from the Butterfly Garden Collection were perfect for a Winter layout. I selected the Another Delicate Garden for Butterflies patterned paper for the base of page. The 4x12" strips of patterned papers and the Cut and Create Ephemera Sheets are fantastic for building up layers on a layout. I used the A Flower Garden for Butterflies 4x12 Strip and the Butterfly Cut and Create Ephemera Sheet here. I decorated the area surrounding my photo with the Temptations in Blue Embellishment Bundle.


I wanted to play up the Winter theme of this page, so I die-cut a couple of snowflakes from a 6x6 piece of The Butterfly Garden At Night patterned paper from the Butterfly Collection Mini Pack.

I finished the layout by highlighting the layers of patterned papers with a pearl pen.

Thanks so much for stopping by today!

Meg's Garden Supplies:
12x12 Another Delicate Garden for Butterflies
4x12 A Flower Garden for Butterflies Strip
6x6 The Butterfly Garden at Night - Butterfly Collection Mini Pack
The Butterfly Collection Cut and Create Ephemera Sheet
Temptations in Blue Embellishment Bundle

04 February, 2015

Butteflies are Hope!: altered art with Irit

Hello my dear crafty friends!
I made this altered wooden word HOPE and a matching tag for Meg's Garden February blog post with this very new and awesome Butterfly Garden  collection and a lot of other Meg's Garden products.


The very old and forgotten wooden Hope was in my closet for like 5 years and  I finally found a reason the alter it: this new Butterflies collection was sure a symbol for Hope.


So I traced the letters from the backside and glued them over the front\, adding a bit of blues to this colors 9I think blues are a great for for Hope).
Then I added all kinds of Meg's Garden embellishments, such as ribbons, vintage metal trinkets, hand cut and glittered butterflies, colored flowers and .... This was actually done and I love the final result a lot. Hope you like it too.
 Then I decided to add a big handmade tag and I used the same paper collection and the same color pallet with pretty much similar embellishments to make this match.


I made a big tag and added a small one with hand cut words from the paper. Some die cuts were added on the right tag side and I added  flowers, trinket, ribbons and ...yes, glittered butterflies again.


Products used from Meg's Garden shop:
Butterfly Garden  6*6'' paper pad
 Butterfly Garden  12*12'' collection
Temptations in blue embellishments
Other products:
Dies- Spellbinders
Wooden word
Pearls
 Inks

02 February, 2015

MY BUTTERFLY GARDEN BOX by MIRIAM

Hello everyone.
My offering for this month using the beautiful Butterfly Garden Collection
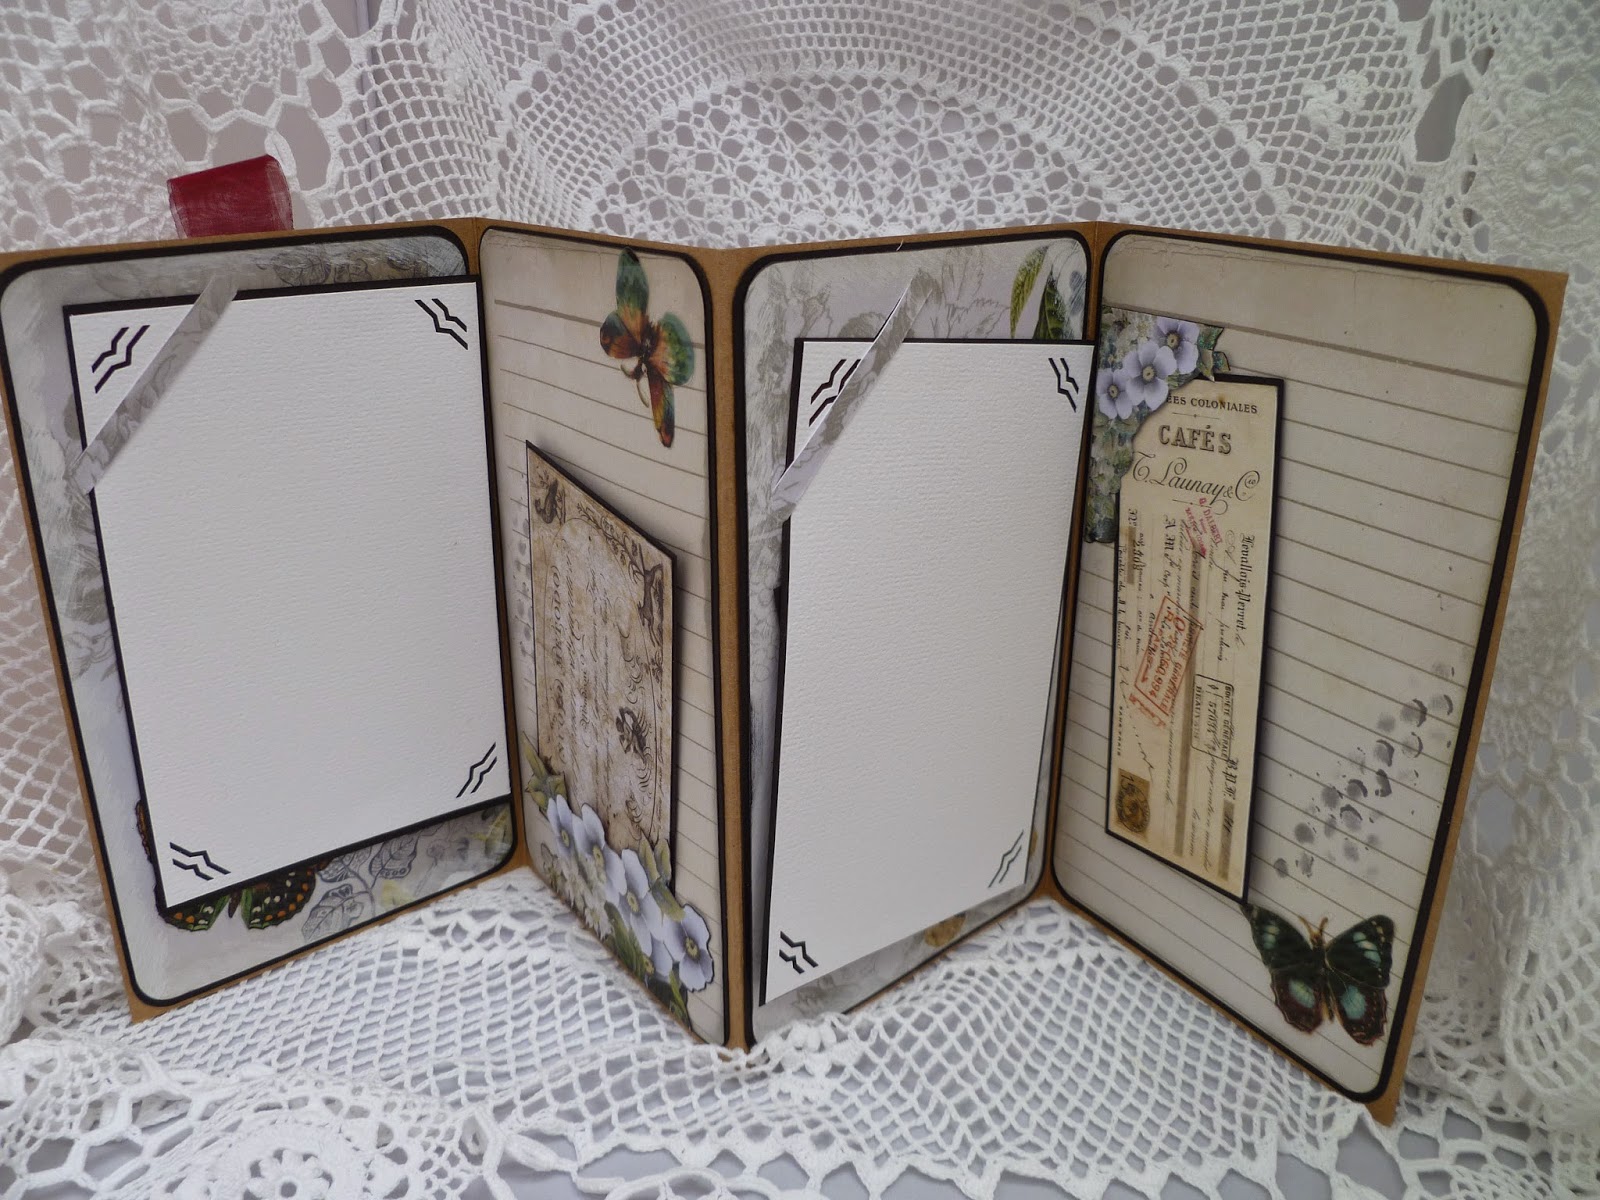
from Meg's Garden is an Altered Art Box I found in my stash. I painted the edges with black acrylic paint then sprayed it with Brushed Pewter distress spray stain, I felt this colour was the perfect choice for the background, the chip board pieces are painted with burgundy acrylic paint and then sprayed with glitter dust. I didn't use any metal embellishments just Prima flowers and the chip board pieces. I used some glossy accents on a few butterflies but most 'were from the Butterfly Transparency sheet from Meg's Garden .The inside pull out has space for journal entries and photo mats that can be changed around, hope you like my take on this little box.


Glossy accents on this little butterfly.


Brushed a little Gesso on the red petals.


Used a Martha Stewart punch and threaded some black ribbon through the punched area.


You can see how the glitter dust gives a nice finish to the painted chip board..


Placed a couple of the butterfly's at the bottom of the box.


Just used the Tim Holtz stencil on each of the journal pages.


The photo mats can slot into any page. They take a 6x4 photo.


The red ribbon is attached to the last page which makes it easy to lift the folder from the box.


PRODUCTS USED FROM MEG'S GARDEN
The Butterfly Garden Collection Paper
Butterfly Transparency's
White Lace

OTHER PRODUCTS
Couture Creations Ornamental Lace Die
Cheery Lynn Vine Leaf Die
Tim Holtz Stencil
Black Ribbon from Stash
Prima Flowers