
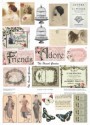
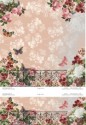
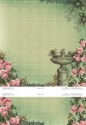
Hello everyone Patti here sharing how I planned out my mini and covered my waterfall pages with beautiful papers from The French Garden Collection and Book Kit available exclusively at Meg's Garden. My problem was I planned the opposite side of the mini in a series of flip ups and downs and failed to check how much paper I had left. Needless to say there wasn't enough left to cover my flips, sigh, that's where planning ahead is such a good thing :-)

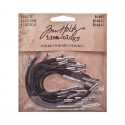
I had to do some creative blending of scraps to cover the rest of my whiteness. It all turns out in the end and makes you think real hard in the process. This mini is two pieces of black medium weight chipboard for the front and back (6"x8") and one for the spine (2 1/4"). I used my Cinch to punch seven holes front and back and a row on each side of the spine. Using a velvet ribbon I laced the spine to the book, corset fashion and tied it in a bow, inside and out.


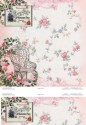
 Here's a peek at the inside you can see how I tied off the ribbon on the inside. The right side is a horizontal waterfall with seven waterfall pages measuring 5"x7", perfect for 4"x6" photos. The left side houses a day planner tucked in the outer pocket. Once removed the pocket will serve as a nice tuck in spot for additional loose photos, ticket stubs or other memorabilia. I used one of Tim Holtz Bands to close the planner. I also roughed up the page edges themselves and inked them with Victorian Velvet Distress Ink from Tim Holtz to follow the theme of the paper line. By just gluing a few of the planner pages to the front and back cover it ties everything together very nicely.
Here's a look at the pocket minus the planner

The flips out on the left side house multiple pages to hold photos,

To s-t-r-e-t-c-h my paper I did a lot of paper splitting,
adding additional headers or toppers of complimentary paper.

I also created tuck in pockets on most pages so besides adhering a photo
directly to the matted page you can also tuck another photo into the pockets.

Magnets help keep the flip out book closed when not being looked at.

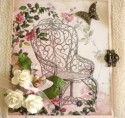
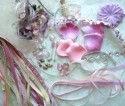
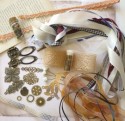
I also wanted to share the front cover which utilizes many of the goodies found in the Meg's Garden store. Don't be afraid to cut your metal pieces to allow them to be tucked in here and there. I did that with both these pieces so they would flow from side to side on the front cover.
Thanks so much for letting me share my book with you. You'll find links to the store items following. I hope you'll come join me on my video as I walk you through the mini and share many more still photos.
~~~ Supplies ~~~


This is amazing Patti,very creative and so very beautiful
ReplyDeleteWow, your mini album is just gorgeous and elegant! I love the papers, colors and texture. And, thanks for sharing the video!
ReplyDeleteGorgeous album Patti and so different from the norm!! Very clever design and fabulous use of those gorgeous papers!!
ReplyDeleteAbsolutely sensation! A beautiful album with so much interaction. Love every inch of it!
ReplyDeleteWhat a Beautiful Mini Album. I love how you have laced it together and how stunning every page looks.
ReplyDeleteGorgeous!
ReplyDeleteHI Patti wow this is a work of great beauty also ,show casing Megs papers love this so much xo
ReplyDeleteSimply amazing. Thank you for the inspiration. I think I am rapidly becoming a fan of those papers.
ReplyDelete